Summary
My CTC hotend broke and I was without a 3D printer. Luckily I am in the process of building a HEVO and therefore I had the mount, hotend, extruder, retainer and duct already on hand. By drilling two extra holes and removing a little plastic near the X endstop flag in the mount, I made it fit the CTC carriage perfectly. Again, since my printer was down, I didn’t design this in CAD and just modified the piece I had by hand and then created the STL for thingiverse so no guarantees that it will fit. I left a bridge in there for support that you will have to break out and I put in two mounting options; one way the way I mounted it by drilling holes, and another for mounting it with M3 brass fittings to lower the mount closer to the bed. The HEVO mount has the proximity probe spot already, so I figured I should add that sensor as well.
If you are ready for a double mod, keep reading…
Items Needed:
Soldering Iron
several connectors
connector wires (from breadboard)
Arduino IDE
an extra Arduino as ISP to update the bootloader on the CTC Aduino
Marlin firmware
BOM:
1 x 5V NPN M12 inductive sensorhttps://www.aliexpress.com/item/M12-4mm-detection-5VDC-NPN-NO-LJ12A3-4-Z-BX-5V-cylinder-inductive-proximity-sensor-switch/32553311139.html?spm=2114.13010608.0.0.iDrnoz
3D Printer Accessories V6 J-Head Hotend RepRap Extruder for 1.75mm Filament, Direct Feed or Bowden. w/ 0.4mm Nozzle, 12V fan, and 3ft PTFE Bowden Tube
ALPTAhttp://a.co/9PxYSl4
8.5″ x 8.5″ galvanized 28ga metal plate to place between the hotbed and glass plate. This ensures that the sensor is triggered properly. Without it you will need to either not use glass or you are going to be very close to the nozzle level. Ferrous metals are the best at triggering proximity sensors, that’s why I didn’t use aluminium.
8.5″ x 8.5″ x 0.880″ glass plate. I prefer to print on glass.
Extruder of your choice (e.g. find one on thingiverse)
Process
Prepare and install your material for your heat bed. Cut the galvanized plate with some metal shears to size. IMPORTANT: make sure the metal does not short out any contacts on the heated bed. You need to cut around those areas!.
Get the glass plate from your a hardware store. They will cut it to size if you ask nicely. You need the corners angled to have room for the screw heads.
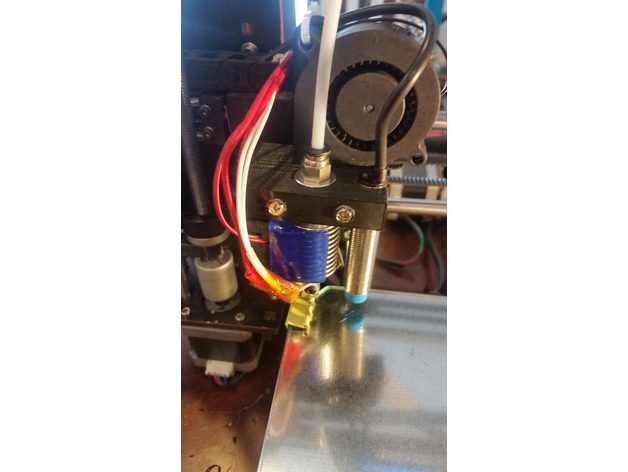
Prepare and install the J hotend and proximity sensor with the extruder mount, retainer and duct from the HEVO project.
Solder the 5V and Ground connections to the board. I chose to use add a connector for easy disconnect.
Make a backup of the original settings. These were mine:
15:07:46.286 : echo:Hardcoded Default Settings Loaded
15:07:46.286 : echo:Steps per unit:
15:07:46.287 : echo: M92 X78.74 Y78.74 Z2560.00 E105.00
15:07:46.287 : echo:Maximum feedrates (mm/s):
15:07:46.287 : echo: M203 X400.00 Y400.00 Z2.00 E45.00
15:07:46.287 : echo:Maximum Acceleration (mm/s2):
15:07:46.287 : echo: M201 X1400 Y1400 Z100 E80000
15:07:46.287 : echo:Acceleration: S=acceleration, T=retract acceleration
15:07:46.287 : echo: M204 S1400.00 T5000.00
15:07:46.287 : echo:Advanced variables: S=Min feedrate (mm/s), T=Min travel feedrate (mm/s), B=minimum segment time (ms), X=maximum XY jerk (mm/s), Z=maximum Z jerk (mm/s), E=maximum E jerk (mm/s)
15:07:46.287 : echo: M205 S0.00 T0.00 B20000 X13.50 Z0.30 E5.00
15:07:46.287 : echo:Home offset (mm):
15:07:46.287 : echo: M206 X0.00 Y0.00 Z0.00
15:07:46.287 : echo:PID settings:
15:07:46.287 : echo: M301 P19.86 I1.00 D98.93
Upgrade your bootloader. Here is how to do it:
Time to download, configure and install Marlin. Use the GEEETECH example in the examples folder as a base. I attached my Configuration.h file here for reference with auto leveling enabled: https://www.thingiverse.com/download:4494314 . Using this config will consume 94% of the memory. So there is hardly anything left for additional features.
Last but not least make sure you adjust the z-axis in the LCD until you get the nozzle in the correct location (mine was -0.25). Then make sure you save your settings.
*ANOTHER BENEFIT of UPGRADING YOUR FIRMWARE**
The CTC is over-extruding (at least mine was). In Cura I had set the correction in the start script, but with the new firmware I changed the E stepper from 105 to 95 in the configuration.h, so no more start code fix needed!