Summary
PP3DP UP Plus and UP Plus 2 are usually terrible with printing PLA. Three major issues with these printers are
The throat of the hotend gets too hot as heat creep up the steel tube and the PLA starts to bulge there and gets impossible to reliably extrude
Extruder stepper motor gets hot during print, both from the fact that it’s a puny motor doing a lot of work and because it’s used partially as a cooler for the cold part of the hot end. This heats up the PLA print and does not allow it to solidify properly, overhangs are crap and bridges are almost impossible.
PLA requires cooling, the “solution” originally is that hotend cooling duct has a “door” that let some of the air go into to part. The “solution” does not work.
To solve these problems I started by redesigning the extruder cooling. This solves both the issue of bulging inside the hotend and the problem with extruder getting too much heat from the hotend. This solves all the print issues with ABS, PETG, PC, Nylon.. but is not enough for PLA.
To tackle second and third problem this small project was created.
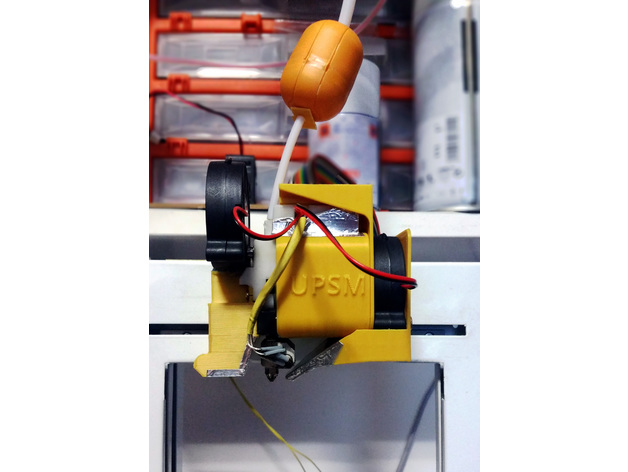
The fan duct goes over the stepper motor and allows for air to pass around the motor and exit back to cool the motor. Make sure you are extracting air and not pushing air in. The “cover” part will clip in to original top part on the UP Plus / UP Plus2 and will come behind the fun duct keeping it in place. As you can notice on both cover and duct there is 2 set of screw holes, 4 holes for the 40mm axial fan and 2 holes for the radial fan. If you do not need part cooling (ABS, PETG..) you mount 40mm axial fan here to extract air and you are golden.
If you do want to use part cooling fan (PLA requires it), I decided to recycle the air and push the air that we get from cooling the extruder motor into the part. This way the air is not “too cold” and will not stress neither the part nor the nozzle and it should (time will tell, so far so good) create PLA parts with less in-built stress. The part cooling duct houses a radial fan (no glue, hotsnot, silicone .. needed, just put it there) and screws trough the back of the cover into the duct.
I’m using custom firmware on the UP Plus2 so I’m controlling the fan trough there. On the top board you can see 3 3pin connectors (picture attached). The leftmost is 12V supply where your extruder cooler is connected. Middle (on the right side of the board the left connector) is also 12V supply and you can connect your fan here. If you are using only motor cooling (no part cooling) this is where you want to connect your fan. The third, rightmost connector is PWM-able. Originally this is where “light strip” is connected on some of these printers. If you have CPU upgrade with NXP chip to run smoothieware (I do) this is on port 1.18. If you are using original UP Studio software then probably check if you can change “light intensity” from software to change fan speed or just connect part cooling to a constant 12V, there’s usually never too much cooling for PLA so should work ok 😀
smoothieware config:
switch.fan.enable true
switch.fan.input_on_command M106
switch.fan.input_off_command M107
switch.fan.output_pin 1.18
switch.fan.output_type hwpwm
switch.fan.max_pwm 100
switch.fan.ignore_on_halt true
switch.fan.startup_state true
switch.fan.startup_value 0
switch.sw1.fail_safe_set_to 100
Print Settings
Printer:
self made Rafts:
Doesn’t Matter Supports:
Yes Resolution:
0.2 – 0.3 Notes:
You want the part to be solid but everything is “thin” here so the infill itself is irrelevant (I use 0%) but you want
4top, 4bottom solid layers
5 perimeters
I printed this in ABS, some other high temp plastic should work (PETG should be great for cover for e.g.)
Do not print in PLA it will deform quickly
Post-Printing
Self adhesive aluminium tape is your friend 🙂
remove supports
take a piece of self adhesive aluminium tape and attach it over the top part of the part cooling duct “nozzle”. This way the heat from the heater block will be reflected and part will last much longer. Also the ABS oils and other dirt that exist in vapors around the heater block will be easier to wipe off.
if you feel the whole contraption is not “stiff” enough, you can use a small piece of tape and attach the duct to the top plastic piece housing the small pcb board.
How I Designed This
onshape source available
this whole project was heavily influenced by PrintMo’s work
PP3DP UP Plus 2 PLA printing kit 3D Print Model