Summary
While there are many existing variants of gun stocks available either for 3D printing, or purchase (on Etsy, eBay, etc.), I had some issues with the few ones I tried, thus I made my own version.
Is it better? How is it different from other designs?
There are few things I’d like to call out;
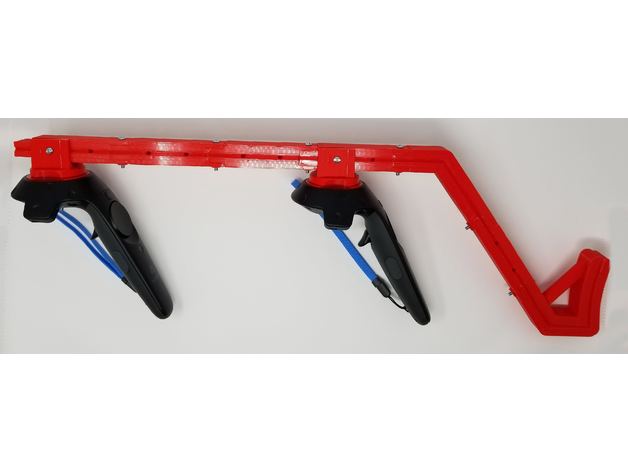
this design is easier to print – may not look as cool as a version made to resemble Picatinny rail, but the print time is significantly shorter, there’s no need to remove tricky supports, and the construction is very sturdy,
can be printed on small bed size – including Monoprice Select Mini! (which is what
I use 🙂 just make sure you rotate the longest pieces [rail, stock a, stock b] and decrease the brim size to 6 lines),
the stock is adjustable – the spacing between controllers, as well as controllers and arm support can be adjusted in 1.6″ – 2.4″ increments to make sure it fits you comfortable,
the shoulder support part is lower than the rail, which makes sure it doesn’t hit the headset during intense gaming sessions,
multiple sizes of magnets are supported – if you have some, chances are they may fit – and if not, you can either buy the ones I used, or leave me a message with the exact dimensions of your magnets (diameter, height) and I’ll make version for you 🙂 [absolute max would probably be around is 20mm x 10mm],
you can easily attach strap to have the accessory secured when not in use, or prevent it from falling when reloading in Onward while under fire 😉 Just guide the strap through one of the unused holes in the rail,
and, well, my design is tried 🙂 I printed out a number of versions, improving parts in between, making sure the tolerances are correct and everything fits properly and stays strong. Some of the other available designs that I tried had issues with tolerances and wouldn’t fit without manually trimming the parts after printing.
But you be the judge, and please let me know if you have any feedback 🙂
And most importantly, I hope you’ll have fun using it!
Parts to print:
2 copies (one for each controller): Controller – bottom
2 copies (one for each controller): Controller – top – select the variant for your magnet size
2 copies (one for each controller): Controller – mount – select the variant for your magnet size
5 copies: Rail
1 copy: Stock – A
1 copy: Stock – B
Required for assembly:
screw + nut, #8-32 x 1-1/2 in – quantity: 4
screw + nut, #8-32 x 1-1/4 in – quantity: 6
magnets – use neodymium, not ceramic disc (we need more strength than those can provide. Quantity depending on the size – see the “Controller – top” and “Controller – mount” part variants as reference (for a total of 12 or 14 magnets). The bigger the magnet (the stronger it is) – the better 🙂
Links to hardware (if you need to buy any):
screws: http://www.homedepot.com/p/Everbilt-8-32-Machine-Screw-Kit-800994/204331402
nuts and washers: http://www.homedepot.com/p/Everbilt-94-Piece-Stainless-Steel-Nut-and-Washer-Kit-803334/205949033
magnets:
http://www.homedepot.com/p/MASTER-MAGNETICS-0-7-in-Neodymium-Rare-Earth-Magnet-Discs-3-per-Pack-07047HD/202526369
http://www.homedepot.com/p/MASTER-MAGNETICS-1-2-in-Neodymium-Rare-Earth-Magnet-Discs-6-per-Pack-07046HD/202526367?keyword=neodymium+6+per+pack
if you head to Home Depot, you’ll find a selection of magnets in the aisle with machine screws and fasteners: http://imgur.com/QZAhJz9
I recommend magnets: 0.472 x 0.118 inch (12 mm x 3 mm).
They’re available in Home Depot as well.
Hope you enjoy!
For other hobby projects, please visit my blog:http://www.BogdanBerg.com/
Print Settings
Printer:
Monoprice Select Mini Rafts:
No Supports:
Yes Resolution:
0.2mm – 0.3mm Infill:
20% Notes:
See provided screenshot for best printing orientation, and information on which pieces need support:http://imgur.com/4sP0OGc
Post-Printing
Gluing the magnets
To glue the magnets, you can either use Super Glue (cyanoacrylate), or epoxy. Make sure the surfaces are clean (no grease/oil from fingers) and additionally you can scorch the surface of magnets for better adhesion (i.e. with screwdriver).
Things to keep in mind:
Make sure the polarities are correct!
Really, I can’t stress this enough 🙂 Double and triple check before gluing. Also, use same polarities for mounts of both controllers, so they can be used interchangeably (this can be helpful if you need to swap them, for any reason).
Let the glue dry/cure fully – neodymium magnets are quite strong, and we don’t want them to pop out mid-game
And please refer to the photo of assembled stock for reference on how the pieces come to life together 🙂 Note that there’s one “Rail” piece between the “stock A” and “stock B” pieces.