Summary
OPEN QUAD TANK
I have been working on this for a while in my free time, but my work has brought me to South Korea for a few months and I cannot continue designing with my current computer and lack of printer. This needs a lot of love and members of both the FPV and 3d Printing community have expressed interest in turning this into a group project, and I am excited to see how awesome we can make this together. Please post makes
All files are of my own design at the time of posting and I permit them to be modified, copied, and used but not sold. All content and creations added by other makers is also not for sale.
Please read the following to get up to speed on the project.
GOALS
MATERIAL CONSIDERATIONS
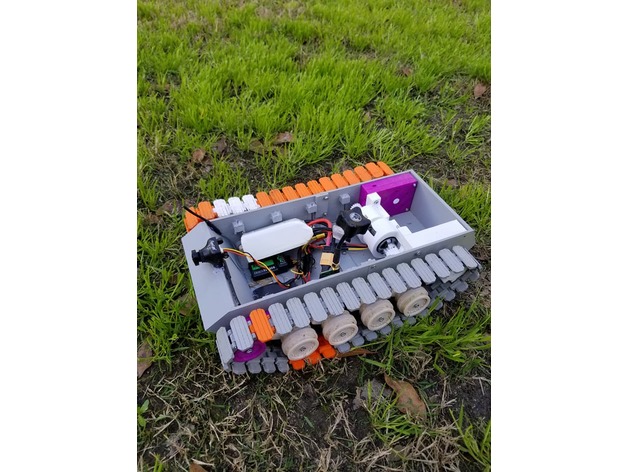
HARDWARE
SETUP
DESGIN FLAWS / TO DO LIST
HOW TO HELP
Many creators inspired this project and taught me what I needed to get this far, some are listed here.
Please check their YouTube channels to support them
-Daniel Noree
Thomas sanladerer
Aloha FPV
Kalani J
Flite test
3D printing NERD
All files are of my own design and I permit them to be modified, copied, and used but not sold.
Primary Goals of this project
1.HAVE FUN
Should be printable on cheap printer such as Wanhao i3, other i3 clones, cr-10s, and other printers with similar build volume
Should use parts common to FPV mini quads
Should not rely on exotic materials (nylon would make the gearbox easier to design but we want everyone to be able to print this)
Should maximize printed parts and eliminate purchased hardware whenever possible to KEEP IT CHEAP
-Printing material suggestions for current files
Everything COULD be printed in PLA, but the gearbox would need heavy lubrication before running. Also using a 3s battery would increase survivability as well.
I suggest PEGT be used for the gearbox and all load bearing parts due to its flex before breaking properties and higher resistance to heat
-Hardware used
An assortment of M3 screws, lots of them
1” 16 or 18 ga finish nails for tracks (ill try to clear this up)
Bearing 3x8x4 3mm hole 8mm tall 4mm thick
Bearing 10x15x4 10mm hole 15mm tall 4mm thick
Xm20 escs x2 or any miniquad ESC capable of 3d mode on BLheli
PDB, one with current sensing and osd would be best
RC radio with receiver capable of PWM (one with pins for each channel) not SBUS
Wire an heatshrink
Xt60 connectors
MOTORS- currently using NTM propdrive 2826 1200KV/ lower KV would be better for the current gearbox
FUTURE MOTOR OPTIONS- hopefully going to design gearbox for use with 22XX miniquad motors which produce 100-200 more watts of power than the NTM motors even with the size difference.
For FPV use the following
runcam 1177 (I use the OWL for night drives)
200-600mW VTX (600 allows me to sit on my couch and drive around my brick house
Any FPV goggles
-SETUP FOR CURRENT FILES
Flash escs on BLheli to 3d mode with center stick begin no throttle (this allows for forward and reverse, if you don’t have escs that do 3d mode you will only have forward on each track)
Connect each esc to the PDB as usually for miniquads
Connect the signal wires to receiver on the elevator and aileron channels (you may need to solder on some old school PWM connectors
Connect the 5v out and ground to the receiver using PWM connector
Wire a battery lead to the PDB
USE 2-4s If you get strange results with the lower voltage, try to up the start up power of the ESCs in BLheli. 4s usually works just fine but 2s gave me issues
Program your radio
You want to use elevon mixing, look it up on youtube. You may have to do both between channel mixing and swapping the connectors on the receiver to get everything going in the right directions.
Reduce your rates to 60% or less on all channels if using 4s. increasing this value will make your tank faster but I began to break PLA parts at 65%. Stronger designs and PEGT tracks may allow for higher rates on 4s
-Problems with the current design in order of severity
no front wheel tensioner makes the track jump off regularly on slow turns
Fix- design and add tensioner
PLA tracks break at the joint
Fix- print in PETG / increate tempt and extrusion multiplier on PLA/ in cad software increase material at weak point
suspension incomplete
Fix design suspension / or just glue suspension arms in place for now (I used hot glue)
gearbox uses uncommon motor
Fix increase gear ratio to 18:1 for 2300kv motors and redesign motor mount
no top
Fix Design any top you like and share (I want to see a T34-85
Print Settings
Printer Brand:
Wanhao
Printer:
Wanhao Duplicator i3 Plus
Resolution:
.2-.25
Infill:
depends
Notes:
USE high at least 4 walls and high infill for the gears on other load bearing parts.
Print the drive shaft horizontally or it will sheer off if printed vertically
make sure to rune the gearbox by hand and oil before using motors