
Download Free 3D Model Magis Spun chair 3D Print Model
Summary
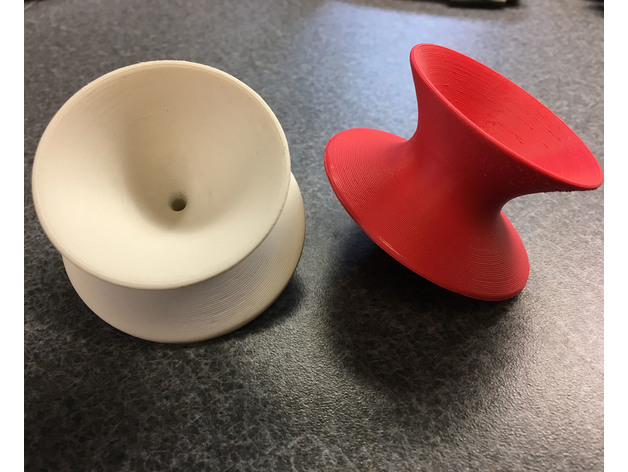
This is a model of the Magis Spun chair, at approximately 1/16 scale. I wanted an accurately proportioned and scaled model so I began with the 3D model from the Herman Miller specifying software I use in my work. My first attempt at printing had the full chair, in its upright position. The lower broad rim required supports due to the overhang so I added them in my slicing software (Simplify 3D). After printing the chair and removing the supports I was not at all happy with the quality of the surface that remained. It was too rough and stringy looking to be fixed via sanding so I looked for another solution.What I settled on was splitting the model into two pieces which would not require supports and would be glued together after printing. This ended up working great!
If you know how to print multiple colors with your printer you can also add accent stripes.
Print Settings
Printer Brand:
Robo 3D
Printer:
R1 ABS + PLA Model
Rafts:
No
Supports:
No
Resolution:
.15mm
Infill:
20%
Notes:
I printed these with PLA, with 3 top solid layers, 4 bottom solid layers, and 1 perimeter shell. Matte-finish filament works great on these ( I used Matteforge filament from Steelmans)
Post-Printing
I print on a glass bed, so the surfaces that get glued together come out very smooth and flat. It is important to have them as flat as possible in order to minimize any gaps at the edge after the pieces are glued together. I use Loctite Ultragel Control super glue, applied in concentric circles. I try to get close to the outer edges but not so close that I have to deal with squeeze out of the glue. I find that a drill bit inserted through both pieces keeps them aligned and allows you to twist the pieces together to get good glue coverage. In my case, a 3/32″ drill bit works perfectly. If there are any visible gaps after gluing you can burnish them closed using a metal rod (I use the shank of a screwdriver), provided the gaps aren’t too large.
The last thing I do is wet sand the part. I start out with 400 grit and then switch to 1500 grit for the final finishing.
Categories: 3D Print Models, All 3D Models, Free 3D Models
Sorry, comments are closed for this item.