3д модель трактор для перевозки грузов из игры “Resident Evil 6”
Tag: for
-
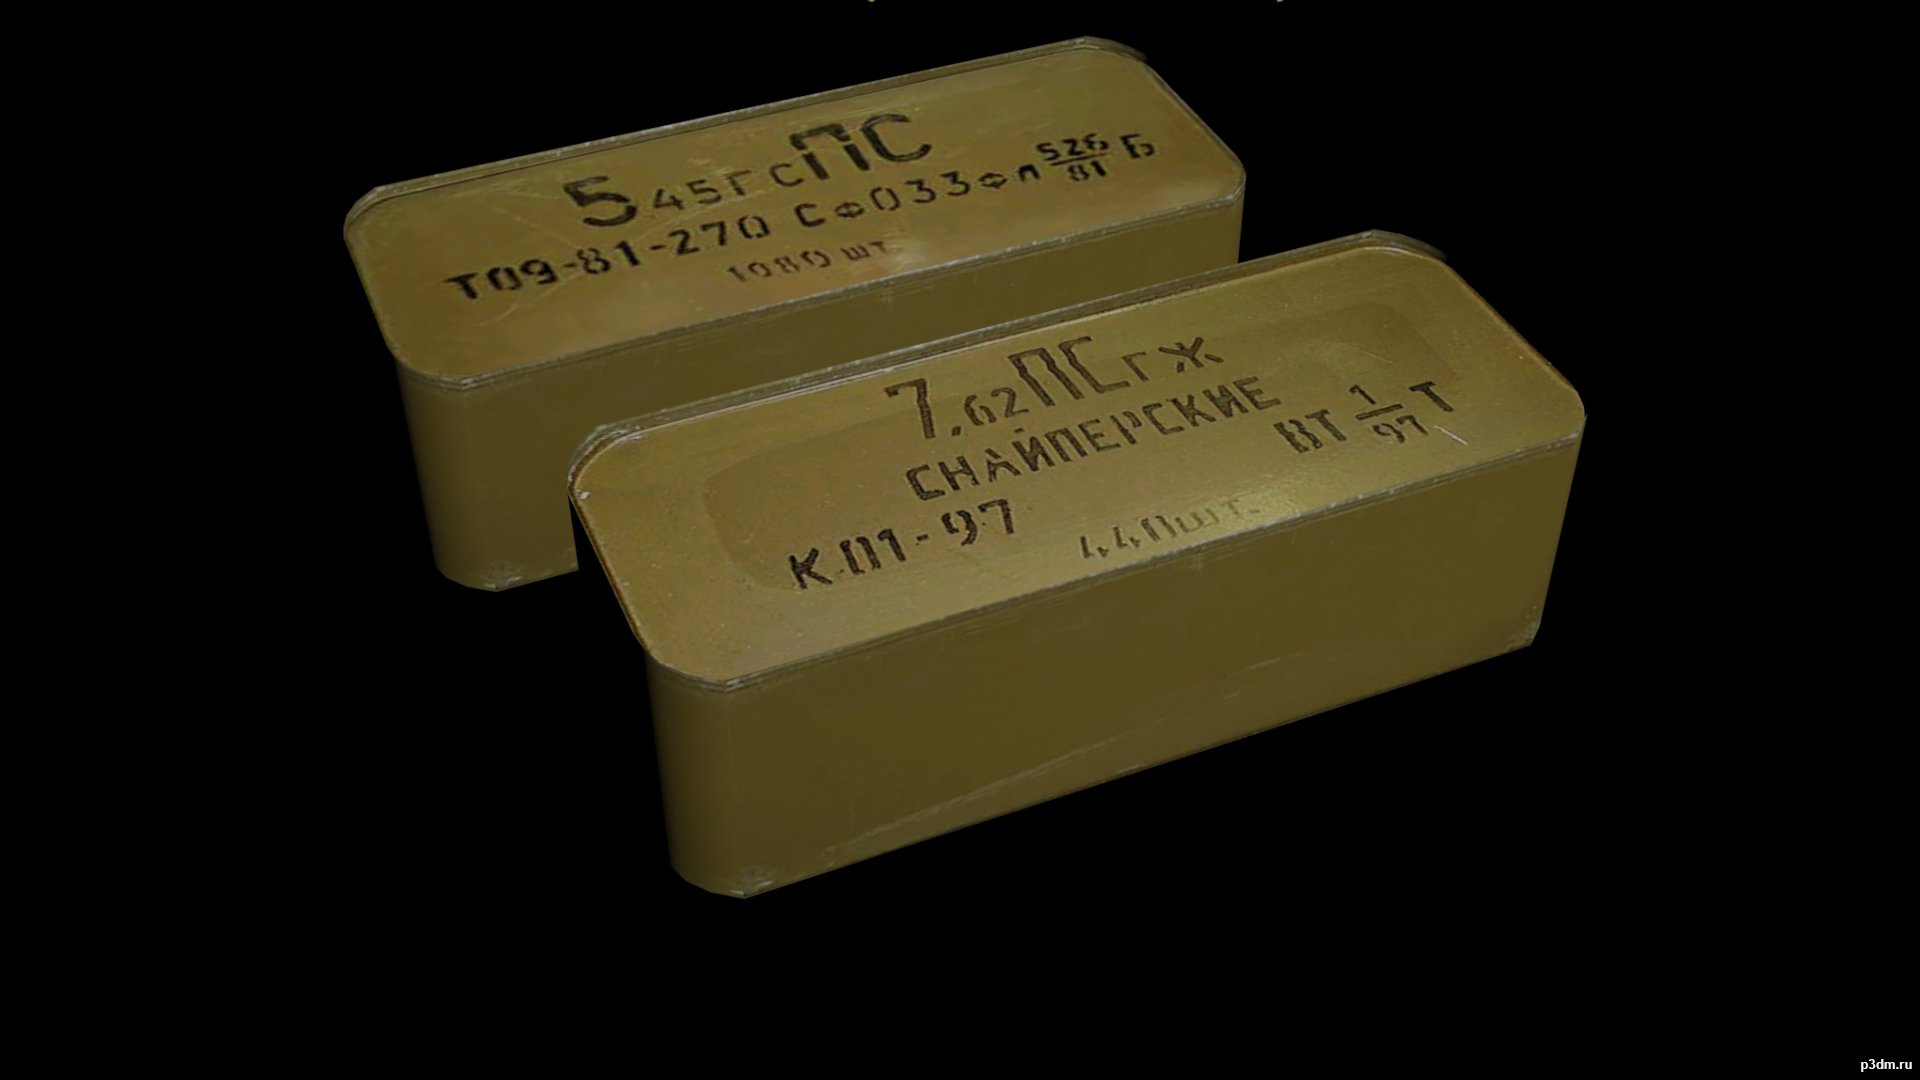
Zinc (box) for cartridges 5.45×39 and 7.62×39 3D Model
3D цинк (анбоксинг) патронов к автомату Калашников 5.45 и снайперской винтовки свд 7.62.Времен СССР 1981-97 годовТекстуры с реальных фото цинков СССР 1981-97,сжатаяD5 с альфой и не сжатая dds+TIF, хотя пришлось текстурировать один хрен. Под дно подготовил часть текстуры но невоспользовался(перекрыто боковиной как делал вначале).Открывашку делать не стал, думаю мне оно не надо, а кому надо сделают сами или обратятся с прозьбой.Адаптированно под игру STALKER-Тени Чернобыля. Тест(формат.ogf) на базе -meshesweaponsammoammo_762x39_ap и ammo_545x39_apШейдеры и звуки оружия метала. Полигон 1 цинка: 602Sidedzinc (unboxing) cartridges for the Kalashnikov 5.45 assault rifle and the SVD 7.62 sniper rifle. USSR times 1981-97Textures from real photos of zinc USSR 1981-97, compressed by D5 with alpha and not compressed by dds + TIF, although I had to texture one horseradish. Under the bottom, I prepared a part of the texture but did not use it (it was blocked by the sidewall, as I did at the beginning).I didn’t make an opener, I think I don’t need it, but whoever needs to do it themselves or apply with a request.Adapted for the game STALKER-Shadows of Chernobyl. Test (.ogf format) based on -meshesweaponsammoammo_762x39_ap and ammo_545x39_apShaders and metal weapon sounds. Polygon 1 zinc: 602Sided
-
Land for Forest Low Poly 3D Model
Так лов поли налепил хрень какую-то) юзайте) для мобилок в самый раз) Лесом застройте и мотель поставить можно
-
Flite Test Gremlin Camera Mount For Andres Frame 3D Print Model
Summary
After digging around for some mounts for the Flite Test Gremlin Andres frame, I came across the perfect answer. Hackoholic published one for TJ’s frame. (Thing #thing:2311377). I started from scratch using my trusty OpenScad program. After wearing out my calipers and emptying out the coffee pot, I now have something that I think will work.
Print Settings
Printer:
MTW Minimax
Rafts:
No
Supports:
Yes
Resolution:
.15 mm
Infill:
100
Notes:
I used 100% infill and Hatchbox TPU. You would have to experiment with an infill less than 100%
Post-PrintingSide View 20 degree camera tilt
Rear 3/4 view
RX top plate for R-XSR
How I Designed This
OpenSCAD
Tell us more… -
Replacement Door Stopper for VW Vanagon T3 Westfalia 3D Print Model
Summary
Just a replacement door stopper for a Vanagon T3. Print it in flexible filament.
Included is the STL file and 123D Design file. -
Electric Mountainboard – Enclosure for Enertion FOCBOX / Trampa deck. 3D Print Model
Summary
Enclosure for 2 Enertion FOCBOX Vesc / Trampa deck.
Printed in Advanced PLA / 50% infill.
Check the complete tutorial here: http://makertuts.com/electric-mountainboard-tutorial/ and check my designs for other parts (pulley, ESC/VESC Enclosures…)
Please help me develop new parts and release them for free or just pay me a beer on http://paypal.me/supportp3x to say Hello and/or Thank you! -
Double 45 Prusa MK2/S heatbed cable cover for enclosures (The Viper) 3D Print Model
Summary
This is a heatbed cable cover for Original Prusa i3 MK2/S designed to work in IKEA lack enclosures. I really liked Neeper’s design and wanted to modify it just abit to better work in my enclosure. I also wanted to lose the zip-tie so I made a little cover for the back held together by two M3x12 bolts and 2 hex nuts. I modified the eyes to have more depth since printing my own so please let me know if you print this and have trouble getting it to fit. -
Feet for a 120mm fan 3D Print Model
Summary
Just like my other set of feet, but these are bigger feets for a bigger fan. All the better to blow you more. 😛
Print Settings
Printer Brand:
Creality
Printer:
CR-10S
Rafts:
No
Supports:
No
Resolution:
1.5
Infill:
20% -
Backplate W1209 Modified for case 3D Print Model
Summary
I Have made this remix for fix using M4 screw, and wood fix. -
Box for keynya’s Nintendo ds / 3ds game card holder 3D Print Model
Summary
Box for keynya’s Nintendo ds / 3ds game card holder
Print Settings
Printer:
Anycubic i3 Mega
Rafts:
No
Supports:
No
Resolution:
0.2 mm
Infill:
20% -
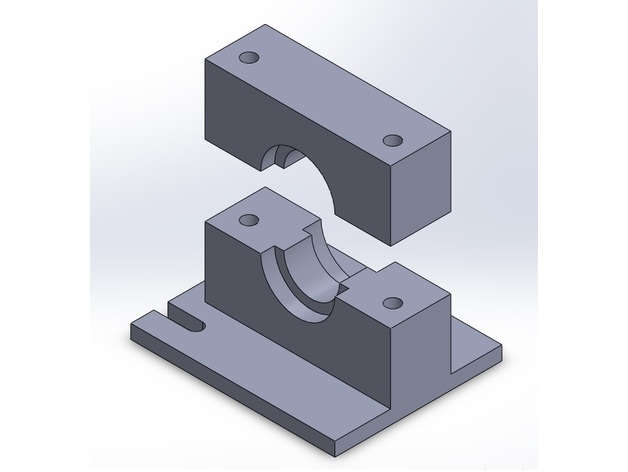
P3Steel X axis for Lead Screws 3D Print Model
Summary
I made this based on the Toolson design for the p3Steel. It will allow the use of a 8mm Lead Screw.
Print Settings
Printer Brand:
Prusa
Rafts:
No
Supports:
No
Resolution:
.2
Infill:
60% -
Prusa Lack Enclosure Door Handles for 20mm x 5mm x 2mm Magnets 3D Print Model
Summary
Using the source files from the Prusa Lack enclosure, I resized the magnet inserts for 20mm x 5mm x 2mm magnets, which were easier to find on eBay.
Print Settings
Printer Brand:
Prusa
Printer:
i3 MK3
Rafts:
No
Supports:
Doesn’t Matter
Resolution:
0.15 mm
Infill:
20% -
Mandrel for hoop earrings 3D Print Model
Summary
Decided to make some hoop earrings for my girlfriend.. looked up what all tools I would need and decided I didn’t want to spend $40 for a tapered cylinder. I figure this will work for a few sets as I’m not looking to become a professional jeweler. It is 50mm at one end and 10 mm at the other. -
Custom sprinkler holder for irrigation system 3D Print Model
Summary
As with my other things, I working on installing a custom irrigation system.
I needed a sprinkler holder to fit on the corner of my fence.
for reference, the sprinkler used is the following: https://www.homedepot.ca/en/home/p.2-inch-spring-loaded-pop-up-sprinkler-head-for-landscaping.1000117651.html
Have fun and enjoy !
Print Settings
Printer:
QIDI Tech 1
Rafts:
Doesn’t Matter
Supports:
Doesn’t Matter
Resolution:
0.2mm
Infill:
10%
Notes:
Printed with PLA
Temp = 230
Bed = 60
Speed = 90 mm/s -
Big Bullzeye Clock – Pieces cut for 200×200 build plate 3D Print Model
Summary
These are pieces that are too big for a 200×200 build plate cut to fit – super glue together -
ORIGINAL XBOX for PI3 3D Print Model
Summary
working with a buddy, i’m the designer for a case and he’s the programmer for the console.Standards
CCSS
Overview and Background
Lesson Plan and Activity
thanks
Materials Needed
filament -
Custom Wade’s Gears for 1.75 (.300 ~titan ratio) 3D Print Model
Summary
Custom Wade’s Gears for 1.75 (.300 ~titan ratio)
The big gear is 10mm, the small is 12mm centered. it runs better and truer… it has a nut trap for a M3, also it does have a D shaft on the small gear. Big gear is for 8mm hobb bolt. -
Case for Fridababy NailFrida the SnipperClipper 3D Print Model
Summary
My wife wanted a case for our daughters nail clipper set so what’s better than designing your own? For the very few of you, if any, that have the Fridababy nail clipper set and in desperate need of a case, here you go =).
Print Settings
Printer Brand:
Prusa
Printer:
i3 MK2S
Rafts:
No
Supports:
No
Resolution:
.2
Infill:
10%
Notes:
There are 2 tops you can choose to print. -
Touchscreen Bracer iPhone 5 Concept for Prosthetic Arm 3D Print Model
Summary
I wanted to make an easy touchscreen holder for kids (and adults) to easily have a phone accessible and thought a bracer/gauntlet would be the way to go.
I am still learning CAD so this is very rough, did I mention very rough concept? lol
How I Designed This
Design Tool
Tinkercad -
Hygropeter (ThermoPro TP-50) mount for Filament storage box 3D Print Model
Summary
Mount for one of the most common Thermo- / Hygrometers on Amazon.
Mounting holes mad for M5.
Battery compartment still accessible after mounting.
ThermoPro TP50 on Amazon: https://amzn.to/2s1PSuA
Print Settings
Printer Brand:
Prusa
Printer:
i3 MK3
Rafts:
No
Supports:
Yes
Resolution:
2mm
Infill:
20% -
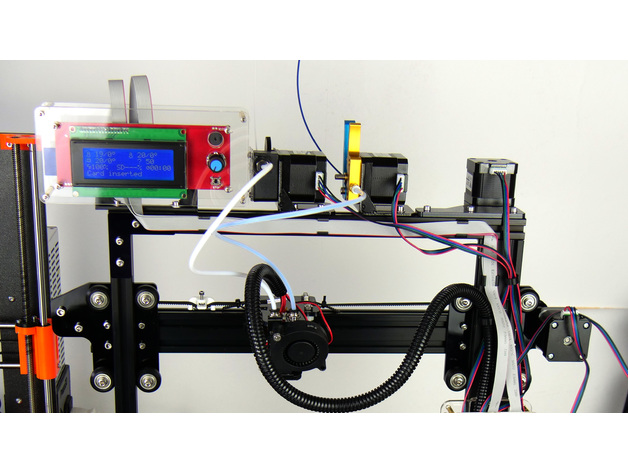
Stepper motor mount for FLSun QQ 3D Print Model
Summary
This is for folks who prefer shorter bowden tube & easier to load filament when the printer is position in a confined area. I use a little “bluetak” to make it less likely to slide along the side rail. -
Add light for Delta / Kossel 3D printer 3D Print Model
Summary
I decided to add LED for my Kossel 3d printer (My model is Anycubic Kossel Linear Plus) to make it easier for me to check if I need to print overnight.
Material:
6x LED stripes (12VDC, width: 1cm, length: 15cm each)
M3x10mm bolts and M3 T-nuts
Wires
Printed parts:
6x Part01
6x Part02
6x Part02_Mirror
I already show to you guys how to make it step by step in each picture. Just follow them and you can make it.
Here are all those steps:
Step 01: Using 12V LED stripe (1cm in width) and cut to 6 pieces (15cm each)
Step 02: Soldering all 6 LED stripes.
Step 03: Wire out all LED stripes.
Step 04: Make a small board to attach all LED stripes, 12VDC power supply and ON/OFF switch
Step 05: Connect and test all LED stripes.
Step 06: Using a piece of thick tape to cover all circuit board.
Step 07: Using M3 bolts and M3 T-nuts for the board.
Step 08: Attach the board to the frame (below the heated bed)
Step 09: Print 6xPart01, 6xPart02 and 6xPart02_Mirror to make 6 LED stripes holder.
Step 10: Using super glue to attach LED stripe into LED stripe holder (Part01). Remember to attach the Part02 and Part02_Mirror to Part02 before doing this step.
Step 11: Attach all LED stripes to 3d printer frame with M3 T-Nuts.
Step 12: Remove the heated bed and connect all LED stripes to the small board we’ve made before. For the 12VDC input, you can use directly from 3d printer power supply.
Step 13: For the ON/OFF switch, you can place it in front.
DONE!!!
Print Settings
Printer:
Anycubic Kossel Linear Plus
Rafts:
No
Supports:
No
Resolution:
0.2mm
Infill:
20%How I Designed This
-
MK3 style X-motor end for MK2(S) 3D Print Model
Summary
Added the mount for the endstop onto the MK3 X-motor end to fit MK2(S)
Use MK3 X-idler end in conjunction with this design.
Helps alleviate belt rubbing, twisting at the idler end AND easier belt tension adjustment.
You will need (4) 3x18mm for the trapezoidal nuts as the mounts are thicker. -
Compact 90 straight and cross for 15×15/OpenBeam/Makerbeam XL 3D Print Model
Summary
This is a compact 90 degree brace for Openbeam/Makerbeam XL 15×15 extrusion. There are two versions – one is a straight 90, the other is a very handy 90 degree rotated variant so you can do crossovers. The crossover version is pictured in the as-built photo.
A couple of things make this design different than the numerous other corner braces out there. This one has channel grooves to keep the part stable, which makes for a really nice, sturdy brace. I also did countersunk holes to make for a nice clean installation.
You do need to print this with supports but cleanup isn’t bad.
Print Settings
Printer Brand:
LulzBot
Printer:
Mini
Rafts:
No
Supports:
Yes
Resolution:
Any. I did 0.3mm
Infill:
20%
Notes:
Supports are required. Rotate the part so it sits flat. -
Parametric 4-post mounting plate for symmetrical circuit boards 3D Print Model
Summary
I’ve made enough 1-off designs for specific boards to motivate me into designing a fully parametric mounting plate. The included .stl file is for a Raspberry Pi with 6mm magnets as the mounting method, but you could use screws or glue just as well. The .f3d file can quickly generate similar mounting plates for other symmetrical 4-mounting-point circuit boards.
Print Settings
Printer:
creality cr-10
Rafts:
Doesn’t Matter
Supports:
No
Resolution:
.16
Infill:
25%
Notes:
MakerGeeks pro-HTPLA, 235C.
Post-Printing
The example print uses CA glue to secure 6mm magnets as the mounting method. -
Samsung S5 Bracket for Heinkel Tourist Scooter 103 A1 & A2 (Windshield mount) 3D Print Model
Summary
I needed a way to hold my GPS when riding with my old Heinkel Tourist Scooter 103 A1.
I used the holder from here:https://www.thingiverse.com/thing:1114561 (Thanks For Sharing!) It’s a nice design, lightweight, yet sturdy.
I then designed an adapter for the windshield-holder on the scooter, to adapt to the S5 holder created by Sonmor.
I added the famous Heinkel logo on it. (just for show)
-Additionnel Parts-list-
You will need the following to assemble the whole thing:
2x M3 (16mm)
4x M3 Washers
2x M3 Bolts
2x M10 (40mm)
4x M10 Washers
2x M10 Bolts
-PrintStuff-
No need for supports, they are included.
PartII needs to be rotated so that the cylindres touch the buildplate.
Tested print on Prusa MKII.
-Material-
I advise to print in ABS as it’s sturdier, and UV-resistant. (NoFan, preferably a small brim to avoid warping of ABS)
-Assembly-
Remove supports from PartII. (they break off when twisting’em)
First assemble PartII and PartIII with the small M3 bolt’n screws.
Then use M10 bolt’n screws to attach to the windshield bracket.
Now clip the Samsung Galaxy S5 holder on it.
-Additional Idea-
I made an USB cable going from battery (with power adapter) to the underside of the handlebars .. so I don’t drain the S5 battery.
-Usage-
I put 4 small foam pieces in each corner of the bottom of the Samsung S5 holder, to keep the phone from shaking too much (oldtimer=vibrations), and avoid the risk of jumping out of the holder whiles driving.
That’s it.
I can only say how gratefull I am that people share stuff so others can change it. So if you’re keen to that principle, don’t go making money on what people share for free !
-enjoy- -
AirBlade Eclair V2 Backpack for Split Mini 3D Print Model
Summary
This is designed to re-locate the pouch on the backpack to the top, freeing up spaces inside the Eclair frame to stack up Split Mini boards. The eclair frame is able to take up to 4 boards inside the cage. The pouch is still for VTX. The receiver can be installed behind the stack.
Print Settings
Printer Brand:
Prusa
Printer:
i3 MK3
Rafts:
No
Supports:
Yes
Notes:
Print in TPU -
axial fan support for E3D hotend (40×40) 3D Print Model
Summary
axial fan support for E3D hotend 40×40 -
Lightsaber Conversion Handle for Night Ize LED Glow Stick 3D Print Model
Summary
Convert LED glow stick into a miniature lightsaber toy. I found these at Home Depot and couldn’t help but make a handle for them to make them look more like a lightsaber for my daughter. I just printed the two halves and you can either glue them together or use a zip tie. -
Battery case for 30 AAA batteries 3D Print Model
Summary
Probably there are allready many around but still i designed and printed a battery case for 30 AAA batteries. I had cases for 4 or 8 batteries and had a few of them so i decided to make one case for all of them. This is it.
Print Settings
Printer Brand:
Prusa
Printer:
i3 MK3
Rafts:
No
Supports:
No
Resolution:
0.20
Infill:
20%How I Designed This
Designed in Tinkercad -
Brake Gear for Clicgear Golf Cart ver 3 3D Print Model
Summary
This is version 3 and hopefully the final version of my Clicgear brake gear. Version 1 was modeled as closely as I could manage to the original from Clicgear. It proved to be too weak when 3D printed. I beefed up the cogs for version 2, and it worked better, but still broke too easily. Version 3 has been tested and modified for two golf seasons now and has held up well.
Along with the beefier cogs, I also made the part that goes into the wheel the same size and shape as the holes that they fit into. This gives a good friction fit and a lot more plastic to take the abuse of forgetting to release the brake before trying to move the cart. I also did away with the little pins that broke off every time I tried to put the gear on the wheel and the groove in the center of the hub that doesn’t seem to have any purpose (at least not on my cart).
I included a picture of what was left of my factory gear that I broke. This is what started me designing my own version.
Print Settings
Printer Brand:
FlashForge
Printer:
Creator Pro
Rafts:
Doesn’t Matter
Supports:
Yes
Resolution:
.2 mm
Infill:
100%
Notes:
I made the previous versions with ABS, but I had PLA loaded when I got ready to print the newest one, so thought I’d give it a try. I think it’s going to work out great. -
35 Degree Triangle for Conveyor belt printer 3D Print Model
Summary
I used this triangle in the conveyor belt prototype printer to align the bed to the hypercube printer.
A newer dedicated infinite printer design is here: https://www.thingiverse.com/thing:2818937 -
Chevy Colorado phone mount for Samsung galaxy S9 3D Print Model
Summary
Fits 2nd generation chevy colorados, intended to hold a galaxy s9 with a case however it should hold other phones. Phones/cases under 15mm thick, and 80mm wide should work just fine.
Prints on it’s side. No supports should be needed, all bridging is small.
Will need to be fastened to the truck in some way, glue, tape, or screws will work.
Print Settings
Printer Brand:
Prusa
Printer:
i3 MK2S
Rafts:
No
Supports:
No -
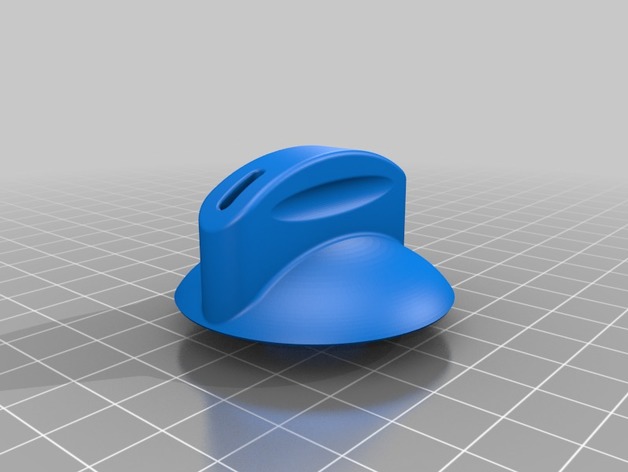
Washer Dryer Knob for GE and maybe others 3D Print Model
Summary
As they are wont to do, the knob on my dryer broke! The design is pretty weak, so I made a stronger and more stylish one! It will fit on Most GE dryers that have a 6mm diameter knob shaft. (the ones that have a cut out on one side of the shaft)
Print Settings
Rafts:
Doesn’t Matter
Supports:
Yes
Resolution:
0.24mm
Infill:
35%
Notes:
The infill needs to be a little higher than normal, at least 35%, so that it won’t collapse the walls when turning it. Maybe increase wall shells to 1 above normal. -
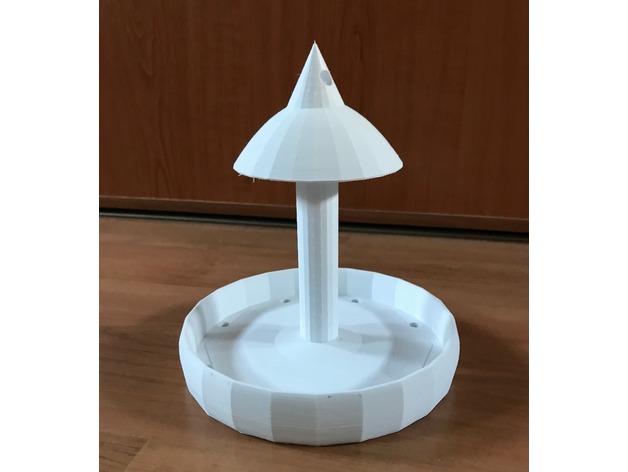
Bird feeder for breadstuff 3D Print Model
Summary
Simple, hanging, Bird feeder for breadstuff unlike most others targeting seeds.
Print Settings
Printer Brand:
MK3
Printer:
Prusa i3
Rafts:
Doesn’t Matter
Supports:
Yes
Resolution:
0.15-0.25
Infill:
20-30%How I Designed This
Tinkercad -
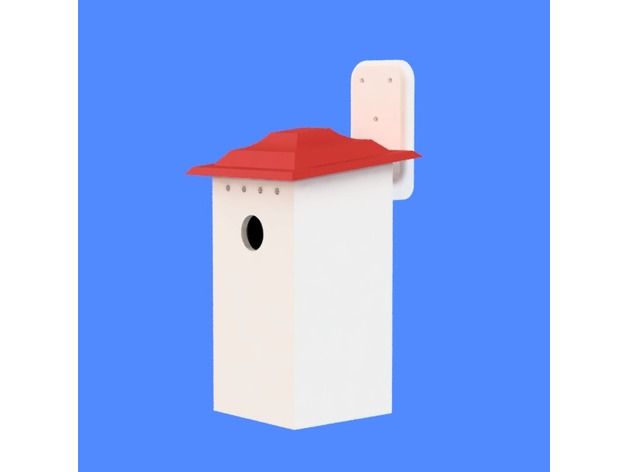
Two Piece Birdhouse for Chickadee, Titmouse, Nuthatch, or Woodpecker 3D Print Model
Summary
This two-piece bird house is designed to attract Chickadees, Tufted Titmouse, Nuthatches, and woodpeckers. It needs to be mounted 8-10 feet above the ground.
The design includes:
Four drain holes
Four ventilation ports above the entrance
A slip-fit roof for easy cleaning
A built-in mounting arm
Please post any comments and Makes – I’d love to see these in their new homes!
Print Settings
Supports:
Yes
Resolution:
.04
Infill:
At least 20% -

Gear set for cutting 10 pitch on a Hardinge TL 3D Print Model
Summary
To start, I measured the center to center on the two shafts on my Hardinge TL lathe that are used for external gearing. After some math I worked out that the ratio I needed was 25:16, with the big gear on the top. Knowing that I simply made two gears with a totally random pitch that had the right pitch circles to get the ratio right (48mm pitch diameter on the small one). FYI, going to 150 teeth on the big one gets the teeth too small for reliable printing. The set I actually built is 75 tooth by 60 tooth; sorry about the file name!
In use, you have to remove the external gear cover AND shift into the external gearing mode (all the way right on the quick change) AND set the three change to “1”.
These gears are a bit scary to use; stay the heck away from then while running! A little way oil (sticky) is a good idea. I was able to cut the 10 pitch Aluminum thread I needed using these without any visible damage on the teeth or bore.
Print Settings
Printer:
WeldingRodBot
Rafts:
No
Supports:
No
Infill:
50%+
Notes:
Its been a long time since I printed these, so I’m not totally sure what I did. I would use at least 3-4 shells with a 0.4mm nozzle.
You will need to ream out the bore and clean the keyway with a needle file. The bottom edges of the teeth are likely to need cleaning too, though you might be able to run one with the build surface toward the lathe and the other away from the lathe and get away with minimal finishing. -
Replacement Knob for Nissan Pathfinder 3D Print Model
Summary
Modeled this for a co-worker who needed a couple replacement knobs for his Nissan Pathfinder.
Print Settings
Printer Brand:
Wanhao
Printer:
Wanhao Duplicator i3 Plus
Rafts:
No
Supports:
No
Resolution:
0.2mm
Infill:
20% -

Red for Ed Keychain 3D Print Model
Summary
Keychain, self-explanatory. Designed in Tinkercad
Print Settings
Printer:
Monoprice Select Mini
Rafts:
Yes
Supports:
No
Resolution:
0.13125
Infill:
20%
Notes:
Only needs a raft because of my printer. -
Tripod Mount for Creative VF0790 Webcam 3D Print Model
Summary
Just add a 1/4in-20 nut to the center
Print Settings
Rafts:
Doesn’t Matter
Supports:
Yes -
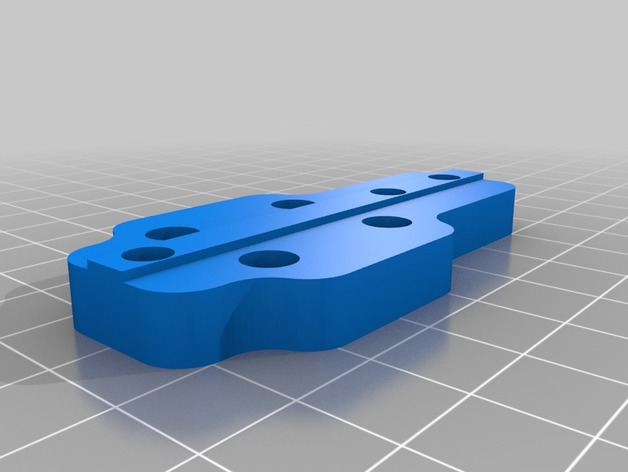
Carriage Module for FLSUN Cube 3D Print Model
Summary
This is to be a set of carriages for the FLSUN Cube, suitable for the three different extruders supplied in the kit. Each carriage can be swapped in and out with minimal effort by clipping Iand optional bolt) on to the universal belt bracket.
Very much a work in progress.
First stage are the STL’s for the Acrylic carriages (Single and Dual) supplied with the kit.
All work done in SCAD – file attached -
Mac Book Pro raised feet for extra cooling 3D Print Model
Summary
Replacement for almost every Mac book and Mac book pro, I thought to combine riser and replacement feet.
I’ve discovered that although pro’s got at least one fan the aluminum case is responsible for a lot of cooling.
Print Settings
Printer Brand:
Wanhao
Printer:
Wanhao Duplicator i3 Plus
Rafts:
No
Supports:
No
Resolution:
0.06
Infill:
25%
Notes:
print @ 0.06 res because I like the finish, no need to process it…
I’m sure that if you’re not concerned with aesthetic you can go way higher…
the only thing I’m not sure of is the infill, I was thinking of printing with 100% but then I changed for my default 25%… I’ll let know if they survive on my Mac.
I’ve opted not to model the ridge in the middle but to make them concave for best adhesion
I’ve glued them with a dab of rubber cement… maybe let me know if you know a better glue for bonding aluminum and pla… -
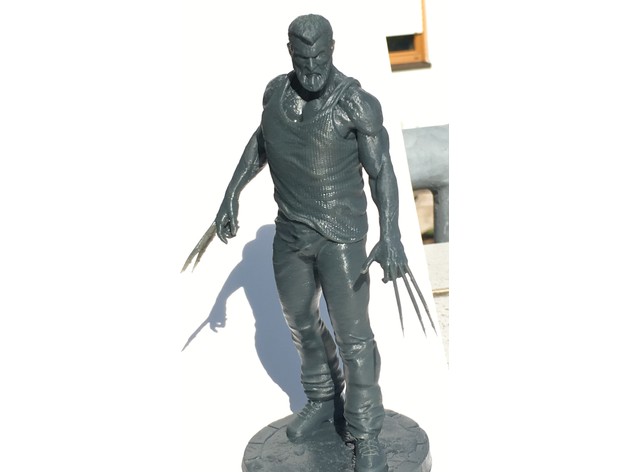
Logan old Man prepared for D7 3D Print Model
Summary
prepared an free available STL for printing with Wanhao D7
unfortunately I lost the origin -
Long Slot Post for Sixth-Finger / Sixth-Toe Capacitive Stylus 3D Print Model
Summary
This remix is strictly to take advantage of a 15 mm long coupling nut that I found on Amazon (https://www.amazon.com/gp/product/B00Z3XE5ZA). The longer nut requires a longer slot be cut in the post (yellow post in picture) but it also means that, for the same length post, a shorter bolt can be used – between 5 and 8 mm shorter). A shorter bolt may be easier to insert into a small diameter ring.
As with the original design, you should only download the zipx file. The STL file is included just for visualization purposes. And, as with the original design, all assembly instructions can be found here: https://wp.me/P9evBA-25
Print Settings
Printer:
Monoprice Select Mini
Rafts:
No
Supports:
No
Resolution:
0.1 mm
Infill:
20% -
Miele Espresso Machine Plate Grommet for Discharge Tube 3D Print Model
Summary
This is a grommet to hold the discharge tube into the metal plate of the Miele CM5100 Espresso Machine.
Print Settings
Rafts:
Doesn’t Matter
Supports:
No
Resolution:
.1
Infill:
100 -
Grocery bag trash hanger for cabinets 3D Print Model
Summary
Our store bought hangers broke. So searched thingiverse for replacements. The one available didn’t fit the thickness of our cabinet doors, so remixed the one available. -

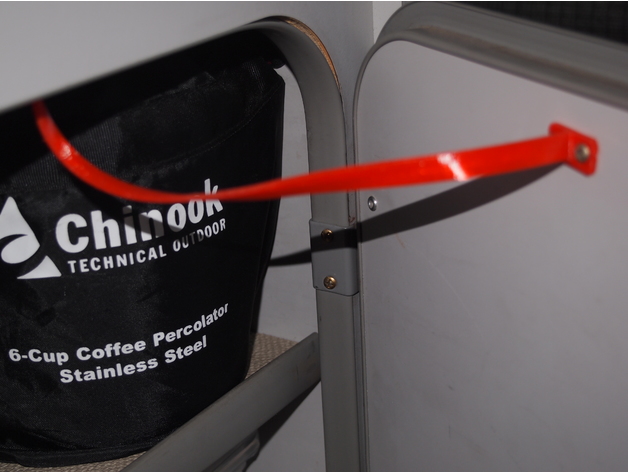
Z axis strap for Maslow 3D Print Model
Summary
I saw a picture on a Maslow forum where someone created one of these straps and used some bungee cords to keep a little tension on the z axis motor so that the router didn’t jerk.
Get some two cheap bungee cords and you’re set. There are holes already in the strap.
You don’t need a big 3D printer. This will fit on a 4″ x 4″ printer at a diagonal. -

Table for printer 3D Print Model
Summary
If you bought a printer recently, then first of all you have to solve the issue with the place of its placement.
A cheap and simple solution:
Buy table from IKEA like “LACK” (about $9.99)https://www.ikea.com/us/en/catalog/products/20011408/#/40104270
Design compatable with table legs size: 50×50 mm 😉
Just print my file four times and install without screws
Enjoy 🙂Print Settings
Rafts:
Doesn’t Matter
Supports:
Yes
Resolution:
0.25
Infill:
100% -
Jumbo Glue Stick Holder for Ultimate Modular Tool Holder Rack 3D Print Model
Summary
This is a remix of the glue stick holder from the Ultimate Modular 3D Printer Tool Holder Rack by Lay3rWorks. This part will hold a larger size glue stick up to about 28mm.
The two pieces fit together very snug, I have been using mine without any glue so far but will probably glue it together eventually. I found the easiest way to get the two parts together is to put the two open ends in place and then press up slightly on the rounded backside to get it into place.
I’ve posted the 123DX file as well as the STL so feel free to modify it as needed. This is the first thing I’ve ever remixed and posted so let me know if it needs more work.
Print Settings
Printer Brand:
TEVO
Printer:
Tornado
Rafts:
No
Supports:
Yes
Resolution:
.2
Infill:
30 -
Replacement Cover for Anchor-Hocking 2qt Pitcher 3D Print Model
Summary
The pitcher: a 2 quart container with circular 670mm filler opening. Purchased at Target; Made by Anchor-Hocking.
The original cover/lid got destroyed in the dishwasher, so I created a replacement for it.
I used Inland PLA from Micro Center.
No Photos available as of this entry.
Print Settings
Printer Brand:
PowerSpec
Printer:
Duplicator I3 PLUS
Rafts:
No
Supports:
No
Resolution:
0.08mm Layer, 0.8 Shell
Infill:
100%, 4% Overlap, Solid Top & Bottom
Notes:
All pieces oriented for no support, uses built-in skirt of 8laps.
Post-Printing
Construction
Pieces require only minimal cleaning.
Adhesive used: Gorilla Brush&Nozzle Super Glue.
Adhere 2 blocks to main lid body; let set.
Adhere large hinge block to spout cover; let set.
Using section of 1.75mm PLA filament for hinge, slide ‘hinge pin’ through openings, then glue at outer ends to lock in place.
How I Designed This
Designed in Blender.
All parts have been ‘cleaned’ and ‘prepped’ using the Blender Add-on “3D Printing”. -
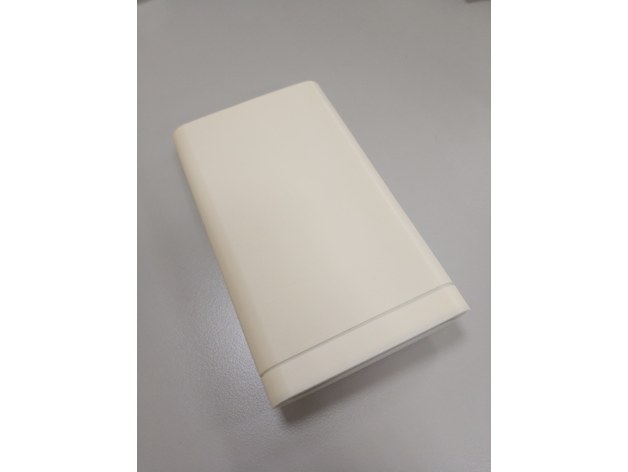
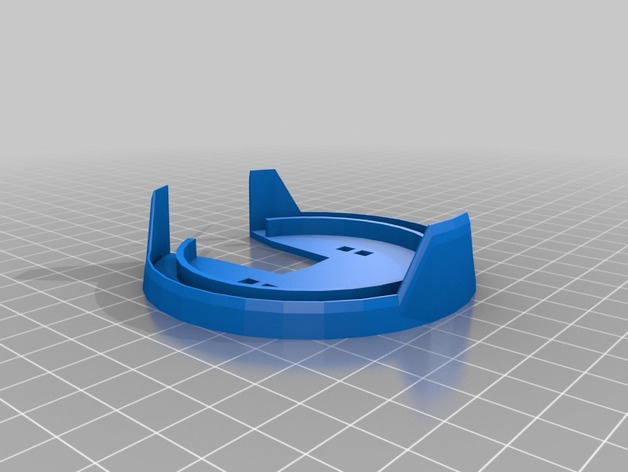
Case for 10000mAh Xiaomi Powerbank Pro QC3.0 3D Print Model
Summary
only use for 10000mAh Xiaomi Powerbank Pro QC3.0
Print Settings
Printer:
Micromake D1
Rafts:
No
Supports:
No
Resolution:
0.2mm
Infill:
20% -
Kennel For Piggeon 3D Print Model
Summary
Wedge basket for the transport of a pigeon. Dimensions 140 x 140 x 350 mm.
It is divided into parts to be able to print on most printers.
Cyanoacrylate has been used to bond the different parts. -
Anti-Jamming-Rattling-Plate for Djin from KS 3D Print Model
Summary
Hi there!
I have enjoyed Djin wallet without this plate.
However, as other people said, I also had a little on my mind about coin-jamming and rattling.
So I desinged this plate.
Please note that I strongly recommend to print this with soft material like rubber not ABS or PLA.
If you choose such hard material, you need to apply soft cloth or sometning with both-side-tape to absorb rattling sound.
Hope this will make your experience greater.
Regards, -
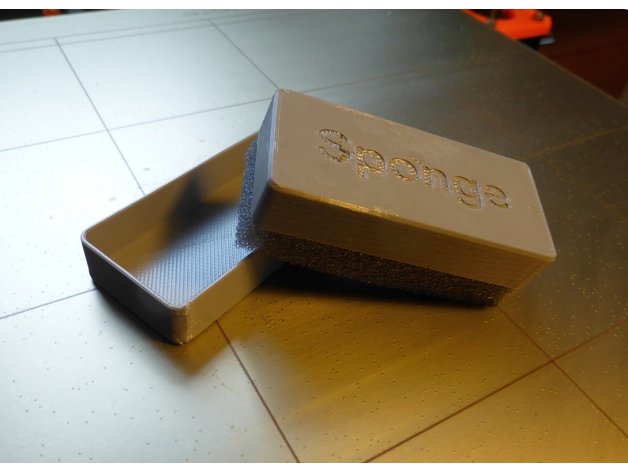
Sponge Holder Box for Hot Bed cleaning 3D Print Model
Summary
Like me, you have properly been wiping the printer hot bed for cleaning with a paper towel more times than you can remember – filling the paper bin with used towels.
I found the solution for me and it will properly also work for you – A sponge in a box, preventing it from drying out.
The box has a size to fit standard kitchen cleaning sponges (the cheap ones with heavy cleaning nylon on one side).
Just cut off the nylon part and slice it to the length you want. This is approximately 12 mm for the small box and 20 mm for the standard box.
I print a lot of PETG and therefore my sponge is wet with windows cleaner. Alternatively disc wash and water. You know best what is needed for your printing…
Don’t use solvents that can dissolve the printed box – just a warning.
>> If you like the design, please leave a Like or a Tip… thank you
Print Settings
Printer Brand:
MK3
Printer:
Prusa i3
Rafts:
No
Supports:
No
Resolution:
0.20mm
Infill:
20%
Notes:
2 perimeters, 3 top and 2 bottom layers.
Shown models is printed in Devil Design Gray PETG. -
Reverse Osmosis Diaphragm Plunger for Whirlpool WHER25 3D Print Model
Summary
My Whirlpool Referse Osmosis system has a plastic plunger used for auto-shut-off. Years ago, I purchases a replacement plunger which also eventually failed (cracked into multiple pieces). This 3d printed replacement part has been in operation in our system for more than a year without issue.
Print using Food Grade PLA and sanitize before installing. I used RAPTOR Series Black PLA which has FDA approval for food contact and prints at 245F. Depending on your printer (and whether the final part has seams or small nubs, the part may require light sanding to ensure perfect fit as the plunger must travel freely for proper operation.
Food Grade PLA:https://www.makergeeks.com/collections/raptor-series-pla/products/raptor-series-pla-high-performance-3d-filament-true-black-175mm-1kg
Print Settings
Printer Brand:
Ultimaker
Printer:
Ultimaker 3
Rafts:
No
Supports:
No
Resolution:
0.1
Infill:
20% -
EggBot suction cup holder enlonged for table tennis’s ball with sources 3D Print Model
Summary
I’ve made it to print on table tennis’s balls. It is suitable for JJrobots Sphere-o-bot kit’s suction cup and has size enough to hold table tennis’s balls. -
Adjustable Raspberry Pi camera mount for PowerSpec Ultra 3D Printer 3D Print Model
Summary
What you need:
I’ve included arm linkage at 40, 50, & 60mm lengths, but you really only need 6 of the 60mm lengths.
You should also print 2 of the arm_joint model.
That’s just to replicate the setup that I have, but it’s honestly very customizable. Print whatever you want!How to setup a streaming webcam with your Raspberry Pi:
https://pimylifeup.com/raspberry-pi-webcam-server/The different bases:
If you have the PowerSpec Ultra, I recommend printing the large base as it’ll allow you to perfectly connect the base to existing screws. You can still use the small base, It just connects at opposite corners and looks a little funny. I’m really just including it for anyone that might not have the PowerSpec Ultra since it may work better for them.
If you are using the large base, do not unscrew all 4 bolts at once! You don’t want to drop one of your axis arms down. Unscrew 3 of them, screw the base most of the way in on one corner, and then unscrew the forth bolt and swing the mount around to line up with the other holes.The different front cases:
I removed the pins out of the case for the v2 version of the camera because they seemed more likely to break than do anything useful. I haven’t modified the v1 version from the original that u/ReMake posted since I don’t have the v1 camera. Just wanted to put everything in one place for everyone else.Adjusting the camera:
If you have the v2 version of the camera, I would print this adjuster: https://www.thingiverse.com/thing:1574661
I recommend printing the taller socket style one as I was constantly hitting my M3 bolts using the wrench style one.
Print Settings
Printer Brand:
PowerSpec
Printer:
Ultra 3D
Rafts:
No
Supports:
Yes
Resolution:
0.32mm
Infill:
100% -
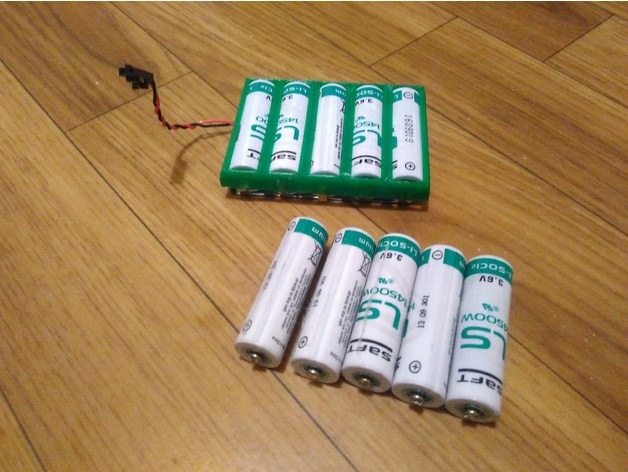
AA 5s Tray for Exogen battery 3D Print Model
Summary
This is a tray for 5s 14500 battery pack.
I used it in custom pack for Exogen4000. (3.6v batteries) -
Camera spacer for Puda 220 3D Print Model
Summary
Camera spacer for Puda 220 frame for camera mouting.
As holes for camera screws is larger than necessary, made this simple spacer, to center screw. Tested with Runcam Owl Plus, but probably fits other as well. -
Meanwell NES-350-12 Cover for MK2 3D Print Model
Summary
This is a remix of mmoore0s great power supply cover. I made the original and broke 2 of them while mounting so I reinforced 3 of the sides and also added the MK2 mounting lug so I could mount it on my clone. It would allow you to use the larger meanwell on any MK2 style frame though. I also, rather than drilling the frame, added the included block and used it with double sided tape to secure the top of the power supply to the frame. I think you could leave that off and the screws at the bottom would be enough to hold it in place if your printer doesnt move much but I just wanted to make sure the top was secured to the frame. I printed the one in the pictures with E3D edge crystal. It looks good and has done the job well so far. -
Baby Handcuffs for Poopy Diapers 4/1/18 3D Print Model
Summary
Baby Handcuffs for Poopy Diaper Changes
It’s a real problem facing the infant population today. Evidence suggests 7 out of every 10 babies faces an irresistible urge to reach down and touch their own poop while you change their diaper.
Eeeww.
Luckily we have 3d printers which can help solve our pressing day-to-day matters.
Enter Baby Handcuffs. Problem solved. The perfectly inhumane way to prevent your baby from touching their own fecal matter.
April Fools 2018
I’m no parenting expert but pretty sure baby handcuffs are not the solution to icky diaper changes.
Print Settings
Notes:
don’t print -
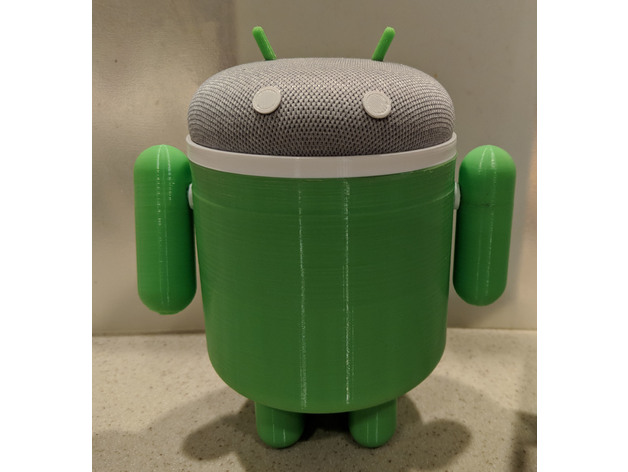
Android Body for Google Home Mini 3D Print Model
Summary
Let me start by thanking and giving credit to RAY_Design for the original idea and design.https://www.thingiverse.com/thing:2813569
Printing instructions:
Print all parts in the orientation provided in the files
In body color:
Body: print with support, feet sticking up.
Arm: print two with support, lying on the side (for strength around socket hole), socket hole down. That way the rough spots from the support material are on the inside and less visible.
Antennae: print two with a brim. They are very small, and without a brim, they might not stick to the print bed.
I printed all these pieces in one batch with support and brim.
White:
Collar: print without support, upside down
Eye: print two
Arm Ring: print two
You can print all these pieces in one bath, no support, no brim.
I made a few changes in this remix:
Uses 40% less material for the body when printed feet up: You still need to print with support, but there’s a lot less of it because of the cone shaped interior
Openings to route the power cable back into the body and out between the legs, for a neater look. You can coil up extra cable inside the body.
One piece arms: my version needs to be printed with support, but the rough spots will all be on the inside, where there aren’t very visible. Some sanding is required. On the plus side, no seam in the middle of the arm, and a stronger socket. You can still use the arms from the original design if you prefer – they are interchangeable.
Arm pins attached to the body
Collar rests in a groove on the body for a snug fit. I recommend glueing it to the body anyway.
Opening for the mute button (although still not easily reachable)
A built-in base in the body for the Home Mini to rest on, for a more stable fit
I used superglue to attach the eyes and the antennae to the Google Home Mini. If you rather not do that, you can skip that step – it still looks cute without it.
Print Settings
Rafts:
No
Supports:
Yes
Resolution:
High detail (for the arms at least)
Infill:
20%
Notes:
Body and arms need support. I recommend printing the antenna, arms, and body with a brim. The body probably doesn’t need it, but I wasn’t gonna risk it, and I printed all the green pieces in one batch.
This is a very large piece. I printed everything with “High Detail” for the best appearance. It takes about 24 hours to print all pieces at that resolution.
Post-Printing
Sanding the arms
I printed the arms lying down, with the pin hole facing down, for extra strength around the pin hole. Support is required in that orientation. But it will be on the inside of the arm, facing the body, so not very visible. After pulling off the support material, I sanded it smooth with fine sand paper.
How I Designed This
I started by looking at and printing RAY_design’s design (https://www.thingiverse.com/thing:2813569), and then recreated it from scratch in OpenScad. I took measurements from an official Android figuring (shown on the left in the 2nd picture), and scaling it up by a factor of 2.22.
I gave the interior of the body a cone shape so that you can print it upside down (for a smooth finish of the bottom and legs) with minimal support. Even so the cone means that extra material is needed to fill the area around the cone, it is a lot less than printing support material to fill the entire body to support a flat bottom. -

Tevo Tarantula Camera Mount for D-Link 3D Print Model
Summary
Tevo Tarantula Camera Mount for D-Link
Print Settings
Printer Brand:
TEVO
Printer:
Tarantula
Rafts:
Yes
Supports:
No -
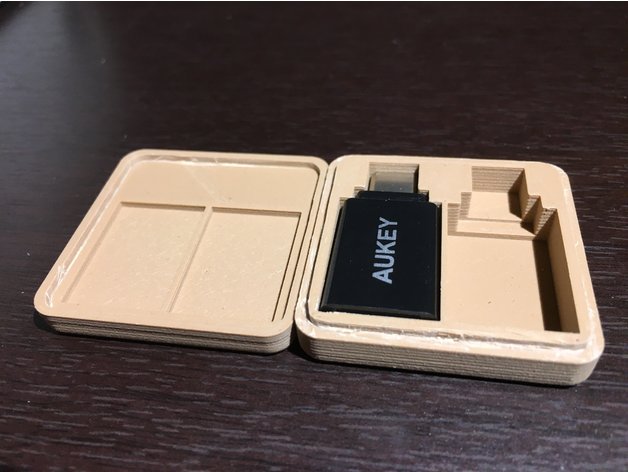
Case for Aukey USB-C Adapter 3D Print Model
Summary
Case for Aukey USB-C Adapter
This case holds 2 Aukey USB-C to USB 3.0 (USB-A) adapters. It is designed to have a 6 x 3 mm magnet embedded in each the box and the lid to hold them together.
To embed the magnets, I used GCode Simulator to find the height of the first layer above the hole for the magnet, then I inserted command M600 to pause the printer. When I added the magnet it wanted to lift out of place and stick to the gantry of my printer when I resumed printing, so I glued it in place with a drop of super glue before resuming. When placing the magnets, be sure to orient them so that the lid and box are attracted to each other when assembled.
Links
Aukey USB-C to USB 3.0 (USB-A) Adapter6 x 3 mm magnetGCode Simulator
Print Settings
Printer:
Monoprice Select Mini
Rafts:
No
Supports:
No
Resolution:
0.0875
Infill:
20%
Notes:
The two boxes pictured were made with Hatchbox Wood PLA and Hatchbox Blue PLA. -
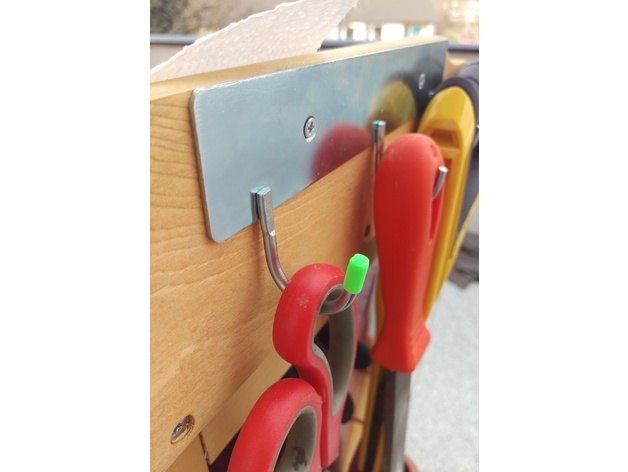
Protection Cap for Tubes, Rods, Hooks 3D Print Model
Summary
Customizable Protection Cap
Cap for metal tubes, rods, hooks,…
Either to prevent water intrusion or sharp edges sticking out.
I’m using it to prevent damaging of a work bench cover by the metal hooks. Wall and top diameter 1mm.
Print Settings
Printer Brand:
Prusa
Printer:
Prusa Clone
Rafts:
Doesn’t Matter
Supports:
Doesn’t Matter
Resolution:
0.12
Infill:
nonapplicable
Notes:
For a small cap (5x5x9mm), wall and top diameter 1mm, use a slow printing speed of 25mm/s. -
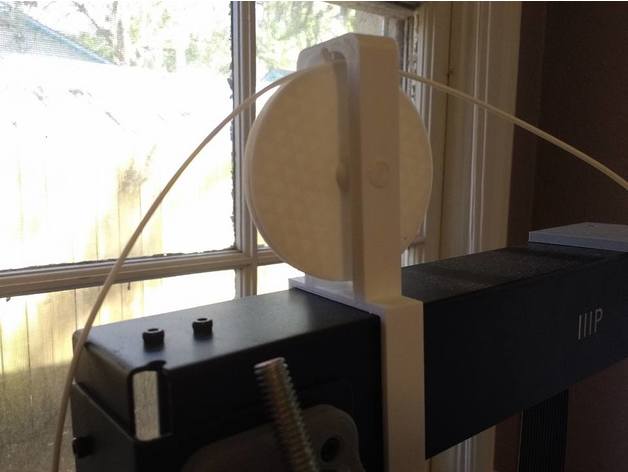
Filament Guide Wheel for Wanhao i3 Plus 3D Print Model
Summary
I designed this because I wanted my spool to sit beside my printer rather than on top, but I needed an elegant way for the filament to go up and back down over the top of the frame. This is the problem this wheel is meant to solve.
It’s designed to not need any glue. Just print the wheel, the frame, and the axle and assemble. Depending on your printer’s tolerances, you may need to sand the axle for the smoothest rotation.
Print Settings
Printer Brand:
Wanhao
Printer:
Wanhao Duplicator i3 Plus
Rafts:
Doesn’t Matter
Supports:
No
Resolution:
0.2
Infill:
wheel/frame:30%, axle:60%
Notes:
Use 3 or more lines for the axle. Print with a brim vertically. You don’t have to take the brim off to use it as an axle either, it’ll just butt up against the side of the frame.
You have two options to print the wheel. You can print the wheel as a whole piece with an extension on each side (with support) or you can print just the wheel and two washers separately. -

landing gear for spyda 500 (crossfire plate version) 3D Print Model
Summary
I edited this thing https://www.thingiverse.com/thing:394957 to make it compatible with crossfire plate. You can split it in 2 pieces like in the photo to make it more strong. -
Linear rail carrier holder for BLV with igus TWE-04-12 3D Print Model
Summary
I had serious problems with the mgn12H rails from Aliexpress and bought some
350 mm T-linear rails from igus : (TS-04-12) and they are alright for the Z-Axis – didnt try X or Y !
Combined with their TWE-04-12 carrier it is only usable with a new 2020_left/right_holder from the BLV_mod -
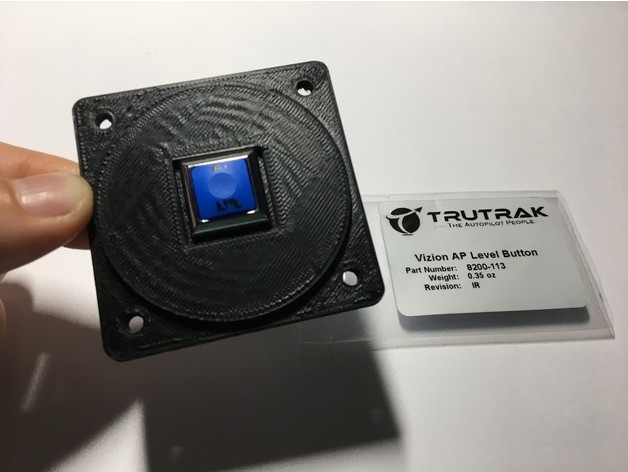
Instrument panel mount for TruTrak autopilot level button 3D Print Model
Summary
This mounting plate allows you to fit a simple momentary-contact push button into a standard 2.25″ round hole in an aircraft instrument panel. In this particular case, it is designed to fit the square push button that comes with the TruTrak Vizion autopilot kit that activates its “emergency level” function.
When installing this in an instrument panel, you can use either Tinnerman clip nuts, self-locking nuts, or just machine nuts. Typically #6-32 screws are used for securing gauges into instrument panels.
Print Settings
Printer Brand:
MakerBot
Printer:
MakerBot Replicator 2X
Rafts:
No
Supports:
No
Infill:
25%
Notes:
I recommend using ABS and not PLA due to the better resistance to high temperatures and sunlight. -
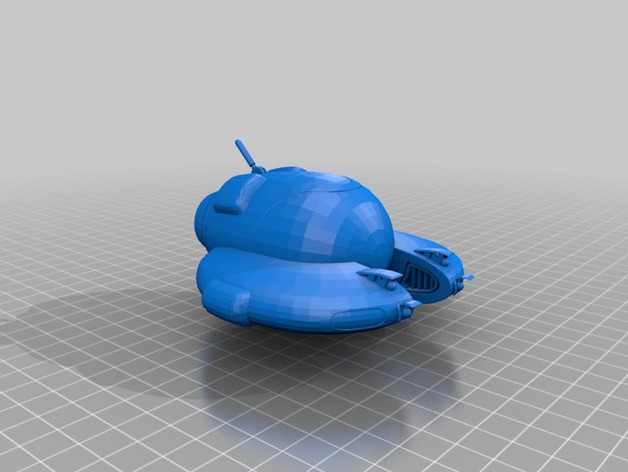
Seamoth for Subnautica – 3D printable 3D Print Model
Summary
This is a printable version of the Seamoth from Subnautica. This model is a derivative of (https://sketchfab.com/models/6feb95e1a958444188438b383003dffa) which was ripped straight from the game’s assets.
btw: Subnautica, your models are a mess.
Print Settings
Printer:
Monoprice Select Mini V2
Rafts:
Yes
Supports:
Yes
Resolution:
0.1
Infill:
20
Notes:
Put support everywhere.
How I Designed This
Find model
found: https://sketchfab.com/models/6feb95e1a958444188438b383003dffa
Remove interior
Open blender, be confused, delete the things.
Repair
https://tools3d.azurewebsites.net/
Manual repair
Using Tinkercad.com
More manual repair
Using Blender
Even more manual repair
Using Tinkercad.com -
Towel Holder for Oven handle 3D Print Model
Summary
This is a towel holder for the bar on my oven. I was tired of towel slipping off the round oven handle, so I made a clip. It has a hole that narrows into a channel; you take the corner of your towel and put it in the hole and slide it into the narrow channel.
You can change the settings in the scad file using OpenScad to fit a different diameter handle, make it a little shorter, use less material, or maybe a square handle. It’s a bit of a mess but not too hard to figure out. Original version just had the clamp and a flat piece for the circle & slot; but it was weak around the hole since there’s little material there and it has to support a rag that might get pulled on, so I made it taper and have more material to prevent snapping.
Print Settings
Printer Brand:
RepRap
Printer:
RepRap Kossel
Rafts:
Doesn’t Matter
Supports:
No
Resolution:
.2
Infill:
20%
Notes:
Print settings are forgiving, this is just what I used. Just use enough shells so it isn’t weak around the narrow parts. -
Corner Coupling for Lowes Peel and Stick Audio Cable Tubes 3D Print Model
Summary
Lowe’s Peel and Stick Speaker Wire Tubes are great and come with a straight alignment coupler but need a corner piece. This will fit their standard tubes. If unsure, print one and take it with you to Lowe’s or wherever and size it up.
Print Settings
Printer:
XYZ Davinci 1.0 Pro
Rafts:
Doesn’t Matter
Supports:
Yes
Resolution:
.3
Infill:
35 -
Container for cosmetic cotton wool 3D Print Model
Summary
I made a container for cosmetic cotton wool. It consists of a bowl and a lid. The cover has two holes for fastening so that the container can hang. Insert the cotton wool by turning the cover by 45 degrees and removing the cover. To close, insert the cover and rotate by 45 degrees
Video off how it work on : https://youtu.be/1k1UoBPSQj0
Print Settings
Printer:
Anet A8
Rafts:
No
Supports:
Yes
Resolution:
0,2
Infill:
20% up
Notes:
Supports All -
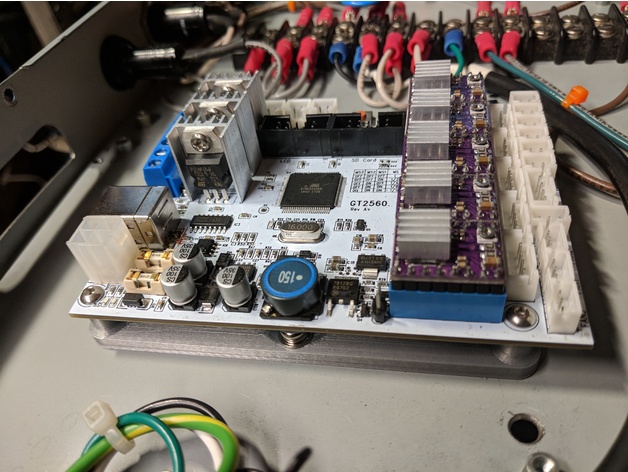
Mounting plate for a GT2560 Melzi board. 3D Print Model
Summary
Simple standoff mount for a GT2560 Melzi board.
The 2 mounting holes in the center are designed for 4mm screws.
Standoffs are designed to be tapped with 3mm threads.
The specific board is here :https://www.amazon.com/gp/product/B074TZC27M/ref=oh_aui_detailpage_o04_s00?ie=UTF8&psc=1
Print Settings
Printer Brand:
Creality
Printer:
CR-10
Rafts:
No
Supports:
No
Resolution:
.2
Infill:
20%
Notes:
Hatchbox silver PLA @ 200°C.
How I Designed This
Tapped standoffs with 3mm tap – holes are printed at 2.6mm. Mounting holes are 4.2mm, designed for 4mm screws. -
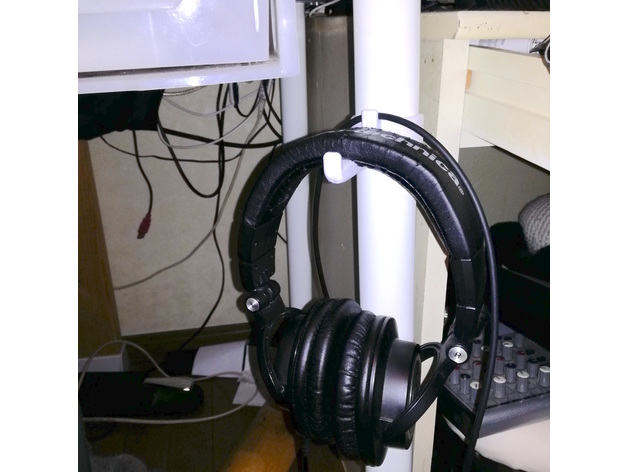
Headphone hook for 40mm pipe 3D Print Model
Summary
I use this by attaching it to IKEA’s ADILS.https://www.ikea.com/jp/ja/catalog/products/00353742/
This requires M3, 10 mm screws and nuts.
Print Settings
Printer:
Snapmaker
Rafts:
Yes
Supports:
Yes
Resolution:
0.15mm
Infill:
8% -
holder for little usb adapter 3D Print Model
Summary
This is a holder for small 10cm usb adapter from ebay. -

TRX4 BODY MOUNT FOR JEEP RUBICON 3D Print Model
Summary
This is the body mount for the Jeep Rubicon www.thingiverse.com/thing:2605921, for TRX4 chassis. Body needs drilling aligning to the holes of the mount.
Post-Printing
Remove screwsDetach the step board
Replace it with the printed body mount
-
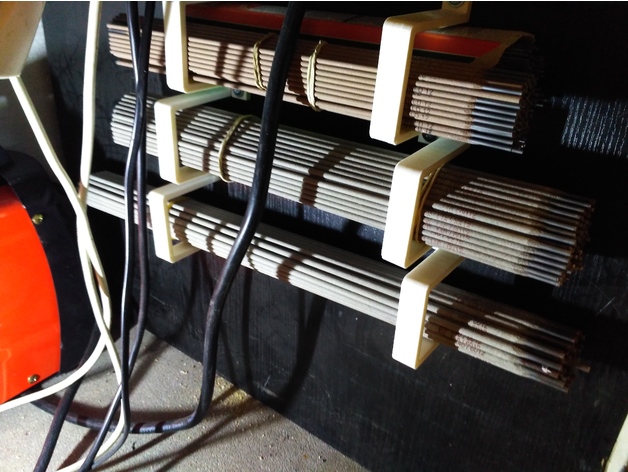
holder/organizer for welding electroder of something else 3D Print Model
Summary
This is my “vision” for organizing welding electrodes in workshop.
I’ve made this in different scales. -
Lamp/holder for led bulb GU10 with adjustment 3D Print Model
Summary
This is holder for GU10 led bulb with diameter 110mm. This have ball type adjustment. -
Temperature display mount for Anycubic 4Max 3D Print Model
Summary
Simple temperature display mount for Anycubic 4Max, it is mountable on the aluminum profiles, up or down side behind the Plexiglas door, there is enough room in the enclosure for the senor wire to mount the display upside down.
If you are lucky enough like me you might have spate T-Nut bolts from the kit otherwise just search for 4mm T-Nut bolts.
Credit: I got the housing from user selmo here: https://www.thingiverse.com/thing:761721 modified the inner part and holes for easy printing.
The sensor I used is at least 10 years old, but you can still buy it here:https://www.aliexpress.com/item/LCD-Digital-Tank-Water-Meter-Detector-Thermometer-Electronic-Fish-Tank-Water-For-Aquarium-Drop-Shipping-Support/32799423978.html
Print as you wish, no supports needed. -
Support iPad for DJI Mavic Pro Remote Control 3D Print Model
Summary
Support Apple iPad Mini 2/3/4 for DJI Mavic Pro Remote Control .
You need a M6 bolt, very careful when tightening the screw
not to break the bracket !
And you need a Self Adhesive Sticky for ipad protection !
Enjoy
Print Settings
Printer:
CTC I3 PRO B CLONE PRUSA
Rafts:
Yes
Supports:
Yes
Infill:
50% -
Paint rack for cosplay fingers 3D Print Model
Summary
This was a rack I made for painting cosplay fingers. Holds 10 parts. You can hot glue some mid finger parts to the rack. -
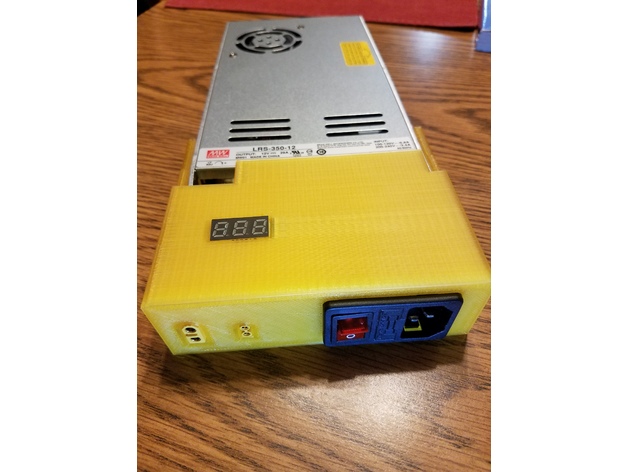
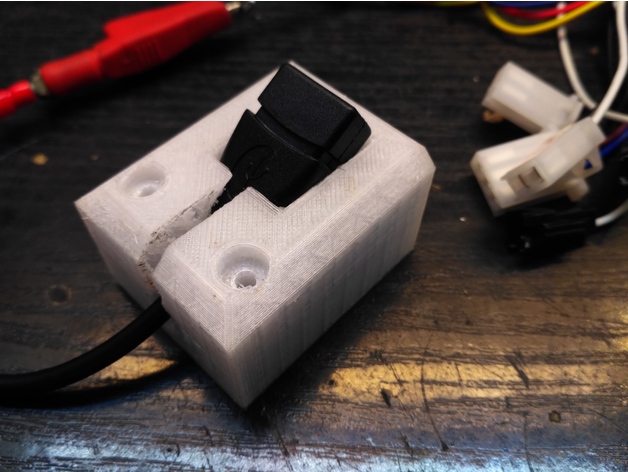
End cap for Meanwell LRS-350-12 3D Print Model
Summary
Wanted an end cap for my meanwell that would allow me to easily disconnect my Ender-2. The xt60 and xt30 just push in and are a tight enough fit that they shouldn’t go anywhere but you can always add a drop of glue to them. Links for the parts I used are below.
Voltmeter:https://www.amazon.com/gp/product/B00C58D47G/ref=oh_aui_search_detailpage?ie=UTF8&psc=1
IEC socket:https://www.amazon.com/gp/product/B01LYMNQ2L/ref=oh_aui_search_detailpage?ie=UTF8&psc=1
XT60:https://www.amazon.com/gp/product/B073QJWVVK/ref=oh_aui_detailpage_o00_s00?ie=UTF8&psc=1
XT30:https://www.amazon.com/gp/product/B074S7NH3H/ref=oh_aui_search_detailpage?ie=UTF8&psc=1
Power Cord:https://www.amazon.com/gp/product/B005VULXA0/ref=oh_aui_search_detailpage?ie=UTF8&psc=1
Meanwell LRS-350-12 Power Supply:https://holiday.lighting/psorderform
Print Settings
Printer:
Ender-2
Rafts:
No
Supports:
Yes
Resolution:
0.28
Infill:
20
Notes:
Supports only needed on the hole for the voltmeter -
Minimalistic fan bracket / mount for 40mm fan on a nema 17 3D Print Model
Summary
I wanted to put a fan to a drive motor (nema 17), but do not have a lot of space for it, so I created this minimalistic fan bracket. Not ideal in any way, shape or form, but it does provide some cooling when there is little room for a fan.
Mount the bracket to a 40mm fan and glue the centre part with CA glue to the motor. Nothing more to it.
Print Settings
Printer:
Heavily modified mendelmax 2
Rafts:
No
Supports:
No
Resolution:
.250
Infill:
lots of it
Notes:
Print using a strong material and with lots of infill, since the arms are flimsy and need all the strength they can get. -
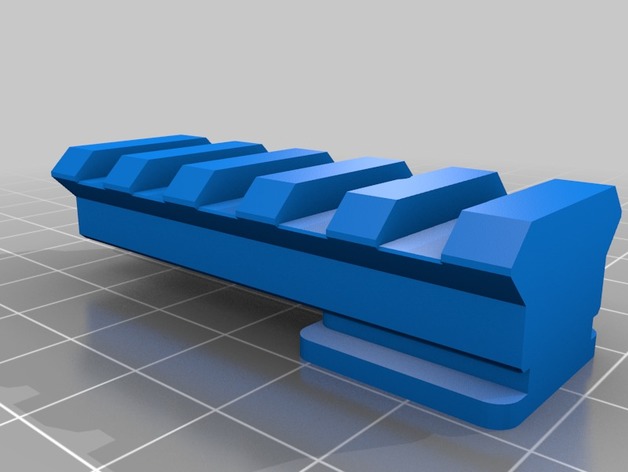
NATO/Picatinny Rail for Hot Shoe 3D Print Model
Summary
NATO Rail for Camera Hotshoe, for example to mount Red Dot/Reflex Sights to a camera.
Picatinny/Weaver compatible
Precise and tight fitting to ensure it is stays accurately aligned.
No moving parts that could be knocked out of alignment.
Includes FreeCAD source file in case you’d like to make your own adjustments. -
Cooling Fan Spacer for A6 with lights 3D Print Model
Summary
The original fan spacer works great. I wanted some light down by the print nozzle, so I could watch the print without using a flashlight. I modified the spacer to add an area for LEDs. I stuck a small strip of LEDs on and wired them into the extruder fan power.
I’m quite happy with the result. Soldering into the existing fan wiring (while it was still on the printer) was a bit of a PITA. I didn’t want to completely undo the loom and remove the fan from the printer, so that’s how it had to be. Still, well worth it.
Print Settings
Printer:
Anet A6
Rafts:
No
Supports:
Yes
Resolution:
.2 mm
Infill:
100%
Notes:
I printed at 100% infill. Once you print the walls, there’s not much left on the inside I figured why not. Print with supports and a brim. Print in the orientation shown on the model here. Its minimal support and it comes off very easily.
Post-Printing
LEDs
I bought a meter long strip of 12v LEDs for about $1. I cut off a 45mm section and attached it to the bottom of this part. I soldered on servo wire, and then soldered those wires to the power leads going to the extruder fan. For extra security, I put some Kapton tape around the LED strip as well (also to cover up the exposed solder points). -
Gear selector extension for BMW K1600 GT GTL 3D Print Model
Summary
With quick shifter gear, the foot selector is to short on BMW K1600.
This print fix the problem. Just squeeze it with a 5 mm zip tie.
Print Settings
Printer Brand:
Prusa
Printer:
i3 MK3
Rafts:
No
Supports:
No
Resolution:
0,20
Infill:
20 %
Notes:
4 perimeters layers
PLA -
Glass Plate Corner Brackets for Flashforge Inventor 3D Printer (Remix) 3D Print Model
Summary
These corner brackets were designed to interface with the Flashforge Inventor 3D printer and the glass plate upgrade from Flashforge USA. Supports glass dimension (L x W x H) 9 x 6 x 0.15 inches. Glass must be installed on top of the Flashforge build tape and aluminum build plate. You may require four washers to prevent the hex nuts from going through the gaps of the corner brackets.
The corner brackets are designed to be of sufficiently low profile to accommodate the build plate movements in proximity of the internal filament spools. The corner brackets can be fastened using the existing build plate hardware and are flush with the surface of the glass.
I would like to say that this project worked on the first attempt but it would be false. What started as a deliberate design attempt turned into a series of trial and error. It took me seven versions to get it right.
Print Settings
Printer:
Flashforge Inventor
Rafts:
No
Supports:
Yes
Resolution:
0.08mm
Infill:
100%
Notes:
In order for these brackets to work at bed temperatures up to 110 degrees Celsius, I recommend using Proto-Pasta Carbon Fiber HTPLA for printing these and then following directions from Proto-Pasta for annealing. I do not recommend the use of regular PLA or ABS for this project as they will become soft and rubbery during heated bed operation.
To ensure compatibility with your system, here are the measured dimensions of the parts that the brackets interface to:
Original Aluminum + PCB + Tape Build Plate (L x W x H) 232 x 153 x 8.25mm
Glass Plate Upgrade (L x W x H) 229 x 152.45 x 3.8mm
I recommend tightening the nuts once the build plate is fully raised and pre-heated to 60-70 degrees Celsius.
How I Designed This
Step 1: New Enhancements
After having used the source version of these for two months, I discovered some areas for improvement. I increased the height of the opening that interfaces with the “Original Aluminum + PCB + Tape Build Plate” by 0.2mm in order to get an even better fit. I also reinforced the external sides of the corner brackets as they seemed to start warping slightly at 110 degrees Celsius (even with the annealed Proto-Pasta Carbon Fiber HTPLA). I think that with the thicker material, which is an insulator, the part should maintain its shape. This is still a work in progress in that I have not yet printed it to verify the fit and conduct some testing; I plan on having it verified and tested next week. -
BMO Wall Hanger for Golden Sword 3D Print Model
Summary
This goes with the Golden Sword for Finn I made. The model I uploaded for the sword is designed for a kid. I enlarged it myself in Tinkercad to make it a bit bigger. If you do the same, this will work for both sizes. The arms are not perfect. I’m going to have to add some kind of filler to the nubs to make them look more smooth and fluid. the arm sockets also have extra material in them. I tried to get as much out as I could. Program is not perfect and I tried for about an hour just on one arm trying to get all that mess out. I’m going to take an razor blade to them and get the extra material out. Should work just fine. -
Redesign wheel castors for video skate dolly 3D Print Model
Summary
This wheel castors was re-design for who not have anywheel.
It can spin freely in any direction.
It’s use 33×38 mm castors, 4×15 mm screw, and 7 mm nuts.
Refer to https://www.thingiverse.com/thing:357568
Print Settings
Printer:
Creality CR-8
Rafts:
Doesn’t Matter
Supports:
Doesn’t Matter
Resolution:
0.3 mm per layer
Infill:
20% -
Tronxy Radial Fan Mount for stock shroud 3D Print Model
Summary
When I just got my Tronxy X1 a part cooling fan was missing. So the bridging performances were very bad. My extruder had alot of problems so I just needed a temporary fix while I made a mount for a V6.
So you just need two M3 screws to put on the side of the shroud and a screw and nut for the Radial Fan. I highly suggest adding a little deflector so your block doesnt cool off too much.
It’s a simple solution and I have a friend that uses it for his permanent set up.
NO NEED TO REPOSITION THE LIMIT SWITCH
Print Settings
Printer:
Tronxy X1
Rafts:
No
Supports:
Doesn’t Matter
Resolution:
0.2
Infill:
15 -
Logitech G930 U replacement for speaker 3D Print Model
Summary
Hi!
Just recently broke the speaker of on my G930 so i made a new one, Dosent look good but it works.
I printed the U shape with 0,2 res with a 0,4 nozzle.
The locking mechanism is printed with 0,125 res with 0,25 nozzle.
Will probably work to print both parts in 0,2 res with 0,4 nozzle.
I dont know but i think it will also work on the G35 headset.
What u need:
2x M2 16mm long screws
2x m2 Nuts
soldering iron
Print Settings
Printer Brand:
TEVO
Printer:
Tarantula
Rafts:
No
Supports:
Yes
Resolution:
0,125
Infill:
80-100
Notes:
just support on the U fitting
PLA