Summary
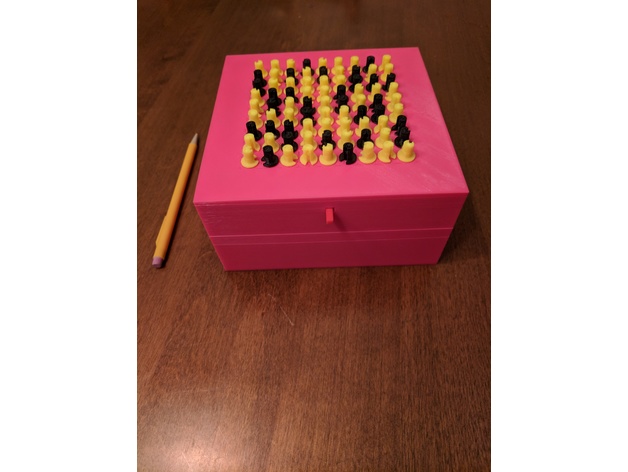
This fully 3d printable box remains locked until the Sudoku puzzle displayed on its top is solved. The puzzle is displayed using knobs pointing to numbers on the box lid. Some knobs are fixed (these are the filled-in numbers on the puzzle) and some are free to rotate. As they rotate, a detent mechanism gives tactile feedback and keeps the pins in place. Once solved, a button on the front of the box is pressed, and the top becomes free to lift off the box. The puzzle is configurable by rearranging different combinations of pins.
Parts:
box.stl – This is the base of the box.
pins-moving.stl – These are all of the rotating pins needed to make any Sudoku puzzle. Included are 81 pins, 9 corresponding to each number. The number each pin corresponds to is printed on its side. Also included are cylindrical supports up the side of the pin. This improves stability, as the pins are tall and have a narrow base.
pins-fixed.stl – This is similar to pins-moving.stl, but contains pins that are fixed in position and cannot move. These are used for the “filled in” numbers of the puzzle.
slideplate.stl – Part of the locking mechanism. The front part of this protrudes as the button (so print it in the desired color for the button).
clips.stl – Internal to the box, these hold the mechanism in place against the lid.
baseplate.stl – The base of the internal mechanisms. It also contains the detent prongs. I recommend printing this in PETG to allow for some flex.
lid.stl – This is the top part of the box. On its face are printed circles of numbers, so ensure your bed is level and Z height is set correctly.
knobs.stl – These knobs press on top of the pins to make them easier to grip. Print 2 sets of these, one in the color for fixed pins, and one in the color for moving pins.
Print Settings
Printer Brand:
Prusa
Printer:
i3 MK3
Rafts:
No
Supports:
No
Infill:
20%
Notes:
I used 0.15mm layer height and an 0.4mm nozzle; other settings may work as well.
Post-Printing
Step 1. Detaching Pins
The pins print with included supports and must be removed from them. They can be removed by pushing straight down on the tops of the pins, out through the bottom of the support platform. Remaining strings at attachment points on the pins are not generally a problem.
You may wish to leave pins attached to the support platform until configuring a puzzle to keep them organized (in rows by number).
Step 2. Configuring Puzzle
Place the base plate on a flat surface such that the detent prongs are facing you (see orientation in photo). Place pins onto the base plate such that the cylinders protruding from the base plate fit into the holes in the bottoms of the pins. Fixed pins should be used for preset positions in the puzzle while moving pins should be used for blank positions. Place pins such that the large slot in the side of the pin is facing you; this should also align a small groove on the opposite side with the detent prong.
If there is a bit of stringing on the base plate, this is usually OK. Remove any large chunks, and just push the pin through the rest, breaking the strings.
Pins inserted into base plate
Step 3. Assembling the Lid
Turn the lid upside-down (such that the numbers printed on the surface are facing downward). Place the slide plate into the lid, inserting the protruding arm of the slide plate (the button) into the hole in the front of the lid. Gripping the button (now protruding through the lid), pull the slide plate to the front of the lid.
Now flip the lid, continuing to pull on the button. Ensure the slide plate is staying roughly level with the top of the lid. You may have to pull a bit hard to counteract gravity and the leverage of the sliding plate. Pulling out and slightly down (using the button as a lever) can make this easier.
Place the lid and slide plate over the base plate, aligning the front of the lid (with the button protruding) to the front of the base plate. Carefully lower the lid, watching from the side to keep the posts protruding from the underside of the lid aligned with the corresponding cutouts in the base plate. If pin shoulders snag on the slide plate, just wiggle the lid a little to get them through; the shoulders of the pins are tapered to help this. Once the tops of the pins reach the underside of the lid (you can see them through the holes in the lid), wiggle and tap the lid a bit to get the pins to go through. Both the underside of the lid and the tops of the pins are tapered.
After lid has been placed on top of base plate, and pins inserted through the holes in the lid, pick it up, and push the lid all the way down. The cutouts on the base plate should seat firmly on top of the lid posts (see picture).
Take each of the 3 clips, and slide it from the side underneath the clip holders. The edges of the clips are chamfered to help this. Ensure the clips are tilted toward the clip holders when first inserting them to get them started. The 3 half-spheres attached to the bottom of the clips should snap into the corresponding holes in the bottom of the base plate. (see picture)
After finishing the assembly of the lid, flip it over again (so that the printed numbers are facing up). Ensure that all pins are pointed at the correct numbers, then push the button on the front to test the locking mechanism. The button should move in about a centimeter. If there are strings on the slide plate or inside the slots on the pins, it may take additional force the first time the button is pushed to break through the strings.
Adding Knobs
Place the lid with the top facing up on a flat surface. (I recommend doing this while the lid is not placed on the box so the force required to push on the knobs does not damage the clips.)
Take each knob and firmly press it down on top of the pin. Ensure the opening in the knob is aligned to the mark on the pin, and to the number indicated by it.
After this, place the lid on the box, aligned to the front (the front of the box is the side with the slot), and assembly is completed.
Locking and Unlocking
To lock the puzzle, pull the button outward, and turn the moving pins to their upward positions (blank). To unlock, turn pins to the correct positions and push button inward.