Summary
The science department at our school did not like the test tube racks they were using. They found them cumbersome and annoying to use, so we created this new design.
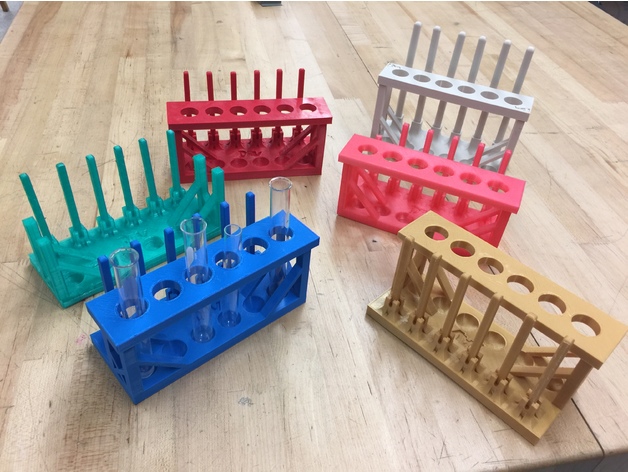
The parts of the test tube rack are printed separately, and they are all detachable. If one of the drying rods snaps, you can either remove it and replace it, or you can print a drying rod sleeve and fit it snugly over the broken stub of the drying rod.
Two test tube racks can be stored compactly by interlocking them within each other. The drying rods on both test tube racks can be inserted simultaneously into the other rack’s holding rack (the top piece with six large holes), making two test tube racks take roughly the same amount of space as one.
PARTS:
1 Test Tube Rack Bottom Piece
1 Test Tube Rack Top Piece
6 Test Tube Rack Drying Rods
However many Drying Rod Sleeves are needed
Print Settings
Printer:
Dremel Idea Builder Rafts:
Yes Supports:
No
Post-Printing
Sanding is sometimes needed if the raft is difficult to remove.
Overview and Background
Limitations and obstacles
10cm x 20cm print plate
Had to accommodate for risk of drying rods breaking
Had to create multiple prototypes, taking suggestions from the science department each time
First prototype was too big; had to make it smaller
Should the drying rods be printed separately from the bottom piece or printed as a part of it? We began with a detachable drying rod design in our first prototype, decided to try printing the drying rods as part of the bottom piece in our second prototype, and upon realizing this design was prone to breaking, we reverted to a detachable design in our final product.
Had to create a test tube rack in which multiple sizes of test tubes could fit
Image taken from Solidworks (right: first prototype; left: second prototype)
Lesson Plan and Activity
1) As a class, students discuss and think of products that the science department needs or would like (ex. test tube stirrer, cellular model, etc.)
2) Students divide into groups and each group chooses a product
3) Each group creates an initial design for their product and asks teachers throughout the science department for feedback and suggestions on their design
4) Update the existing design and create a new prototype based on the teachers’ suggestions
5) Ask teachers throughout the science department for more suggestions
6) Repeat steps 4 and 5 until a satisfactory final product is created
Materials Needed
3D printer
3D printer filament
3D design software (such as Solidworks)