Summary
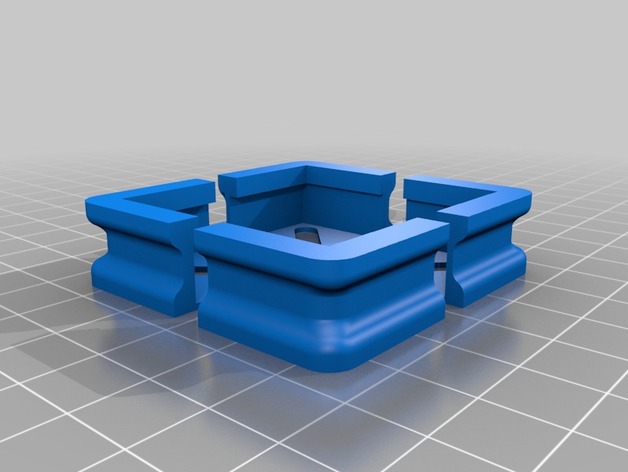
These corner brackets were designed to interface with the Flashforge Inventor 3D printer and the glass plate upgrade from Flashforge USA. Supports glass dimension (L x W x H) 9 x 6 x 0.15 inches. Glass must be installed on top of the Flashforge build tape and aluminum build plate. You may require four washers to prevent the hex nuts from going through the gaps of the corner brackets.
The corner brackets are designed to be of sufficiently low profile to accommodate the build plate movements in proximity of the internal filament spools. The corner brackets can be fastened using the existing build plate hardware and are flush with the surface of the glass.
I would like to say that this project worked on the first attempt but it would be false. What started as a deliberate design attempt turned into a series of trial and error. It took me seven versions to get it right.
Print Settings
Printer:
Flashforge Inventor
Rafts:
No
Supports:
Yes
Resolution:
0.08mm
Infill:
100%
Notes:
In order for these brackets to work at bed temperatures up to 110 degrees Celsius, I recommend using Proto-Pasta Carbon Fiber HTPLA for printing these and then following directions from Proto-Pasta for annealing. I do not recommend the use of regular PLA or ABS for this project as they will become soft and rubbery during heated bed operation.
To ensure compatibility with your system, here are the measured dimensions of the parts that the brackets interface to:
Original Aluminum + PCB + Tape Build Plate (L x W x H) 232 x 153 x 8.25mm
Glass Plate Upgrade (L x W x H) 229 x 152.45 x 3.8mm
I recommend tightening the nuts once the build plate is fully raised and pre-heated to 60-70 degrees Celsius.
How I Designed This
Step 1: New Enhancements
After having used the source version of these for two months, I discovered some areas for improvement. I increased the height of the opening that interfaces with the “Original Aluminum + PCB + Tape Build Plate” by 0.2mm in order to get an even better fit. I also reinforced the external sides of the corner brackets as they seemed to start warping slightly at 110 degrees Celsius (even with the annealed Proto-Pasta Carbon Fiber HTPLA). I think that with the thicker material, which is an insulator, the part should maintain its shape. This is still a work in progress in that I have not yet printed it to verify the fit and conduct some testing; I plan on having it verified and tested next week.
Tag: Flashforge
-
Glass Plate Corner Brackets for Flashforge Inventor 3D Printer (Remix) 3D Print Model
-
Wall holder for Flashforge Creator Pro Original Spool holder 3D Print Model
Summary
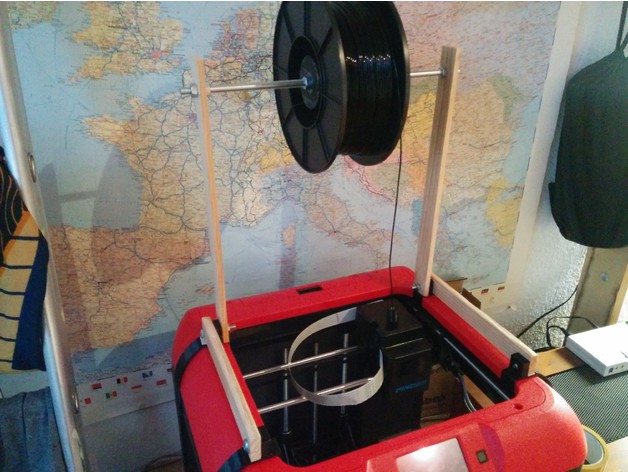
Here is a wall holder for the original spool holder of the Flashforge Creator Pro. Of course, it also mount alternative holders designed for the Creator Pro.
( I had first attached the spools above the printer but then realized that the conduction of the teflon tubes doesnt work well. Thus, these have then attached under the printer. That worked a lot better. )
Print Settings
Printer Brand:
FlashForge
Printer:
Creator Pro
Rafts:
No
Supports:
Yes
Resolution:
0,2mm
Infill:
15% -
Flashforge Finder minimum resistance filament holder 3D Print Model
Summary
My Finder kept producing errors because of hard-to-pull filament,so I decided to build a mont with minimum resistance.
I think the pictures are self-exlanatory. If you still have questions, just leave a comment!:) -

3mm/5mm Z-Axis Shim for Flashforge Creator Pro Glass Bed 3D Print Model
Summary
3mm/5mm Z-Axis Shim for Flashforge Creator Pro Glass Bed