
Description
Blog
-

Sukhoi Su-57 Pak-Fa Splinter camo blackpanthers 3D Model
The Sukhoi Su-57 is the designation intended for a stealth, single-seat, twin-engine jet multirole fighter aircraft designed for air superiority and attack operations. The aircraft is called the PAK-FA , a fifth-generation fighter programme of the Russian Air Force. Sukhoi’s internal name for the aircraft is T-50. The Su-57 will be the first aircraft in Russian military service to use stealth technology. The fighter is planned to have supercruise, stealth, supermaneuverability and advanced avionics to overcome the prior generation fighter aircraft as well as ground and maritime defences. Around 150 to 200 aircraft orders from the Russian Air Force and 200 from the Indian Air Force (IAF) are expected. Production will commence in 2015 after five to six flight trials. Around three flight trials were completed as of February 2010.
-

Ford Super Duty 2015 F250 XLT 3D Model
Created in 3dsmax 2012 with Vray materials.Polycount with Turbosmooth off: 327000Polycount with Turbosmooth on (iterations set to 1): 1906000Modeled in real world scale and metric unit.All objects, materials and textures are properly named.Objects organized in layers and groups.This model contains 12 textures:(2) 4000 x 4000(5) 2000 x 2000(5) 1000 x 1000Lighting setup is not included in the package.
-

ID171024 3D Model
A set of simple furniture model,Can be used for study and bedroom space.Standard Vray material type,You can use or customize the material type directly.all the best!
-

Party bar ktv sauna design complete-07 3D Model
Realistic panorama model, elaborate,Full model rendering, detail, material, bulb, texture, renderer VR.The model is opened directly and displays the image in the preview image.1 – Fully modeled interior decoration2 – delicate and realistic material3 – real lighting4 – Include all texture maps5 – Refer to the wireframeA highly detailed object that is modeled in 3ds Max 2012 or a new view and preview using V-Ray 2.0 rendering. 3ds Max fileContains the entire scene, and rendering is ready.
-

Party bar ktv sauna design complete-03 3D Model
Realistic panorama model, elaborate,Full model rendering, detail, material, bulb, texture, renderer VR.The model is opened directly and displays the image in the preview image.1 – Fully modeled interior decoration2 – delicate and realistic material3 – real lighting4 – Include all texture maps5 – Refer to the wireframeA highly detailed object that is modeled in 3ds Max 2012 or a new view and preview using V-Ray 2.0 rendering. 3ds Max fileContains the entire scene, and rendering is ready.
-

Party bar ktv sauna design complete-04 3D Model
Realistic panorama model, elaborate,Full model rendering, detail, material, bulb, texture, renderer VR.The model is opened directly and displays the image in the preview image.1 – Fully modeled interior decoration2 – delicate and realistic material3 – real lighting4 – Include all texture maps5 – Refer to the wireframeA highly detailed object that is modeled in 3ds Max 2012 or a new view and preview using V-Ray 2.0 rendering. 3ds Max fileContains the entire scene, and rendering is ready.
-

Party bar ktv sauna design complete-05 3D Model
Realistic panorama model, elaborate,Full model rendering, detail, material, bulb, texture, renderer VR.The model is opened directly and displays the image in the preview image.1 – Fully modeled interior decoration2 – delicate and realistic material3 – real lighting4 – Include all texture maps5 – Refer to the wireframeA highly detailed object that is modeled in 3ds Max 2012 or a new view and preview using V-Ray 2.0 rendering. 3ds Max fileContains the entire scene, and rendering is ready.
-

Party bar ktv sauna design complete-06 3D Model
Realistic panorama model, elaborate,Full model rendering, detail, material, bulb, texture, renderer VR.The model is opened directly and displays the image in the preview image.1 – Fully modeled interior decoration2 – delicate and realistic material3 – real lighting4 – Include all texture maps5 – Refer to the wireframeA highly detailed object that is modeled in 3ds Max 2012 or a new view and preview using V-Ray 2.0 rendering. 3ds Max fileContains the entire scene, and rendering is ready.
-

Party bar ktv sauna design complete-01 3D Model
Realistic panorama model, elaborate,Full model rendering, detail, material, bulb, texture, renderer VR.The model is opened directly and displays the image in the preview image.1 – Fully modeled interior decoration2 – delicate and realistic material3 – real lighting4 – Include all texture maps5 – Refer to the wireframeA highly detailed object that is modeled in 3ds Max 2012 or a new view and preview using V-Ray 2.0 rendering. 3ds Max fileContains the entire scene, and rendering is ready.
-

Party bar ktv sauna design complete-02 3D Model
Realistic panorama model, elaborate,Full model rendering, detail, material, bulb, texture, renderer VR.The model is opened directly and displays the image in the preview image.1 – Fully modeled interior decoration2 – delicate and realistic material3 – real lighting4 – Include all texture maps5 – Refer to the wireframeA highly detailed object that is modeled in 3ds Max 2012 or a new view and preview using V-Ray 2.0 rendering. 3ds Max fileContains the entire scene, and rendering is ready.
-

Party bar ktv sauna design complete 177 3D Model
Realistic panorama model, elaborate,Full model rendering, detail, material, bulb, texture, renderer VR.The model is opened directly and displays the image in the preview image.1 – Fully modeled interior decoration2 – delicate and realistic material3 – real lighting4 – Include all texture maps5 – Refer to the wireframeA highly detailed object that is modeled in 3ds Max 2012 or a new view and preview using V-Ray 2.0 rendering. 3ds Max fileContains the entire scene, and rendering is ready.
-

Party bar ktv sauna design complete 178 3D Model
Realistic panorama model, elaborate,Full model rendering, detail, material, bulb, texture, renderer VR.The model is opened directly and displays the image in the preview image.1 – Fully modeled interior decoration2 – delicate and realistic material3 – real lighting4 – Include all texture maps5 – Refer to the wireframeA highly detailed object that is modeled in 3ds Max 2012 or a new view and preview using V-Ray 2.0 rendering. 3ds Max fileContains the entire scene, and rendering is ready.
-

Party bar ktv sauna design complete 176 3D Model
Realistic panorama model, elaborate,Full model rendering, detail, material, bulb, texture, renderer VR.The model is opened directly and displays the image in the preview image.1 – Fully modeled interior decoration2 – delicate and realistic material3 – real lighting4 – Include all texture maps5 – Refer to the wireframeA highly detailed object that is modeled in 3ds Max 2012 or a new view and preview using V-Ray 2.0 rendering. 3ds Max fileContains the entire scene, and rendering is ready.
-

Party bar ktv sauna design complete 174 3D Model
Realistic panorama model, elaborate,Full model rendering, detail, material, bulb, texture, renderer VR.The model is opened directly and displays the image in the preview image.1 – Fully modeled interior decoration2 – delicate and realistic material3 – real lighting4 – Include all texture maps5 – Refer to the wireframeA highly detailed object that is modeled in 3ds Max 2012 or a new view and preview using V-Ray 2.0 rendering. 3ds Max fileContains the entire scene, and rendering is ready.
-

Party bar ktv sauna design complete 175 3D Model
Realistic panorama model, elaborate,Full model rendering, detail, material, bulb, texture, renderer VR.The model is opened directly and displays the image in the preview image.1 – Fully modeled interior decoration2 – delicate and realistic material3 – real lighting4 – Include all texture maps5 – Refer to the wireframeA highly detailed object that is modeled in 3ds Max 2012 or a new view and preview using V-Ray 2.0 rendering. 3ds Max fileContains the entire scene, and rendering is ready.
-

Bear 3D Model
Simple but cute teddy bear is perfect for any interiorModelled : Blender 3DRendered : Blender 3D – Cycles RenderFiles : .3ds, fbx, blend, objNo skeleton and animation
-

ID171023 3D Model
Rest for a few days,today is not busy continue to upload beautiful indoor model.Nice sofa and coffee table model, hope you will love!I am engaged in rendering for many years, if there is a need for production please contact me.
-

Party bar ktv sauna design complete 171 3D Model
Realistic panorama model, elaborate,Full model rendering, detail, material, bulb, texture, renderer VR.The model is opened directly and displays the image in the preview image.1 – Fully modeled interior decoration2 – delicate and realistic material3 – real lighting4 – Include all texture maps5 – Refer to the wireframeA highly detailed object that is modeled in 3ds Max 2012 or a new view and preview using V-Ray 2.0 rendering. 3ds Max fileContains the entire scene, and rendering is ready.
-

Party bar ktv sauna design complete 172 3D Model
Realistic panorama model, elaborate,Full model rendering, detail, material, bulb, texture, renderer VR.The model is opened directly and displays the image in the preview image.1 – Fully modeled interior decoration2 – delicate and realistic material3 – real lighting4 – Include all texture maps5 – Refer to the wireframeA highly detailed object that is modeled in 3ds Max 2012 or a new view and preview using V-Ray 2.0 rendering. 3ds Max fileContains the entire scene, and rendering is ready.
-

Party bar ktv sauna design complete 173 3D Model
Realistic panorama model, elaborate,Full model rendering, detail, material, bulb, texture, renderer VR.The model is opened directly and displays the image in the preview image.1 – Fully modeled interior decoration2 – delicate and realistic material3 – real lighting4 – Include all texture maps5 – Refer to the wireframeA highly detailed object that is modeled in 3ds Max 2012 or a new view and preview using V-Ray 2.0 rendering. 3ds Max fileContains the entire scene, and rendering is ready.
-

Party bar ktv sauna design complete 170 3D Model
Realistic panorama model, elaborate,Full model rendering, detail, material, bulb, texture, renderer VR.The model is opened directly and displays the image in the preview image.1 – Fully modeled interior decoration2 – delicate and realistic material3 – real lighting4 – Include all texture maps5 – Refer to the wireframeA highly detailed object that is modeled in 3ds Max 2012 or a new view and preview using V-Ray 2.0 rendering. 3ds Max fileContains the entire scene, and rendering is ready.
-

Party bar ktv sauna design complete 166 3D Model
Realistic panorama model, elaborate,Full model rendering, detail, material, bulb, texture, renderer VR.The model is opened directly and displays the image in the preview image.1 – Fully modeled interior decoration2 – delicate and realistic material3 – real lighting4 – Include all texture maps5 – Refer to the wireframeA highly detailed object that is modeled in 3ds Max 2012 or a new view and preview using V-Ray 2.0 rendering. 3ds Max fileContains the entire scene, and rendering is ready.
-

Party bar ktv sauna design complete 167 3D Model
Realistic panorama model, elaborate,Full model rendering, detail, material, bulb, texture, renderer VR.The model is opened directly and displays the image in the preview image.1 – Fully modeled interior decoration2 – delicate and realistic material3 – real lighting4 – Include all texture maps5 – Refer to the wireframeA highly detailed object that is modeled in 3ds Max 2012 or a new view and preview using V-Ray 2.0 rendering. 3ds Max fileContains the entire scene, and rendering is ready.
-

Party bar ktv sauna design complete 168 3D Model
Realistic panorama model, elaborate,Full model rendering, detail, material, bulb, texture, renderer VR.The model is opened directly and displays the image in the preview image.1 – Fully modeled interior decoration2 – delicate and realistic material3 – real lighting4 – Include all texture maps5 – Refer to the wireframeA highly detailed object that is modeled in 3ds Max 2012 or a new view and preview using V-Ray 2.0 rendering. 3ds Max fileContains the entire scene, and rendering is ready.
-

Party bar ktv sauna design complete 169 3D Model
Realistic panorama model, elaborate,Full model rendering, detail, material, bulb, texture, renderer VR.The model is opened directly and displays the image in the preview image.1 – Fully modeled interior decoration2 – delicate and realistic material3 – real lighting4 – Include all texture maps5 – Refer to the wireframeA highly detailed object that is modeled in 3ds Max 2012 or a new view and preview using V-Ray 2.0 rendering. 3ds Max fileContains the entire scene, and rendering is ready.
-
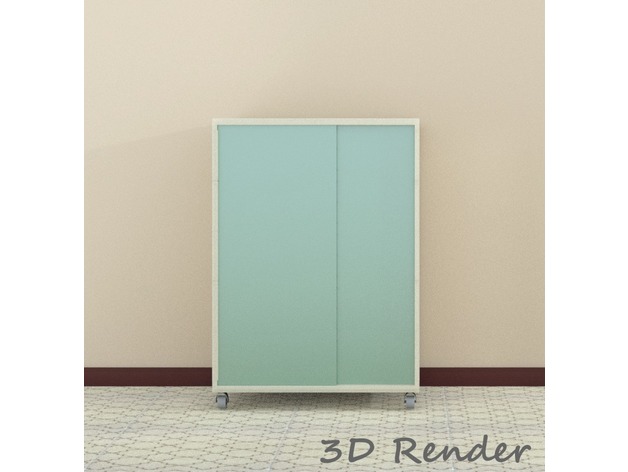
Cabinet 3D Print Model
Summary
Cabinet should measure about 24″ x 36″ x 16.5″ when completed. 1/4″ wood dowels (oak dowels recommended) connect the parts along the width and regular dowels along the depth. I have not determined if glue will be necessary. PLA/PHA or another filament that allows some flexibility is neccessary.
Print Settings
Printer Brand:
Prusa Printer:
Prusa Clone Rafts:
No Supports:
No Resolution:
.2 mm Infill:
20% Notes:
2 perimeters -
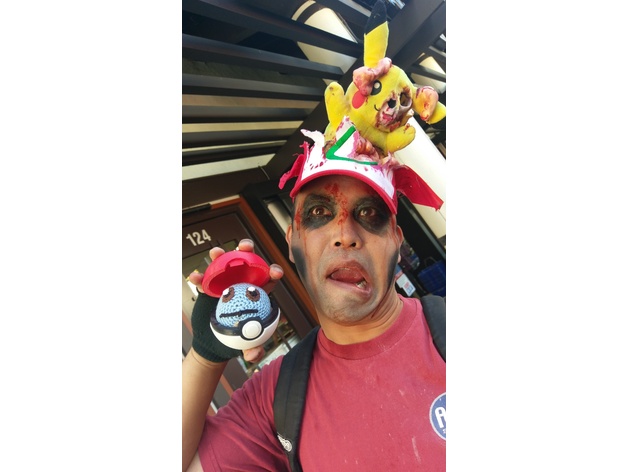
Zombie Pikachu coming out of my head 3D Print Model
Summary
As I’m performing as a zombie in Little Tokyo for the 2018 Thrill the World event, I wanted to go with an Anime theme. Hence, zombie Pikachu coming out of my head.
The Pikachu doll (fair use!) was from Amazon, as was the hat. I 3D printed the Pikachu skull (based on bfince’s cat skull), and inserted it into the head, Terminator style. I also designed a “skull cap” with a hole and brains coming out.
Small plush Pikachu: https://smile.amazon.com/gp/product/B00GGKKXC8/ref=oh_aui_detailpage_o02_s00?ie=UTF8&psc=1
Ash hat: https://smile.amazon.com/gp/product/B00A4XBTX0/ref=oh_aui_detailpage_o03_s00?ie=UTF8&psc=1
I also used Great Stuff spray foam (windows and doors) to fill in some “brains.”
For the STL files, I’m including the modified cat skull, 4 versions of the skull cap. One with no brains in case someone wants to use it. One low poly count brain version, one with a higher poly count (It may be 5mm shorter than the previous ones, after test fitting for my own head). The 4th one has the doll support I glued on pre-merged with the skull cap.
I’m holding a Pokeball designed by Intentional3D: https://www.thingiverse.com/thing:411193 The little Squirtle inside is a friend’s crochet creation.
CostumeChallenge2017
Print Settings
Printer Brand:
Wanhao Printer:
Wanhao Duplicator i3 Plus Rafts:
No Supports:
Yes Resolution:
0.2mm Infill:
20
How I Designed This
Here’s the Imgur album on the design: https://imgur.com/a/lFLDL
Basically, I took that skull cap, scaled it up, made a “hole version” offset a few mm down to make the whole thing thinner. Cut off the bottom with a box to give it a printable edge, and cut out the jagged hole with a bunch of polygons.
I imported that into Oculus Medium as a stamp, and sculpted some brains around the edges, exported that back into TinkerCAD to merge with the skull cap.
The cat skull was scaled upward and filled in with solid polygons to better fit the doll head.
Pained the “brains” a salmon color for a base coat. Will add some browns and reds.Some more detail on the skull cap. I really should have primed it first. Some painting done to darken the eye and nose socket, and make the tongue red. Dilute wash of red over a lot of the skull.
Found I needed a support structure to hold up the doll. Printed this up, and glued it on. New version of the file has it incorporated
Skull placed into doll.
-
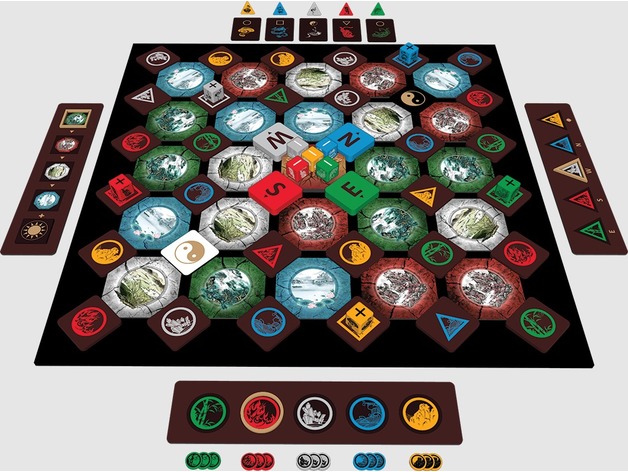
Wu Wei: Journey of the Changing Path 3D Print Model
Summary
Wu Wei: Journey of the Changing Path is a strategy game that embraces the universal concept of the Tao (the way). This game is deeply rooted in Chinese philosophy martial arts strategy and carries with it the concepts of yin and yang, the four seasons, chi (energy), and the eight directions.
You will need to paint and print out the cards to play. -
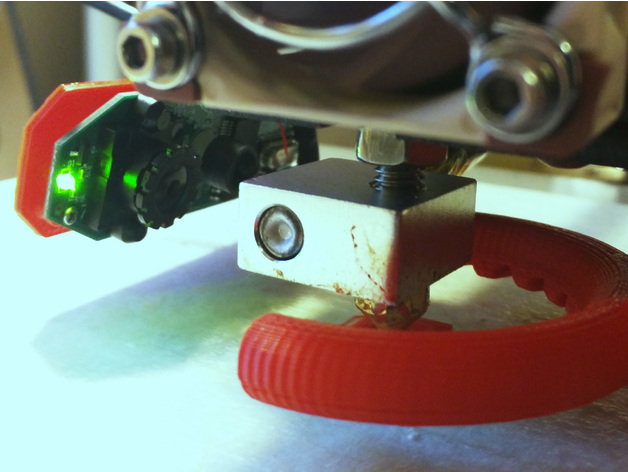
Anet A8 – Logitech C310 Webcam Nozzle Mount 3D Print Model
Summary
This is a small bracket for mounting a Logitech C310 webcam to the print head of your Anet A8 so that you can monitor the print nozzle. Since it simply inserts into the bearing this might work on other printers with similar design. But I cannot guarantee that.
Here is a youtube video showing it in action. As you can see it can make a pretty detailed image of how your nozzle is performing.
Also, this is designed for a fairly stock Anet A8 and it just barely clears the frame and other parts while homed. If you’ve made major modifications to your A8 this might not work and you might have to alter the stl file.
As you can see from the photos you’ll have to remove the casing of the webcam and get to the bare electronics. This can be tricky for the inexperienced. There is a wire soldered to the board that has to be un-soldered and re-soldered. If you break your webcam it’s not my fault, obviously.
Important note: There is a dab of glue on the side of the main lens that holds it at a certain focus distance. You’ll have to remove that dab of glue with a small pick of some kind. After that you can screw the main lens in and out to change the focus distance. Here is a video showing that.https://www.youtube.com/watch?v=v-gYgBeiOVI
Print Settings
Printer:
Anet A8 Rafts:
No Supports:
No Resolution:
0.2 mm Infill:
100% -
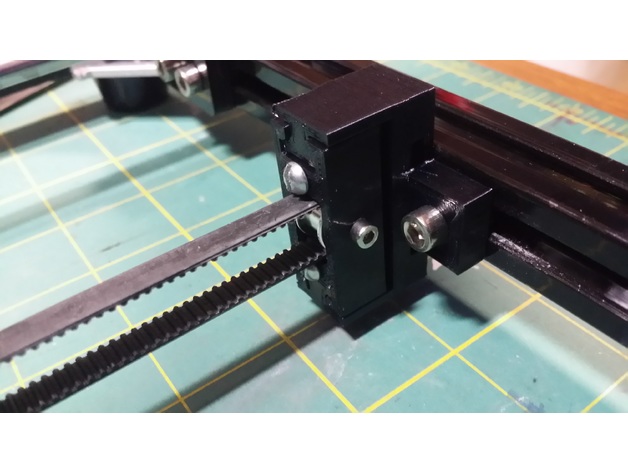
Adjustable Y Axis Tensioner 3D Print Model
Summary
I designed this adjustable tensioner bracket for my HICTOP 3DP-17 Y-Axis as the stock ‘pulley’ would not keep the belt on the bearing and would rub (and squeak) no matter how well aligned it was.
This design should also work with most 20X20 extruded aluminum frame printers.
I purchased the Timing Belt Idler Pulley from Amazon:https://www.amazon.com/gp/product/B01H3FNZ4M
To build, use either M3x25 or 6-32 X 1″ bolts for the adjustment screws.
I designed it for M3 bolts with M3 nuts in the nut traps but didn’t have any 25mm long so I just used some 6-32 machine screws I had laying around.
The idler pulley will need an M3 X 16 or longer bolt to hold it in.
Happy printing!
Print Settings
Printer Brand:
Prusa Printer:
Prusa Clone Rafts:
No Supports:
No Resolution:
.2mm Infill:
55%+ -

Party bar ktv sauna design complete 163 3D Model
Realistic panorama model, elaborate,Full model rendering, detail, material, bulb, texture, renderer VR.The model is opened directly and displays the image in the preview image.1 – Fully modeled interior decoration2 – delicate and realistic material3 – real lighting4 – Include all texture maps5 – Refer to the wireframeA highly detailed object that is modeled in 3ds Max 2012 or a new view and preview using V-Ray 2.0 rendering. 3ds Max fileContains the entire scene, and rendering is ready.
-

Party bar ktv sauna design complete 164 3D Model
Realistic panorama model, elaborate,Full model rendering, detail, material, bulb, texture, renderer VR.The model is opened directly and displays the image in the preview image.1 – Fully modeled interior decoration2 – delicate and realistic material3 – real lighting4 – Include all texture maps5 – Refer to the wireframeA highly detailed object that is modeled in 3ds Max 2012 or a new view and preview using V-Ray 2.0 rendering. 3ds Max fileContains the entire scene, and rendering is ready.
-

Party bar ktv sauna design complete 165 3D Model
Realistic panorama model, elaborate,Full model rendering, detail, material, bulb, texture, renderer VR.The model is opened directly and displays the image in the preview image.1 – Fully modeled interior decoration2 – delicate and realistic material3 – real lighting4 – Include all texture maps5 – Refer to the wireframeA highly detailed object that is modeled in 3ds Max 2012 or a new view and preview using V-Ray 2.0 rendering. 3ds Max fileContains the entire scene, and rendering is ready.
-

Party bar ktv sauna design complete 158 3D Model
Realistic panorama model, elaborate,Full model rendering, detail, material, bulb, texture, renderer VR.The model is opened directly and displays the image in the preview image.1 – Fully modeled interior decoration2 – delicate and realistic material3 – real lighting4 – Include all texture maps5 – Refer to the wireframeA highly detailed object that is modeled in 3ds Max 2012 or a new view and preview using V-Ray 2.0 rendering. 3ds Max fileContains the entire scene, and rendering is ready.
-

Party bar ktv sauna design complete 159 3D Model
Realistic panorama model, elaborate,Full model rendering, detail, material, bulb, texture, renderer VR.The model is opened directly and displays the image in the preview image.1 – Fully modeled interior decoration2 – delicate and realistic material3 – real lighting4 – Include all texture maps5 – Refer to the wireframeA highly detailed object that is modeled in 3ds Max 2012 or a new view and preview using V-Ray 2.0 rendering. 3ds Max fileContains the entire scene, and rendering is ready.
-

Party bar ktv sauna design complete 160 3D Model
Realistic panorama model, elaborate,Full model rendering, detail, material, bulb, texture, renderer VR.The model is opened directly and displays the image in the preview image.1 – Fully modeled interior decoration2 – delicate and realistic material3 – real lighting4 – Include all texture maps5 – Refer to the wireframeA highly detailed object that is modeled in 3ds Max 2012 or a new view and preview using V-Ray 2.0 rendering. 3ds Max fileContains the entire scene, and rendering is ready.
-

Party bar ktv sauna design complete 161 3D Model
Realistic panorama model, elaborate,Full model rendering, detail, material, bulb, texture, renderer VR.The model is opened directly and displays the image in the preview image.1 – Fully modeled interior decoration2 – delicate and realistic material3 – real lighting4 – Include all texture maps5 – Refer to the wireframeA highly detailed object that is modeled in 3ds Max 2012 or a new view and preview using V-Ray 2.0 rendering. 3ds Max fileContains the entire scene, and rendering is ready.
-

Party bar ktv sauna design complete 162 3D Model
Realistic panorama model, elaborate,Full model rendering, detail, material, bulb, texture, renderer VR.The model is opened directly and displays the image in the preview image.1 – Fully modeled interior decoration2 – delicate and realistic material3 – real lighting4 – Include all texture maps5 – Refer to the wireframeA highly detailed object that is modeled in 3ds Max 2012 or a new view and preview using V-Ray 2.0 rendering. 3ds Max fileContains the entire scene, and rendering is ready.
-

Party bar ktv sauna design complete 156 3D Model
Realistic panorama model, elaborate,Full model rendering, detail, material, bulb, texture, renderer VR.The model is opened directly and displays the image in the preview image.1 – Fully modeled interior decoration2 – delicate and realistic material3 – real lighting4 – Include all texture maps5 – Refer to the wireframeA highly detailed object that is modeled in 3ds Max 2012 or a new view and preview using V-Ray 2.0 rendering. 3ds Max fileContains the entire scene, and rendering is ready.
-

Party bar ktv sauna design complete 157 3D Model
Realistic panorama model, elaborate,Full model rendering, detail, material, bulb, texture, renderer VR.The model is opened directly and displays the image in the preview image.1 – Fully modeled interior decoration2 – delicate and realistic material3 – real lighting4 – Include all texture maps5 – Refer to the wireframeA highly detailed object that is modeled in 3ds Max 2012 or a new view and preview using V-Ray 2.0 rendering. 3ds Max fileContains the entire scene, and rendering is ready.
-

Party bar ktv sauna design complete 152 3D Model
Realistic panorama model, elaborate,Full model rendering, detail, material, bulb, texture, renderer VR.The model is opened directly and displays the image in the preview image.1 – Fully modeled interior decoration2 – delicate and realistic material3 – real lighting4 – Include all texture maps5 – Refer to the wireframeA highly detailed object that is modeled in 3ds Max 2012 or a new view and preview using V-Ray 2.0 rendering. 3ds Max fileContains the entire scene, and rendering is ready.
-

Party bar ktv sauna design complete 153 3D Model
Realistic panorama model, elaborate,Full model rendering, detail, material, bulb, texture, renderer VR.The model is opened directly and displays the image in the preview image.1 – Fully modeled interior decoration2 – delicate and realistic material3 – real lighting4 – Include all texture maps5 – Refer to the wireframeA highly detailed object that is modeled in 3ds Max 2012 or a new view and preview using V-Ray 2.0 rendering. 3ds Max fileContains the entire scene, and rendering is ready.
-

Party bar ktv sauna design complete 154 3D Model
Realistic panorama model, elaborate,Full model rendering, detail, material, bulb, texture, renderer VR.The model is opened directly and displays the image in the preview image.1 – Fully modeled interior decoration2 – delicate and realistic material3 – real lighting4 – Include all texture maps5 – Refer to the wireframeA highly detailed object that is modeled in 3ds Max 2012 or a new view and preview using V-Ray 2.0 rendering. 3ds Max fileContains the entire scene, and rendering is ready.
-

Party bar ktv sauna design complete 155 3D Model
Realistic panorama model, elaborate,Full model rendering, detail, material, bulb, texture, renderer VR.The model is opened directly and displays the image in the preview image.1 – Fully modeled interior decoration2 – delicate and realistic material3 – real lighting4 – Include all texture maps5 – Refer to the wireframeA highly detailed object that is modeled in 3ds Max 2012 or a new view and preview using V-Ray 2.0 rendering. 3ds Max fileContains the entire scene, and rendering is ready.
-

Party bar ktv sauna design complete 148 3D Model
Realistic panorama model, elaborate,Full model rendering, detail, material, bulb, texture, renderer VR.The model is opened directly and displays the image in the preview image.1 – Fully modeled interior decoration2 – delicate and realistic material3 – real lighting4 – Include all texture maps5 – Refer to the wireframeA highly detailed object that is modeled in 3ds Max 2012 or a new view and preview using V-Ray 2.0 rendering. 3ds Max fileContains the entire scene, and rendering is ready.
-

Party bar ktv sauna design complete 149 3D Model
Realistic panorama model, elaborate,Full model rendering, detail, material, bulb, texture, renderer VR.The model is opened directly and displays the image in the preview image.1 – Fully modeled interior decoration2 – delicate and realistic material3 – real lighting4 – Include all texture maps5 – Refer to the wireframeA highly detailed object that is modeled in 3ds Max 2012 or a new view and preview using V-Ray 2.0 rendering. 3ds Max fileContains the entire scene, and rendering is ready.
-

Party bar ktv sauna design complete 150 3D Model
Realistic panorama model, elaborate,Full model rendering, detail, material, bulb, texture, renderer VR.The model is opened directly and displays the image in the preview image.1 – Fully modeled interior decoration2 – delicate and realistic material3 – real lighting4 – Include all texture maps5 – Refer to the wireframeA highly detailed object that is modeled in 3ds Max 2012 or a new view and preview using V-Ray 2.0 rendering. 3ds Max fileContains the entire scene, and rendering is ready.
-

Party bar ktv sauna design complete 151 3D Model
Realistic panorama model, elaborate,Full model rendering, detail, material, bulb, texture, renderer VR.The model is opened directly and displays the image in the preview image.1 – Fully modeled interior decoration2 – delicate and realistic material3 – real lighting4 – Include all texture maps5 – Refer to the wireframeA highly detailed object that is modeled in 3ds Max 2012 or a new view and preview using V-Ray 2.0 rendering. 3ds Max fileContains the entire scene, and rendering is ready.
-

Party bar ktv sauna design complete 143 3D Model
Realistic panorama model, elaborate,Full model rendering, detail, material, bulb, texture, renderer VR.The model is opened directly and displays the image in the preview image.1 – Fully modeled interior decoration2 – delicate and realistic material3 – real lighting4 – Include all texture maps5 – Refer to the wireframeA highly detailed object that is modeled in 3ds Max 2012 or a new view and preview using V-Ray 2.0 rendering. 3ds Max fileContains the entire scene, and rendering is ready.
-

Party bar ktv sauna design complete 144 3D Model
Realistic panorama model, elaborate,Full model rendering, detail, material, bulb, texture, renderer VR.The model is opened directly and displays the image in the preview image.1 – Fully modeled interior decoration2 – delicate and realistic material3 – real lighting4 – Include all texture maps5 – Refer to the wireframeA highly detailed object that is modeled in 3ds Max 2012 or a new view and preview using V-Ray 2.0 rendering. 3ds Max fileContains the entire scene, and rendering is ready.
-

Party bar ktv sauna design complete 145 3D Model
Realistic panorama model, elaborate,Full model rendering, detail, material, bulb, texture, renderer VR.The model is opened directly and displays the image in the preview image.1 – Fully modeled interior decoration2 – delicate and realistic material3 – real lighting4 – Include all texture maps5 – Refer to the wireframeA highly detailed object that is modeled in 3ds Max 2012 or a new view and preview using V-Ray 2.0 rendering. 3ds Max fileContains the entire scene, and rendering is ready.
-

Party bar ktv sauna design complete 146 3D Model
Realistic panorama model, elaborate,Full model rendering, detail, material, bulb, texture, renderer VR.The model is opened directly and displays the image in the preview image.1 – Fully modeled interior decoration2 – delicate and realistic material3 – real lighting4 – Include all texture maps5 – Refer to the wireframeA highly detailed object that is modeled in 3ds Max 2012 or a new view and preview using V-Ray 2.0 rendering. 3ds Max fileContains the entire scene, and rendering is ready.
-

Party bar ktv sauna design complete 147 3D Model
Realistic panorama model, elaborate,Full model rendering, detail, material, bulb, texture, renderer VR.The model is opened directly and displays the image in the preview image.1 – Fully modeled interior decoration2 – delicate and realistic material3 – real lighting4 – Include all texture maps5 – Refer to the wireframeA highly detailed object that is modeled in 3ds Max 2012 or a new view and preview using V-Ray 2.0 rendering. 3ds Max fileContains the entire scene, and rendering is ready.
-

Party bar ktv sauna design complete 140 3D Model
Realistic panorama model, elaborate,Full model rendering, detail, material, bulb, texture, renderer VR.The model is opened directly and displays the image in the preview image.1 – Fully modeled interior decoration2 – delicate and realistic material3 – real lighting4 – Include all texture maps5 – Refer to the wireframeA highly detailed object that is modeled in 3ds Max 2012 or a new view and preview using V-Ray 2.0 rendering. 3ds Max fileContains the entire scene, and rendering is ready.
-

Party bar ktv sauna design complete 141 3D Model
Realistic panorama model, elaborate,Full model rendering, detail, material, bulb, texture, renderer VR.The model is opened directly and displays the image in the preview image.1 – Fully modeled interior decoration2 – delicate and realistic material3 – real lighting4 – Include all texture maps5 – Refer to the wireframeA highly detailed object that is modeled in 3ds Max 2012 or a new view and preview using V-Ray 2.0 rendering. 3ds Max fileContains the entire scene, and rendering is ready.
-

Party bar ktv sauna design complete 142 3D Model
Realistic panorama model, elaborate,Full model rendering, detail, material, bulb, texture, renderer VR.The model is opened directly and displays the image in the preview image.1 – Fully modeled interior decoration2 – delicate and realistic material3 – real lighting4 – Include all texture maps5 – Refer to the wireframeA highly detailed object that is modeled in 3ds Max 2012 or a new view and preview using V-Ray 2.0 rendering. 3ds Max fileContains the entire scene, and rendering is ready.
-

Party bar ktv sauna design complete 135 3D Model
Realistic panorama model, elaborate,Full model rendering, detail, material, bulb, texture, renderer VR.The model is opened directly and displays the image in the preview image.1 – Fully modeled interior decoration2 – delicate and realistic material3 – real lighting4 – Include all texture maps5 – Refer to the wireframeA highly detailed object that is modeled in 3ds Max 2012 or a new view and preview using V-Ray 2.0 rendering. 3ds Max fileContains the entire scene, and rendering is ready.
-

Party bar ktv sauna design complete 136 3D Model
Realistic panorama model, elaborate,Full model rendering, detail, material, bulb, texture, renderer VR.The model is opened directly and displays the image in the preview image.1 – Fully modeled interior decoration2 – delicate and realistic material3 – real lighting4 – Include all texture maps5 – Refer to the wireframeA highly detailed object that is modeled in 3ds Max 2012 or a new view and preview using V-Ray 2.0 rendering. 3ds Max fileContains the entire scene, and rendering is ready.
-

Party bar ktv sauna design complete 137 3D Model
Realistic panorama model, elaborate,Full model rendering, detail, material, bulb, texture, renderer VR.The model is opened directly and displays the image in the preview image.1 – Fully modeled interior decoration2 – delicate and realistic material3 – real lighting4 – Include all texture maps5 – Refer to the wireframeA highly detailed object that is modeled in 3ds Max 2012 or a new view and preview using V-Ray 2.0 rendering. 3ds Max fileContains the entire scene, and rendering is ready.
-

Party bar ktv sauna design complete 138 3D Model
Realistic panorama model, elaborate,Full model rendering, detail, material, bulb, texture, renderer VR.The model is opened directly and displays the image in the preview image.1 – Fully modeled interior decoration2 – delicate and realistic material3 – real lighting4 – Include all texture maps5 – Refer to the wireframeA highly detailed object that is modeled in 3ds Max 2012 or a new view and preview using V-Ray 2.0 rendering. 3ds Max fileContains the entire scene, and rendering is ready.
-

Party bar ktv sauna design complete 139 3D Model
Realistic panorama model, elaborate,Full model rendering, detail, material, bulb, texture, renderer VR.The model is opened directly and displays the image in the preview image.1 – Fully modeled interior decoration2 – delicate and realistic material3 – real lighting4 – Include all texture maps5 – Refer to the wireframeA highly detailed object that is modeled in 3ds Max 2012 or a new view and preview using V-Ray 2.0 rendering. 3ds Max fileContains the entire scene, and rendering is ready.
-

Party bar ktv sauna design complete 131 3D Model
Realistic panorama model, elaborate,Full model rendering, detail, material, bulb, texture, renderer VR.The model is opened directly and displays the image in the preview image.1 – Fully modeled interior decoration2 – delicate and realistic material3 – real lighting4 – Include all texture maps5 – Refer to the wireframeA highly detailed object that is modeled in 3ds Max 2012 or a new view and preview using V-Ray 2.0 rendering. 3ds Max fileContains the entire scene, and rendering is ready.
-

Party bar ktv sauna design complete 132 3D Model
Realistic panorama model, elaborate,Full model rendering, detail, material, bulb, texture, renderer VR.The model is opened directly and displays the image in the preview image.1 – Fully modeled interior decoration2 – delicate and realistic material3 – real lighting4 – Include all texture maps5 – Refer to the wireframeA highly detailed object that is modeled in 3ds Max 2012 or a new view and preview using V-Ray 2.0 rendering. 3ds Max fileContains the entire scene, and rendering is ready.
-

Party bar ktv sauna design complete 133 3D Model
Realistic panorama model, elaborate,Full model rendering, detail, material, bulb, texture, renderer VR.The model is opened directly and displays the image in the preview image.1 – Fully modeled interior decoration2 – delicate and realistic material3 – real lighting4 – Include all texture maps5 – Refer to the wireframeA highly detailed object that is modeled in 3ds Max 2012 or a new view and preview using V-Ray 2.0 rendering. 3ds Max fileContains the entire scene, and rendering is ready.
-

Party bar ktv sauna design complete 134 3D Model
Realistic panorama model, elaborate,Full model rendering, detail, material, bulb, texture, renderer VR.The model is opened directly and displays the image in the preview image.1 – Fully modeled interior decoration2 – delicate and realistic material3 – real lighting4 – Include all texture maps5 – Refer to the wireframeA highly detailed object that is modeled in 3ds Max 2012 or a new view and preview using V-Ray 2.0 rendering. 3ds Max fileContains the entire scene, and rendering is ready.
-

Party bar ktv sauna design complete 127 3D Model
Realistic panorama model, elaborate,Full model rendering, detail, material, bulb, texture, renderer VR.The model is opened directly and displays the image in the preview image.1 – Fully modeled interior decoration2 – delicate and realistic material3 – real lighting4 – Include all texture maps5 – Refer to the wireframeA highly detailed object that is modeled in 3ds Max 2012 or a new view and preview using V-Ray 2.0 rendering. 3ds Max fileContains the entire scene, and rendering is ready.
-

Party bar ktv sauna design complete 128 3D Model
Realistic panorama model, elaborate,Full model rendering, detail, material, bulb, texture, renderer VR.The model is opened directly and displays the image in the preview image.1 – Fully modeled interior decoration2 – delicate and realistic material3 – real lighting4 – Include all texture maps5 – Refer to the wireframeA highly detailed object that is modeled in 3ds Max 2012 or a new view and preview using V-Ray 2.0 rendering. 3ds Max fileContains the entire scene, and rendering is ready.
-

Party bar ktv sauna design complete 129 3D Model
Realistic panorama model, elaborate,Full model rendering, detail, material, bulb, texture, renderer VR.The model is opened directly and displays the image in the preview image.1 – Fully modeled interior decoration2 – delicate and realistic material3 – real lighting4 – Include all texture maps5 – Refer to the wireframeA highly detailed object that is modeled in 3ds Max 2012 or a new view and preview using V-Ray 2.0 rendering. 3ds Max fileContains the entire scene, and rendering is ready.
-

Party bar ktv sauna design complete 130 3D Model
Realistic panorama model, elaborate,Full model rendering, detail, material, bulb, texture, renderer VR.The model is opened directly and displays the image in the preview image.1 – Fully modeled interior decoration2 – delicate and realistic material3 – real lighting4 – Include all texture maps5 – Refer to the wireframeA highly detailed object that is modeled in 3ds Max 2012 or a new view and preview using V-Ray 2.0 rendering. 3ds Max fileContains the entire scene, and rendering is ready.
-

Party bar ktv sauna design complete 122 3D Model
Realistic panorama model, elaborate,Full model rendering, detail, material, bulb, texture, renderer VR.The model is opened directly and displays the image in the preview image.1 – Fully modeled interior decoration2 – delicate and realistic material3 – real lighting4 – Include all texture maps5 – Refer to the wireframeA highly detailed object that is modeled in 3ds Max 2012 or a new view and preview using V-Ray 2.0 rendering. 3ds Max fileContains the entire scene, and rendering is ready.
-

Party bar ktv sauna design complete 123 3D Model
Realistic panorama model, elaborate,Full model rendering, detail, material, bulb, texture, renderer VR.The model is opened directly and displays the image in the preview image.1 – Fully modeled interior decoration2 – delicate and realistic material3 – real lighting4 – Include all texture maps5 – Refer to the wireframeA highly detailed object that is modeled in 3ds Max 2012 or a new view and preview using V-Ray 2.0 rendering. 3ds Max fileContains the entire scene, and rendering is ready.
-

Party bar ktv sauna design complete 124 3D Model
Realistic panorama model, elaborate,Full model rendering, detail, material, bulb, texture, renderer VR.The model is opened directly and displays the image in the preview image.1 – Fully modeled interior decoration2 – delicate and realistic material3 – real lighting4 – Include all texture maps5 – Refer to the wireframeA highly detailed object that is modeled in 3ds Max 2012 or a new view and preview using V-Ray 2.0 rendering. 3ds Max fileContains the entire scene, and rendering is ready.
-

Party bar ktv sauna design complete 125 3D Model
Realistic panorama model, elaborate,Full model rendering, detail, material, bulb, texture, renderer VR.The model is opened directly and displays the image in the preview image.1 – Fully modeled interior decoration2 – delicate and realistic material3 – real lighting4 – Include all texture maps5 – Refer to the wireframeA highly detailed object that is modeled in 3ds Max 2012 or a new view and preview using V-Ray 2.0 rendering. 3ds Max fileContains the entire scene, and rendering is ready.
-

Party bar ktv sauna design complete 126 3D Model
Realistic panorama model, elaborate,Full model rendering, detail, material, bulb, texture, renderer VR.The model is opened directly and displays the image in the preview image.1 – Fully modeled interior decoration2 – delicate and realistic material3 – real lighting4 – Include all texture maps5 – Refer to the wireframeA highly detailed object that is modeled in 3ds Max 2012 or a new view and preview using V-Ray 2.0 rendering. 3ds Max fileContains the entire scene, and rendering is ready.
-

Party bar ktv sauna design complete 119 3D Model
Realistic panorama model, elaborate,Full model rendering, detail, material, bulb, texture, renderer VR.The model is opened directly and displays the image in the preview image.1 – Fully modeled interior decoration2 – delicate and realistic material3 – real lighting4 – Include all texture maps5 – Refer to the wireframeA highly detailed object that is modeled in 3ds Max 2012 or a new view and preview using V-Ray 2.0 rendering. 3ds Max fileContains the entire scene, and rendering is ready.
-

Party bar ktv sauna design complete 120 3D Model
Realistic panorama model, elaborate,Full model rendering, detail, material, bulb, texture, renderer VR.The model is opened directly and displays the image in the preview image.1 – Fully modeled interior decoration2 – delicate and realistic material3 – real lighting4 – Include all texture maps5 – Refer to the wireframeA highly detailed object that is modeled in 3ds Max 2012 or a new view and preview using V-Ray 2.0 rendering. 3ds Max fileContains the entire scene, and rendering is ready.
-

Party bar ktv sauna design complete 121 3D Model
Realistic panorama model, elaborate,Full model rendering, detail, material, bulb, texture, renderer VR.The model is opened directly and displays the image in the preview image.1 – Fully modeled interior decoration2 – delicate and realistic material3 – real lighting4 – Include all texture maps5 – Refer to the wireframeA highly detailed object that is modeled in 3ds Max 2012 or a new view and preview using V-Ray 2.0 rendering. 3ds Max fileContains the entire scene, and rendering is ready.
-

Party bar ktv sauna design complete 115 3D Model
Realistic panorama model, elaborate,Full model rendering, detail, material, bulb, texture, renderer VR.The model is opened directly and displays the image in the preview image.1 – Fully modeled interior decoration2 – delicate and realistic material3 – real lighting4 – Include all texture maps5 – Refer to the wireframeA highly detailed object that is modeled in 3ds Max 2012 or a new view and preview using V-Ray 2.0 rendering. 3ds Max fileContains the entire scene, and rendering is ready.
-

Party bar ktv sauna design complete 116 3D Model
Realistic panorama model, elaborate,Full model rendering, detail, material, bulb, texture, renderer VR.The model is opened directly and displays the image in the preview image.1 – Fully modeled interior decoration2 – delicate and realistic material3 – real lighting4 – Include all texture maps5 – Refer to the wireframeA highly detailed object that is modeled in 3ds Max 2012 or a new view and preview using V-Ray 2.0 rendering. 3ds Max fileContains the entire scene, and rendering is ready.
-

Party bar ktv sauna design complete 117 3D Model
Realistic panorama model, elaborate,Full model rendering, detail, material, bulb, texture, renderer VR.The model is opened directly and displays the image in the preview image.1 – Fully modeled interior decoration2 – delicate and realistic material3 – real lighting4 – Include all texture maps5 – Refer to the wireframeA highly detailed object that is modeled in 3ds Max 2012 or a new view and preview using V-Ray 2.0 rendering. 3ds Max fileContains the entire scene, and rendering is ready.
-

Party bar ktv sauna design complete 118 3D Model
Realistic panorama model, elaborate,Full model rendering, detail, material, bulb, texture, renderer VR.The model is opened directly and displays the image in the preview image.1 – Fully modeled interior decoration2 – delicate and realistic material3 – real lighting4 – Include all texture maps5 – Refer to the wireframeA highly detailed object that is modeled in 3ds Max 2012 or a new view and preview using V-Ray 2.0 rendering. 3ds Max fileContains the entire scene, and rendering is ready.
-
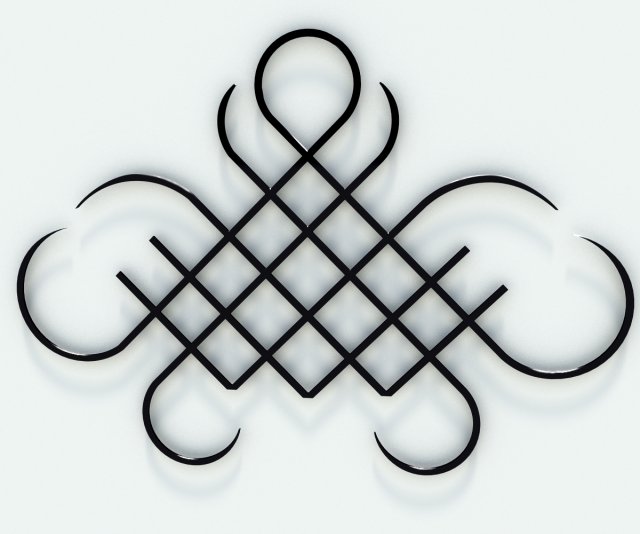
Tribal Tattoo 1 3D Model
Tribal tattoo style for 3d printing.55,077 x 39,124 x 0,258.Faces: 4493Verts: 4431One object named tribal01.Modelled in 3ds Max.Checked with Blender Add-on 3d priter box.The pictures above is rendered with Mental RayMore tribal tattoos to come!
-
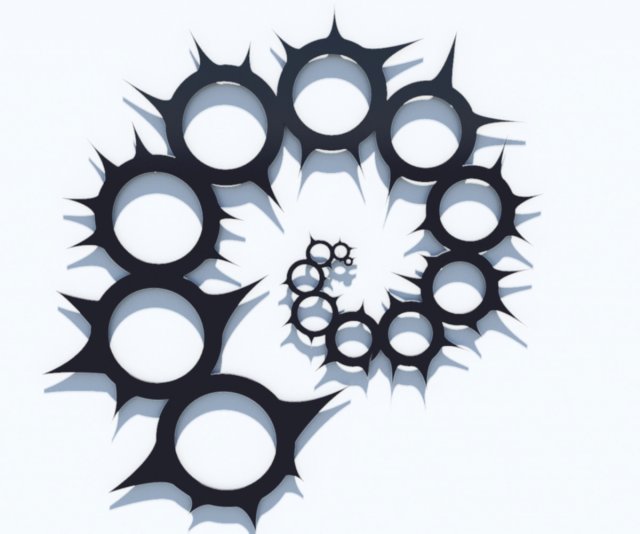
Tribal Tattoo 3 3D Model
Tribal Tattoo model for print.Modeled in 3DS MAX.Checked with STL check modifier and Blender Add-on 3d print tool.Faces: 15276Vertices: 17107x: 74,096 cmy: 0,227 cmz: 78,743 cm.Resizing can be done on request.
-

Party bar ktv sauna design complete 108 3D Model
Realistic panorama model, elaborate,Full model rendering, detail, material, bulb, texture, renderer VR.The model is opened directly and displays the image in the preview image.1 – Fully modeled interior decoration2 – delicate and realistic material3 – real lighting4 – Include all texture maps5 – Refer to the wireframeA highly detailed object that is modeled in 3ds Max 2012 or a new view and preview using V-Ray 2.0 rendering. 3ds Max fileContains the entire scene, and rendering is ready.
-

Party bar ktv sauna design complete 110 3D Model
Realistic panorama model, elaborate,Full model rendering, detail, material, bulb, texture, renderer VR.The model is opened directly and displays the image in the preview image.1 – Fully modeled interior decoration2 – delicate and realistic material3 – real lighting4 – Include all texture maps5 – Refer to the wireframeA highly detailed object that is modeled in 3ds Max 2012 or a new view and preview using V-Ray 2.0 rendering. 3ds Max fileContains the entire scene, and rendering is ready.
-

Party bar ktv sauna design complete 111 3D Model
Realistic panorama model, elaborate,Full model rendering, detail, material, bulb, texture, renderer VR.The model is opened directly and displays the image in the preview image.1 – Fully modeled interior decoration2 – delicate and realistic material3 – real lighting4 – Include all texture maps5 – Refer to the wireframeA highly detailed object that is modeled in 3ds Max 2012 or a new view and preview using V-Ray 2.0 rendering. 3ds Max fileContains the entire scene, and rendering is ready.
-

Party bar ktv sauna design complete 112 3D Model
Realistic panorama model, elaborate,Full model rendering, detail, material, bulb, texture, renderer VR.The model is opened directly and displays the image in the preview image.1 – Fully modeled interior decoration2 – delicate and realistic material3 – real lighting4 – Include all texture maps5 – Refer to the wireframeA highly detailed object that is modeled in 3ds Max 2012 or a new view and preview using V-Ray 2.0 rendering. 3ds Max fileContains the entire scene, and rendering is ready.
-

Party bar ktv sauna design complete 113 3D Model
Realistic panorama model, elaborate,Full model rendering, detail, material, bulb, texture, renderer VR.The model is opened directly and displays the image in the preview image.1 – Fully modeled interior decoration2 – delicate and realistic material3 – real lighting4 – Include all texture maps5 – Refer to the wireframeA highly detailed object that is modeled in 3ds Max 2012 or a new view and preview using V-Ray 2.0 rendering. 3ds Max fileContains the entire scene, and rendering is ready.
-

Party bar ktv sauna design complete 114 3D Model
Realistic panorama model, elaborate,Full model rendering, detail, material, bulb, texture, renderer VR.The model is opened directly and displays the image in the preview image.1 – Fully modeled interior decoration2 – delicate and realistic material3 – real lighting4 – Include all texture maps5 – Refer to the wireframeA highly detailed object that is modeled in 3ds Max 2012 or a new view and preview using V-Ray 2.0 rendering. 3ds Max fileContains the entire scene, and rendering is ready.
-

Party bar ktv sauna design complete 105 3D Model
Realistic panorama model, elaborate,Full model rendering, detail, material, bulb, texture, renderer VR.The model is opened directly and displays the image in the preview image.1 – Fully modeled interior decoration2 – delicate and realistic material3 – real lighting4 – Include all texture maps5 – Refer to the wireframeA highly detailed object that is modeled in 3ds Max 2012 or a new view and preview using V-Ray 2.0 rendering. 3ds Max fileContains the entire scene, and rendering is ready.
-

Party bar ktv sauna design complete 106 3D Model
Realistic panorama model, elaborate,Full model rendering, detail, material, bulb, texture, renderer VR.The model is opened directly and displays the image in the preview image.1 – Fully modeled interior decoration2 – delicate and realistic material3 – real lighting4 – Include all texture maps5 – Refer to the wireframeA highly detailed object that is modeled in 3ds Max 2012 or a new view and preview using V-Ray 2.0 rendering. 3ds Max fileContains the entire scene, and rendering is ready.
-

Party bar ktv sauna design complete 107 3D Model
Realistic panorama model, elaborate,Full model rendering, detail, material, bulb, texture, renderer VR.The model is opened directly and displays the image in the preview image.1 – Fully modeled interior decoration2 – delicate and realistic material3 – real lighting4 – Include all texture maps5 – Refer to the wireframeA highly detailed object that is modeled in 3ds Max 2012 or a new view and preview using V-Ray 2.0 rendering. 3ds Max fileContains the entire scene, and rendering is ready.
-

Party bar ktv sauna design complete 102 3D Model
Realistic panorama model, elaborate,Full model rendering, detail, material, bulb, texture, renderer VR.The model is opened directly and displays the image in the preview image.1 – Fully modeled interior decoration2 – delicate and realistic material3 – real lighting4 – Include all texture maps5 – Refer to the wireframeA highly detailed object that is modeled in 3ds Max 2012 or a new view and preview using V-Ray 2.0 rendering. 3ds Max fileContains the entire scene, and rendering is ready.
-

Party bar ktv sauna design complete 103 3D Model
Realistic panorama model, elaborate,Full model rendering, detail, material, bulb, texture, renderer VR.The model is opened directly and displays the image in the preview image.1 – Fully modeled interior decoration2 – delicate and realistic material3 – real lighting4 – Include all texture maps5 – Refer to the wireframeA highly detailed object that is modeled in 3ds Max 2012 or a new view and preview using V-Ray 2.0 rendering. 3ds Max fileContains the entire scene, and rendering is ready.
-

Party bar ktv sauna design complete 104 3D Model
Realistic panorama model, elaborate,Full model rendering, detail, material, bulb, texture, renderer VR.The model is opened directly and displays the image in the preview image.1 – Fully modeled interior decoration2 – delicate and realistic material3 – real lighting4 – Include all texture maps5 – Refer to the wireframeA highly detailed object that is modeled in 3ds Max 2012 or a new view and preview using V-Ray 2.0 rendering. 3ds Max fileContains the entire scene, and rendering is ready.
-

Party bar ktv sauna design complete 99 3D Model
Realistic panorama model, elaborate,Full model rendering, detail, material, bulb, texture, renderer VR.The model is opened directly and displays the image in the preview image.1 – Fully modeled interior decoration2 – delicate and realistic material3 – real lighting4 – Include all texture maps5 – Refer to the wireframeA highly detailed object that is modeled in 3ds Max 2012 or a new view and preview using V-Ray 2.0 rendering. 3ds Max fileContains the entire scene, and rendering is ready.
-

Party bar ktv sauna design complete 100 3D Model
Realistic panorama model, elaborate,Full model rendering, detail, material, bulb, texture, renderer VR.The model is opened directly and displays the image in the preview image.1 – Fully modeled interior decoration2 – delicate and realistic material3 – real lighting4 – Include all texture maps5 – Refer to the wireframeA highly detailed object that is modeled in 3ds Max 2012 or a new view and preview using V-Ray 2.0 rendering. 3ds Max fileContains the entire scene, and rendering is ready.
-

Party bar ktv sauna design complete 101 3D Model
Realistic panorama model, elaborate,Full model rendering, detail, material, bulb, texture, renderer VR.The model is opened directly and displays the image in the preview image.1 – Fully modeled interior decoration2 – delicate and realistic material3 – real lighting4 – Include all texture maps5 – Refer to the wireframeA highly detailed object that is modeled in 3ds Max 2012 or a new view and preview using V-Ray 2.0 rendering. 3ds Max fileContains the entire scene, and rendering is ready.
-

Party bar ktv sauna design complete 96 3D Model
Realistic panorama model, elaborate,Full model rendering, detail, material, bulb, texture, renderer VR.The model is opened directly and displays the image in the preview image.1 – Fully modeled interior decoration2 – delicate and realistic material3 – real lighting4 – Include all texture maps5 – Refer to the wireframeA highly detailed object that is modeled in 3ds Max 2012 or a new view and preview using V-Ray 2.0 rendering. 3ds Max fileContains the entire scene, and rendering is ready.