Summary
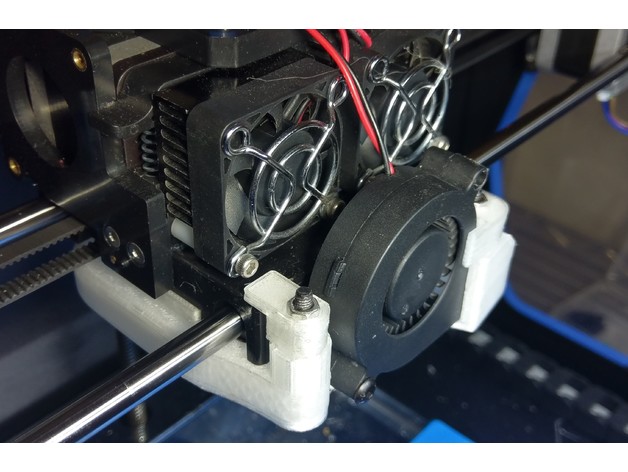
The Turbo Fan on a Qidi X-Pro truly lives up to its name. When it is on, it roars like a turbo jet on an airliner. If you listen closely, you can hear parts rattling from the vibration.
This redesigned Dual Vortex Fan Duct eliminates that noise by reducing vibration. The fan duct is fastened onto the carriage by two screws that are aligned with the extruder nozzles. Two additional clips next to the fan further dampens vibration from the fan.
Additional parts:
■ 2 x M3x20mm screws for carriage
■ 2 x M4x35mm screws and nuts for front clips
■ 1 x M4x20mm screws and nuts for blower fan
■ 1 x 6″ tie-wrap
Modification:
■ Clip the tie-wrap around the wiring bundle.
■ Gently wiggle an pull the fan wires out of the wiring bundle.
■ Tie the rest of the wiring bundle back in place with new tie-wrap.
■ Remove 2 screws that hold the dual-extruder onto the carriage.
New Assembly:
■ Push one M4 nut through the slot at the top (as pictured).
■ Snap fan into place and fasten it in with one M4x20mm screw.
■ Fasten fan duct onto the carriage and dual-extruder with two M3x20mm screws.
■ Fasten fan clips with two M4x35mm screws.
Printing Tips:
■ Print with “touching plate” support type at about 25% density.
■ Can be printed using ABS without turning on the print cooling fan.
Tag: Vortex
-
Dual Vortex Fan Duct 3D Print Model
-
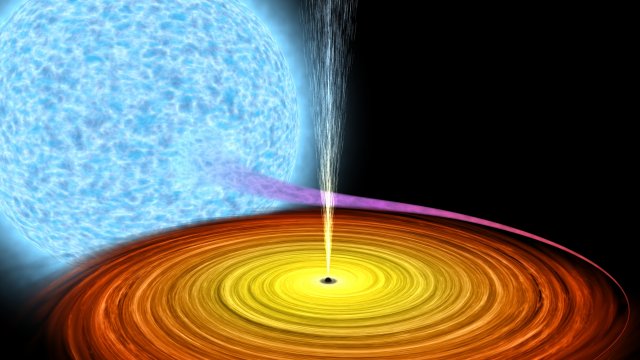
Black hole absorbs star in deep space 3D Model
Black hole absorbs star, Astronomically accurate 3D animation. Was used procedure materials for textures and animation.Blue star animated with procedure material (noise). Flowning matter made form spray, also animated. If you want to use correctly animation, please use max file.
-

Vortex logo 3D Model
High-poly 3D model.Model is made in Autodesc Maya 2012. For convenient use of the model, all сomponents are named.The model can be used in the manufacture of games,rendering images,videos.
-
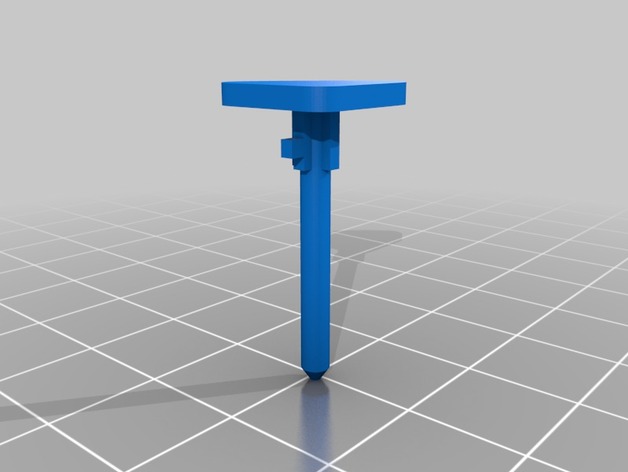
Cooler Master Vortex Plus CPU Cooler Mounting Clip 3D Print Model
Summary
Mounting clips for a Cooler Master Vortex Plus CPU cooler.
I had several of these break on me after moving my computer around, so I grabbed the remaining intact ones and modeled them out.
Print Settings
Printer:
Creality CR-10 Rafts:
No Supports:
Yes Resolution:
0.1 mm Infill:
100% Notes:
Printed with PETG for better temperature resistance.
I found the best orientation for these parts is to place Push Pin (A) horizontally with the long edge of the base triangle against the print bed and Push Pin (B) horizontally with the split tip perpendicular to the print bed and supports only on the parts touching the bed.
This is a small part so there will likely be some variation from print to print (mine came out pretty ugly, but functional).
Post-Printing
The slot at the top of Push Pin (B) needs to be cut to extend it out to edge of the part.
This wasn’t included in order to print more solidly, but it may be able to be printed with supports.
This allows Push Pin (A) to be inserted and rotated into the part.
How I Designed This
Designed in Fusion 360; .f3d file is included.