Summary
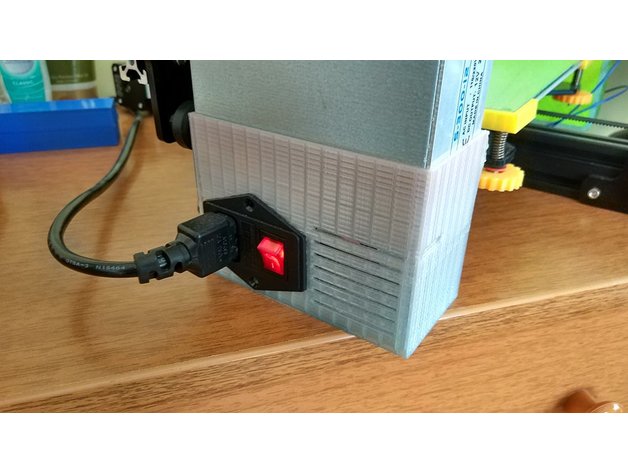
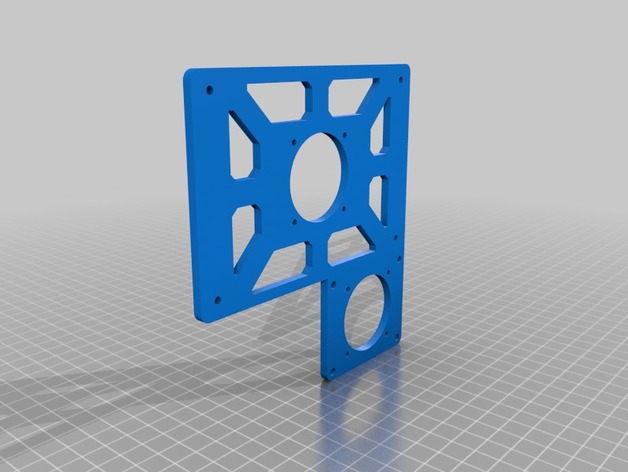
This is a PSU cover for the standard TEVO Tarantula power supply. Adds protection as the cables and the terminals are not exposed and it makes the printer portable as the PSU is on the printer. Added grilles for cooling.
Screw it with the default 4mm screws and t4 nuts. You will also need a C14 male power supply connector with switch and fuse and screws/nuts for mounting.
My target was to make it use less material than other designs making it affordable.
Print Settings
Printer Brand:
TEVO
Printer:
Tarantula
Rafts:
No
Supports:
No
Resolution:
0.2mm
Infill:
25
Notes:
26 meters of plastic with wall and top/bottom thickness of 0.8mm.
16 meters of plastic with wall and top/bottom thickness of 0.6mm.
Tag: Tevo
-
Tevo Tarantula PSU Vertical Cover 3D Print Model
-
Tevo Leveling Rim 3D Print Model
Summary
Put the bolts into the oven and press them in the printed parts for a good fit. -

Tevo Tarantula Camera Mount for D-Link 3D Print Model
Summary
Tevo Tarantula Camera Mount for D-Link
Print Settings
Printer Brand:
TEVO
Printer:
Tarantula
Rafts:
Yes
Supports:
No -
Tevo Tornado – Creality CR-10 Lights (low cost) 3D Print Model
Summary
Système de Leds à petit prix pour l’éclairage de votre Tevo Tornado ou Creality CR-10 :
Vous avez besoin de (Il existe une version 12 et 24volt) : http://www.ebay.fr/itm/10-x-24V-24-Volts-BLANC-6-LED-FEUX-DE-GABARIT-CAMION-CARAVANE-SHASSIS-REMORQUES/322314654417
Pour pouvoir installer la pièce dans le rail de la Tevo Tornado, vous devez retirer les vis du rail coté droit. Exercez une légère flexion de la pièce support et tout en tenant la flexion faites la glisser lentement dans le rail, puis relâcher.Vous pouvez ajouter un vis M3-M5 munie d’un T-nut.
Les leds sont branchées en parallèle (12-24v) directement sur l’alimentation (24v pas 110-220v)
Pour que la pièce soit solide, je conseille 90% d’infill.
Low cost led lights in 12-24 v.
You need in (12 or 24v): http://www.ebay.fr/itm/10-x-24V-24-Volts-BLANC-6-LED-FEUX-DE-GABARIT-CAMION-CARAVANE-SHASSIS-REMORQUES/322314654417
To be able to install the part in the TT rail, you must remove the screws from the rail on the right side. Exercise a slight bending of the support piece and while holding the flexion slowly slide it into the rail and then release. You can add a M3-M5 screw fitted with a T-nut.
The leds are connected in parallel (12-24v) directly on the power supply (24v not 110-220v)
For the piece to be solid, I advise 90% infill.
Print Settings
Printer Brand:
TEVO
Printer:
Tornado
Rafts:
No
Supports:
Yes
Resolution:
0.2
Infill:
90 -
TEVO Tornado Ultrabase Upgrade Remix with cable strain relief 3D Print Model
Summary
Clamps to attach Anycubic Ultrabase to the Tevo Tornado.
Added cable strain relief to the rear left part.
Remixed this https://www.thingiverse.com/thing:2782720 and this https://www.thingiverse.com/thing:2748197 things. -
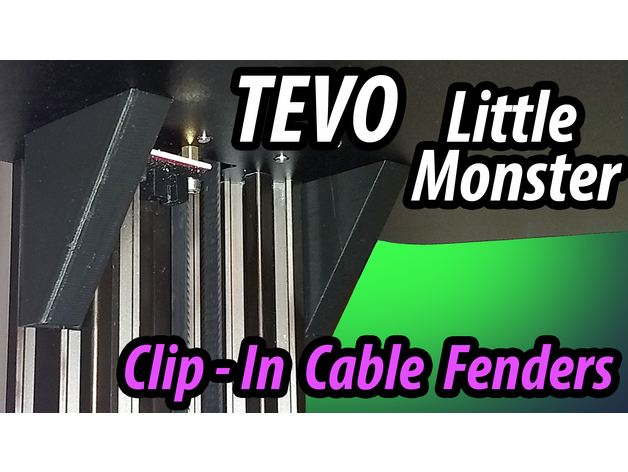
Tevo Little Monster Clip-On Cable Fenders 3D Print Model
Summary
Tonight when I was calibrating my Little Monster I heard that awful sound when the cable gets stuck between the truck and the optical sensor… It’s probably the 20th time it’s happened but this time I said enough is enough!
So I made these cable guards that only take 10 minutes to print and they snap into position and won’t budge unless you want them to – they work a treat! 🙂
Print in vase mode in the supplied orientation
You can check out my other designs here:-https://www.thingiverse.com/ScottyMakesStuff/designs
You can see all my videos on my YouTube Channel, ScottyMakesStuff here:-https://www.youtube.com/c/ScottyMakesStuffhttps://twitter.com/ScottyMakesStufhttps://www.instagram.com/scottymakesstuff/ -
Left top corner for Tevo Tarantula upgrade 3D Print Model
Summary
I mixed it with the casual top left corner, if you want it for the right side too, just mirror it in your slicer 🙂
I did this beacuse when you add the top piece at the backside, you will lose about 3cm of build volume in your Z axies….
You can print it in this sice, it is a bit bigger than the orginal bracket, so it will fit easyer on your alluminium rods.
Print Settings
Printer:
Tevo Tarantula Rafts:
No Supports:
Yes Resolution:
0.2 Infill:
20 Notes:
I recomend to it print with support
Post-PrintingHow I Designed This
Mixed it in fusion 360 -
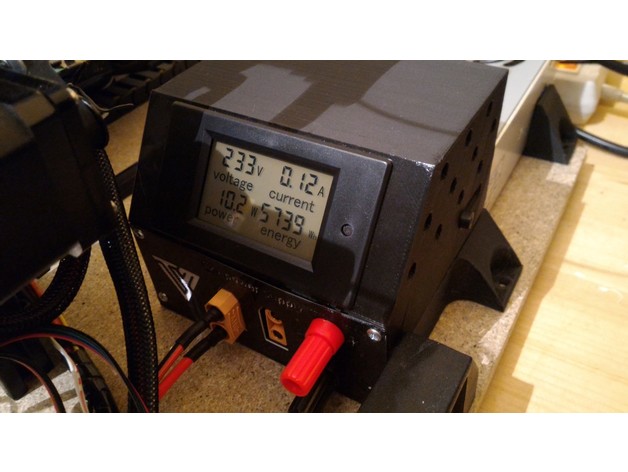
Tevo Tarantula Power Supply Enclosure 3D Print Model
Summary
Designed to enclose the standard PSU outputs and fit a power meter.
The walls are only ~2mm thick, which make them fragile. This is due to my concern of using less material as possible.
I’ve used XT90 for 2 outputs, it’s oversized but I already had them 🙂
There is an “XT90 Holder” that you can screw on top of them with an M4 screw, but I didn’t needed it.
Fusion 360 file attached, feel free to modify/use it !
Parts needed :
1 Power Socket W/Fuse & Switch :https://fr.aliexpress.com/item/Free-Shipping-power-socket/476915963.html
1 Power Meter :https://fr.aliexpress.com/item/AC-80-260V-LCD-Digital-100A-Volt-Watt-Power-Meter-Ammeter-Voltmeter-110V-220V-free-shipping/32617343719.html
1 meter Black & Red 13AWG:https://fr.aliexpress.com/item/1meter-Black-1meter-Red-Silicon-Wire-Heatproof-Soft-Silicone-Silica-Gel-Wire-Cable-12AWG-13AWG-14AWG/32797523458.html
1 IEC 320 C13 Female Plug :https://fr.aliexpress.com/item/New-Wholesale-Price-Black-IEC-320-C13-Female-Plug-Rewirable-Power-Connector-3pin-Socket-10A-250V/32808416783.html
2 XT 90 :https://www.aliexpress.com/item/5Pair-XT90-XT-90-Gold-Plated-Banana-Plugs-Male-and-Female-Antiskid-for-helicopter-Battery-esc/32460919234.html
2 Banana Plugs :https://fr.aliexpress.com/item/4Pcs-Lot-Speaker-Amplifier-Terminal-Binding-Post-4mm-Banana-Plug-Socket-Female-Connector-10pcs-lot/32739527467.html
Hardware
Terminals Connectors :https://fr.aliexpress.com/item/280Pcs-Assorted-Insulated-Spade-Crimp-Terminal-Electrical-Wire-Connector-Set-Red-Blue-Yellow/32810002612.html
6 Ring connectors #4 Blue
3 Ring connectors #4 Red
5 Female Spade Connector Red
Screws :
4 3×10 (front pannel)
1 M4x10 (side)
Schrink tubes :https://www.aliexpress.com/item/385pcs-heat-shrinking-tube-2-1-Shrinkage-ratio-black/32662765147.html
Print Settings
Printer:
Tevo Tarantula Rafts:
No Supports:
No Resolution:
0.2mm Infill:
20% Notes:
I’ve put a picture of the orientation that I used to print the top part (rotate 145°) to minimise bridging, but it’s not the only way to print it 🙂
For the front panel, I changed filament color manually at the beginning of the 3rd layer.There is a plug-in for Cura to do this and also a way to do it for S3D users… or leave it the same color 😉
Post-Printing
Parts needed
1 Power Socket W/Fuse & Switch :https://fr.aliexpress.com/item/Free-Shipping-power-socket/476915963.html1 Power Meter :https://fr.aliexpress.com/item/AC-80-260V-LCD-Digital-100A-Volt-Watt-Power-Meter-Ammeter-Voltmeter-110V-220V-free-shipping/32617343719.html1 meter Black & Red 13AWG :https://fr.aliexpress.com/item/1meter-Black-1meter-Red-Silicon-Wire-Heatproof-Soft-Silicone-Silica-Gel-Wire-Cable-12AWG-13AWG-14AWG/32797523458.html1 IEC 320 C13 Female Plug :https://fr.aliexpress.com/item/New-Wholesale-Price-Black-IEC-320-C13-Female-Plug-Rewirable-Power-Connector-3pin-Socket-10A-250V/32808416783.html2 XT 90 :https://www.aliexpress.com/item/5Pair-XT90-XT-90-Gold-Plated-Banana-Plugs-Male-and-Female-Antiskid-for-helicopter-Battery-esc/32460919234.html2 Banana Plugs :https://fr.aliexpress.com/item/4Pcs-Lot-Speaker-Amplifier-Terminal-Binding-Post-4mm-Banana-Plug-Socket-Female-Connector-10pcs-lot/32739527467.html
HardwareTerminals Connectors :
6 Ring connectors #4 Blue
3 Ring connectors #4 Red
5 Female Spade Connector RedSchrink tubes.
Screws :4 3×10 (front pannel)
1 M4x10 (side) -
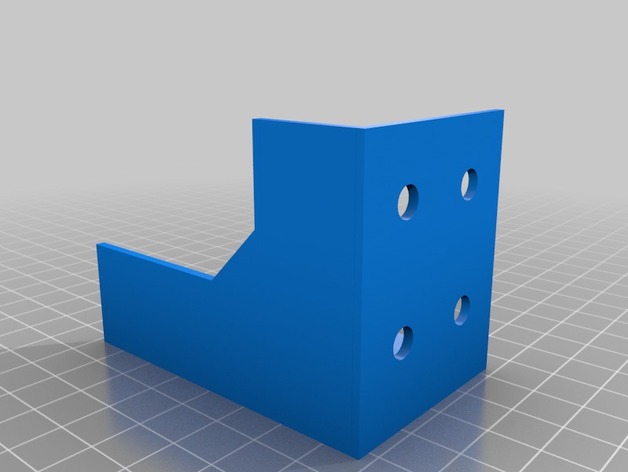
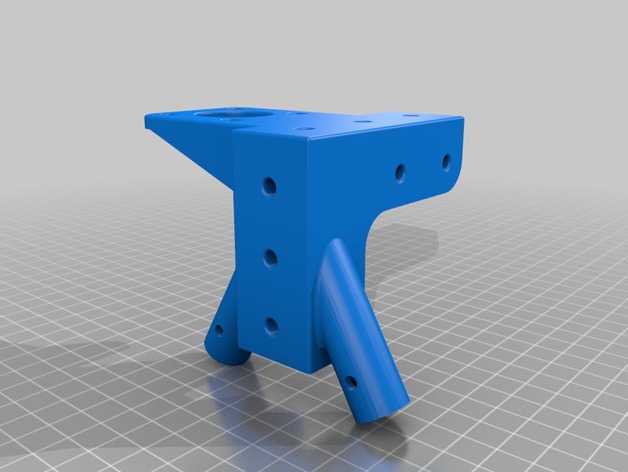
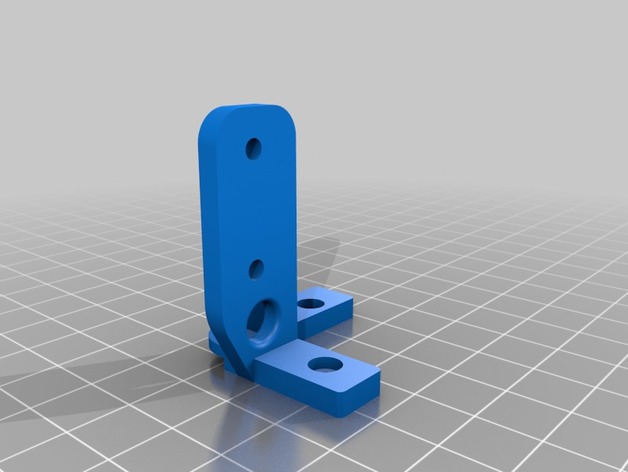
Tevo Tarantula Bottom Right Bracket 3D Print Model
Summary
Simple z axis strengthening bracket for bottom right hand corner
Print Settings
Printer Brand:
Prusa Printer:
i3 MK2 MMU Rafts:
No Supports:
No Resolution:
0.2 Infill:
25% -
Tevo tarantula X Drag chain ends 3D Print Model
Summary
This drag chain ends are made to fit the Tevo Tarantula stock x carriage.
You can add connectors to easy connect a sensor or a layer fan with ribbon cables. It can be used for the heatsink fan and the thermistance. I haven’t checked if it could support the amperage of the hot end.
Fusion 360 file attached, feel free to use it !
Post-Printing
Materials Needed
You can find the chain on Amazon :https://www.amazon.com/TOOGOO-Plastic-Towline-Cable-Chain/dp/B00KBPQIBE/ref=sr_1_2
Or Aliexpress :https://www.aliexpress.com/item/Free-Shipping-10-x-20mm-10-20mm-L1000mm-Cable-Drag-Chain-Wire-Carrier-with-end-connectors/32733132867.html
the connectors (2X2pin & 2X3pin):https://fr.aliexpress.com/item/KF2510-Kits-50-sets-Kit-in-box-2p-3p-4-pin-2-54mm-Pitch-Terminal-Housing/32698994359.html
and ribbon cable (22awg is fine for layer fan and sensors, don’t use it for the hot end) :https://fr.aliexpress.com/item/20-meters-5Pin-Extension-Electric-Wire-Cable-Blue-White-Red-Green-Black-Led-Connector-For-RGBW/32220197329.html -
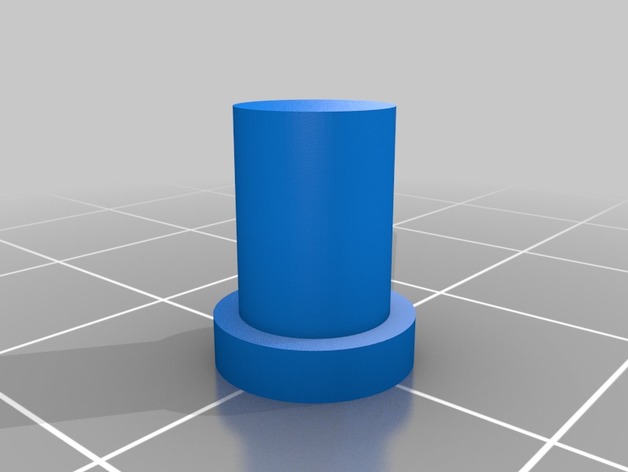
TEVO TORNADO KNOB LEVELING. 3D Print Model
Summary
Tevo tornado knob leveling.
55mm diameter
5mm height.
it fits just perfect! -
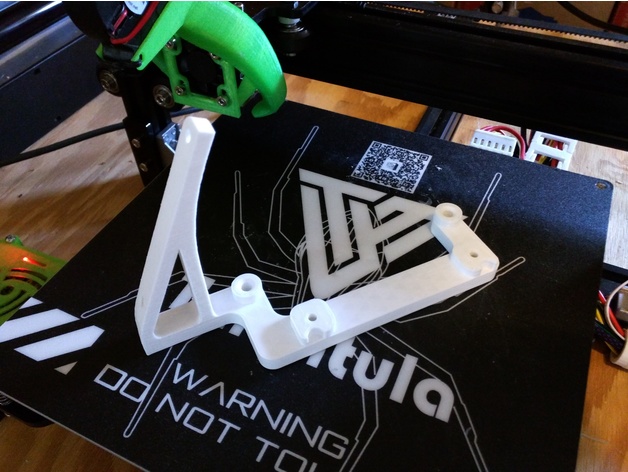
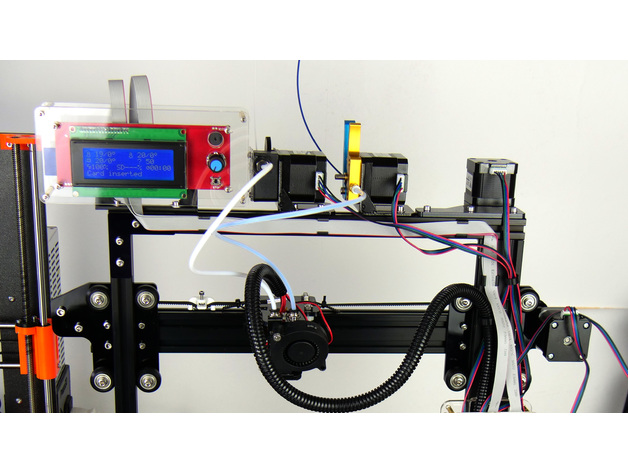
Display and board stand for Tevo Tarantula 3D Print Model
Summary
It’s a display and board stand for the Tevo Tarantula that keeps all the fancy clear acrylic pieces. Print twice, with one of them mirrored. Supports are helpful for the upside-down countersunk holes in the base, but not strictly necessary.
I will eventually tame this rat’s nest of wires; this is just the first step. -
Tevo Tornado BLTouch Mount 3D Print Model
Summary
a BLTouch mount I created for the Tevo Tornado. Also, if you’re looking for instructions on how to install the BLTouch on a Tevo Tornado, here’s a Youtube video I made explaining the whole process: https://youtu.be/mBwHGuX5de8 -
Various Upgrades TEVO Black Widow 3D Print Model
Summary
Here you can find some Upgrades for the TEVO Black Widow that i designed.
I also made some Remixes of other Peoples Upgrades for the Printer which i will add some time soon.
Please keep in mind that the parts are work in progress and may change, the things i already installed and know that they fit atleast my printer are the Corner Brackets bottom and the inner Corner Brackets. -
Tevo Tarantula controller reset button 3D Print Model
Summary
Simple stop button for the discount smart controller. -
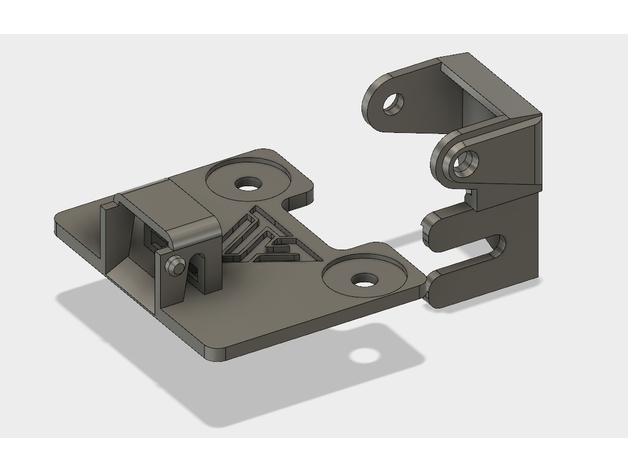
Modular Tevo Tarantula Dual Extruder X Carriage for MGN12H Linear Rail 3D Print Model
Summary
This is an X carriage for the Tevo Tarantula with dual extruder option. It is designed to be mounted on an MGN12H block on a linear guide rail. Make sure you get a block that has the same spacing as an MGN12H block (20mm distance between mounting holes).The belt is attached to the lower portion only and the upper portion screws on top of it (through it and into the MGN12H block). This allows the upper portion that holds the hotend, endstop, fans to be removed without detaching the belt. I designed it this way because I intend to have several different versions of the upper part to hold a single extruder or to hold other hotends.
Lastly, the top part has intentionally been left clear so as to accomodate other parts that can be bolted on later. I am currently working on cable management attachments that take advantage of this feature. It can also be used to attach fans, lights, etc.
Print Settings
Printer:
Tevo Tarantula Rafts:
Doesn’t Matter Supports:
Yes Resolution:
0.2mm Infill:
20% Notes:
Make sure your printer is calibrated correctly specially in the X and Y axes to ensure that the screw holes line up. -
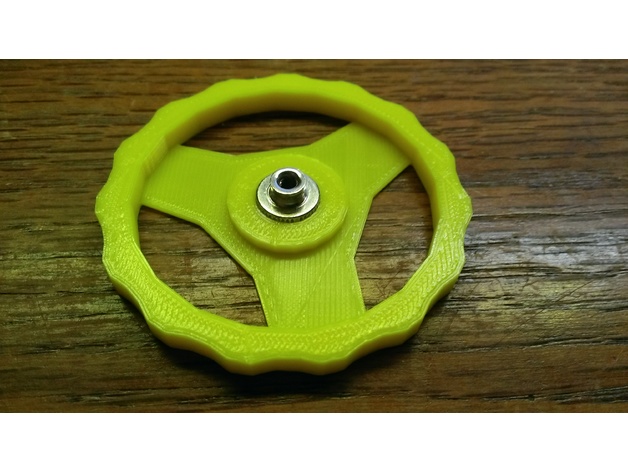
Tevo Tarantula Bed Level Knob WIDE 3D Print Model
Summary
Created this using TinkerCad, inspiration from the CR-10 bed level knob created by Valsrath. I was immediately spoiled by how easy it was to bed level once I had his knobs installed on my machine. Wanted the same experience for my Tevo, hadn’t yet seen anything like this, so I made my own. It’s a tight fit, intentionally, highly recommend removing the bed level nuts and then gently hammer them in place.
Designed this to use minimal amount of filament, but does appear to be plenty strong. I printed this on my CR-10. -

Tevo Tarantula bracket 3D Print Model
Summary
This bracket is to attach the left side of the Tarantula frame to a Lack table or other surface.
It attaches to the frame using 5 x M4 8mm screws and M4 T-nuts. 3 screws are then used to secure it to the surface.
Right hand bracket to come…… -
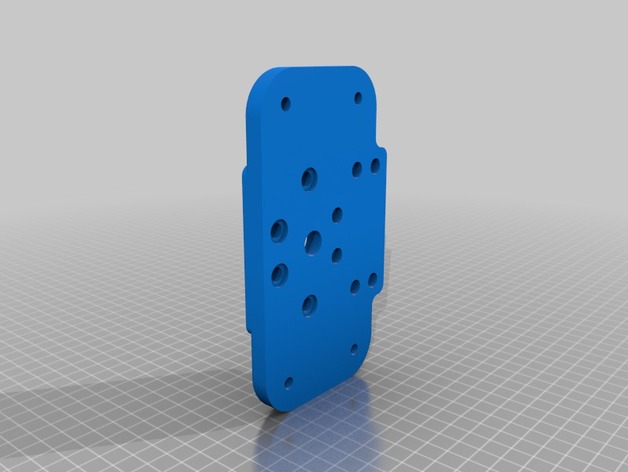
Tevo Tarantula MKS Gen-L Plate w/MOSFET 3D Print Model
Summary
I decided to switch to a MKS Gen-L so I could replace NEMA 17 drivers when/if needed, but I still wanted to use my original plates. While I was designing the new plate, I decided I’d add a side pod to mount a MOSFET out of the way (this MOSFET if you’re thinking of using this https://smile.amazon.com/gp/product/B01HEQVQAK/ref=oh_aui_detailpage_o04_s00?ie=UTF8&psc=1). I’m still very much a beginner with Fusion 360, so if you can do it more elegantly, please feel free to remix it (and drop me a line so I can see what you did and hopefully learn from it).
The MOSFET is taller than the MKS Gen board obviously, so you might need to use taller offsets than the stock ones from the Tarantula. The sketches in 360 should allow you to print the MOSFET cover separately from the MKS cover. I haven’t printed it yet or I’d tell you all for sure if that’s the case. -
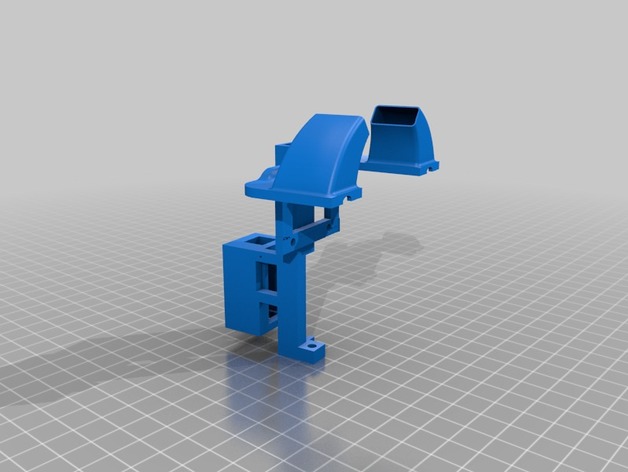
The Scorpio: Dual Blower Fanduct + SG90 Servo for Tevo Tarantula 3D Print Model
Summary
This is a remix marrying two beautiful and functional designs into one: https://www.thingiverse.com/thing:1850163 (Dual Blower fan duct) and this wonderful servo bracket https://www.thingiverse.com/thing:930292.
Printing is difficult, and the design might change in future to try and make it easier to print. Best is to use custom supports, and if you have good adhesion print it upside down. If you don’t have custom supports, print it lying on the ‘box’ and with supports from build plate. You will likely have a lot of cleaning up to do, as there is a lot of bridging.
main body can be printed at 0.2, medium infil. The arm and gear should be printed at around 0.1, no brim, solid.