Summary
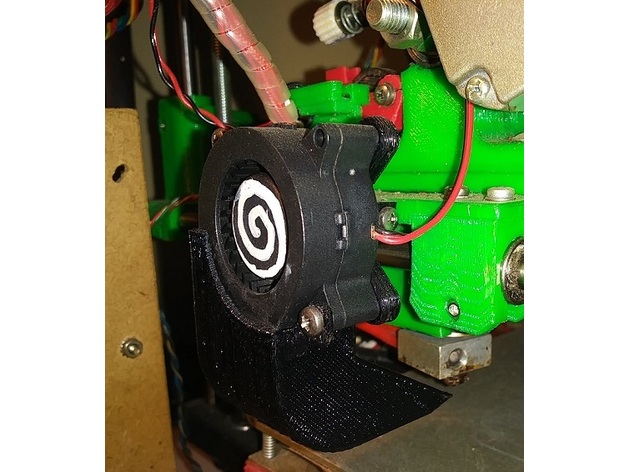
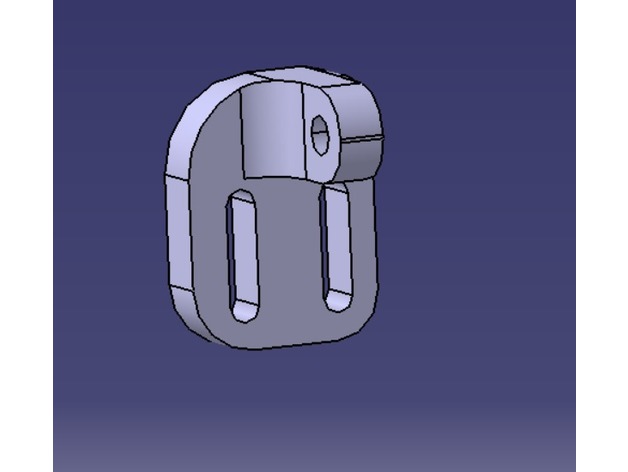
This product allows i3 Mini users to effectively turn off print cooling and then turn it back on once the initial layer is finished. Without stopping the print or making permanent mods to the machine! This part can drastically improve bed adhesion on the lovable i3 Mini.
The i3 Mini lacks a second fan for cooling the printed filament. Instead it has a baffle that splits the airflow from a single fan onto the build bed as well as the hotend. This design choice likely helps to keep the i3 Mini inexpensive, but also creates a major flaw in that there is no control over print cooling as the one fan must remain on at all times to control the hotend temperature.
I found that the i3 Mini therefore required a fair amount of work to get decent bed adhesion. Blue tape, glue, slow speeds, etc were all necessary to get a usable initial layer. Unless the airflow is blocked from reaching the build plate. So I created this fan shroud which slides on and off easily; allowing the user to effectively turn off the fan for the first couple layers (or the entire build if so desired). Once a solid layer is complete and print cooling is needed, the user only needs to gently tug the shroud off and the rest of the build goes as expected without interruption.
Print Settings
Printer Brand:
Wanhao
Printer:
i3 Mini
Rafts:
No
Supports:
Yes
Resolution:
0.4mmW x 0.2mmH x 60mm/s
Infill:
Parallel Lines, 20%
Tag: shroud
-
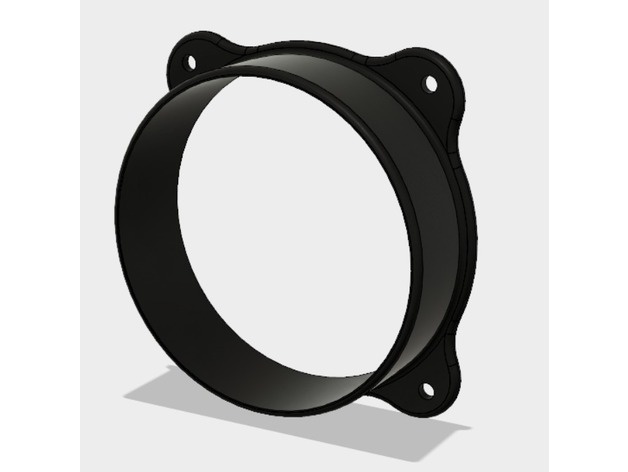
Wanhao/Monoprice i3 Mini Fan Shroud (Mk 2) 3D Print Model
-
Caliburn Extended Barrel Shroud 3D Print Model
Summary
This is designed to cover longer Caliburn Barrels, over 18″.
All parts except for rail print without support. Requires 4 10-32 screws.
You’ll need to split the shroud into two parts.
Inspired by, but completely distinct from the original Argus Modworks barrel shroud.
Designed at the request of a customer.
etsy.com/shop/remzak -
Tronxy Radial Fan Mount for stock shroud 3D Print Model
Summary
When I just got my Tronxy X1 a part cooling fan was missing. So the bridging performances were very bad. My extruder had alot of problems so I just needed a temporary fix while I made a mount for a V6.
So you just need two M3 screws to put on the side of the shroud and a screw and nut for the Radial Fan. I highly suggest adding a little deflector so your block doesnt cool off too much.
It’s a simple solution and I have a friend that uses it for his permanent set up.
NO NEED TO REPOSITION THE LIMIT SWITCH
Print Settings
Printer:
Tronxy X1
Rafts:
No
Supports:
Doesn’t Matter
Resolution:
0.2
Infill:
15 -

Filament Cooler Fan Shroud, Dual Side, E3D Chimera and Cyclops 3D Print Model
Summary
Dual side shroud designed for lightness, access, and easy installation on a E3D Chimera or Cyclops hotend.
Printed with PETG, standing on fan mount surface.
Print Settings
Printer:
Banana 3D 330 Rafts:
Yes Supports:
No Resolution:
<= 0.2 Infill:
70 to 100% Notes:
Instead of a raft, a brim may be used with good results.
Heater block “socks” provided by E3D with their chimera and cyclops extruders should be used to minimize heat loss from peripheral air flow. -
Asrock C2750D4I 60mm Fan CPU Shroud 3D Print Model
Summary
This friction-mount shroud allows a standard 60mm fan to be mounted to the passive heatsink on Asrock C2750D4I avoton motherboard to increase cooling for cases with limited airflow.
Print Settings
Printer Brand:
Wanhao Printer:
Wanhao Duplicator i3 Plus Rafts:
No Supports:
No Resolution:
.2mm Infill:
20% Notes:
Print in PETG, ABS, or other polymer with glass transition temperature >70˚C to avoid deformation under thermal load. -

Robo 3D R1 Plus Shroud with Cable Hook 3D Print Model
Summary
This was a simple combination to allow an easier alternative to a cable chain. It seems to work fine if you add the two screws to fasten it down.
Print Settings
Printer Brand:
Robo 3D Printer:
R1 ABS + PLA Model Rafts:
Yes Supports:
Yes Resolution:
.2 Infill:
100% -
Rick Turbo Fan Shroud 3D Print Model
Summary
Rick face fan cover. Enjoy!
Print Settings
Rafts:
No Supports:
Yes Resolution:
.1 Infill:
100
Post-Printing -

Hubsan X4 Millennium Falcon Shroud 3D Print Model
Summary
A quick print for making your Hubsan X4 ready for the Kessel Run!
Note: this does the opposite of improving speed and agility but it looks cool. -
Be Quiet Dark Rock Pro front fan shroud 3D Print Model
Summary
A shroud to fit on a Dark Rock Pro cooler. Does require the original fan to be cut and pressed into the shroud.